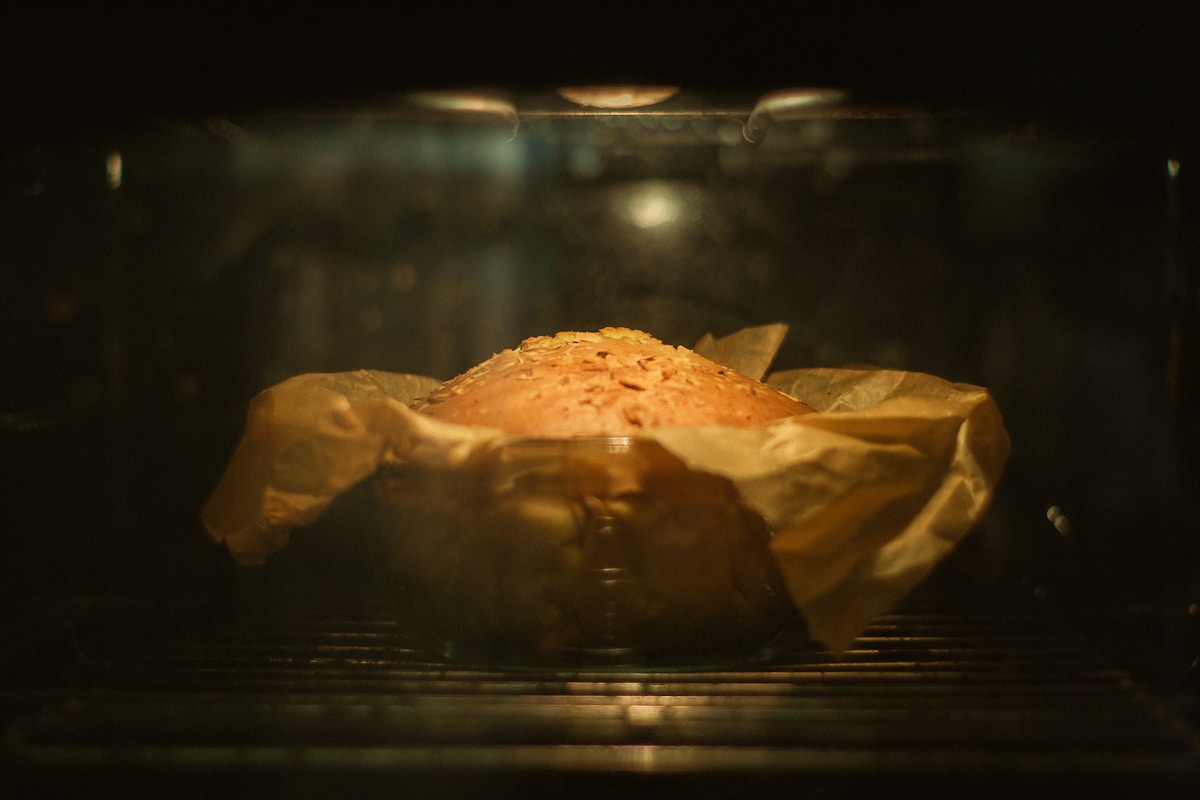
You followed the recipe with the precision of a surgeon. You measured the King Arthur flour, creamed the butter and sugar until it was light and fluffy, preheated the oven to exactly 350°F (177°C), and set the timer. Yet, halfway through, the bittersweet smell of burning sugar begins to creep from the oven door. It’s a scent every baker dreads. You pull out the tray to find the heartbreaking reality: the tops of your cookies are pale and doughy, but the bottoms are blackened discs of charcoal.
It’s one of the most maddening frustrations in the kitchen. You followed the rules, but the game feels rigged. You blame the recipe, you question your new baking sheets, you might even think you’ve lost your touch. But I’m here to tell you that the problem almost certainly isn’t you. It’s your oven—a seemingly simple box that is, in reality, a chaotic and misunderstood beast. The good news? Taming it doesn’t require a thousand-dollar replacement. It just requires a little bit of knowledge.
The Deceptive Dial: Anatomy of an Inaccurate Oven
Here’s the hard truth every professional chef knows: the temperature you set on your oven dial is more of a hopeful suggestion than a scientific constant. Most home ovens, whether they’re ten years old or fresh out of the box, can be off by a staggering 25°F to 50°F (that’s about 15-25°C). In the world of baking, that’s the difference between a golden-brown cake and a sunken, gummy mess.
Why the inaccuracy? Ovens don’t work like a heated room with a perfect thermostat. They operate in a crude cycle. The heating element (at the bottom, top, or both) gets blazing hot, then shuts off. The internal temperature rises, then slowly falls until the thermostat kicks the element back on again. The number on your dial represents the average temperature the oven is trying to achieve through these peaks and valleys. An older, worn-out thermostat—often a simple bimetallic strip that bends with heat—loses its precision, causing those swings to become more extreme. This is why the edges of your lasagna are burnt to a crisp while the center is still trying to get warm.
And what about that convection fan? While great for roasting vegetables and getting crispy skin on a chicken, a convection setting can amplify your oven’s existing problems. The fan circulates the air, which is great for evenness, but if that air is 30 degrees hotter than you think it is, it just becomes a hyper-efficient food-burning machine.
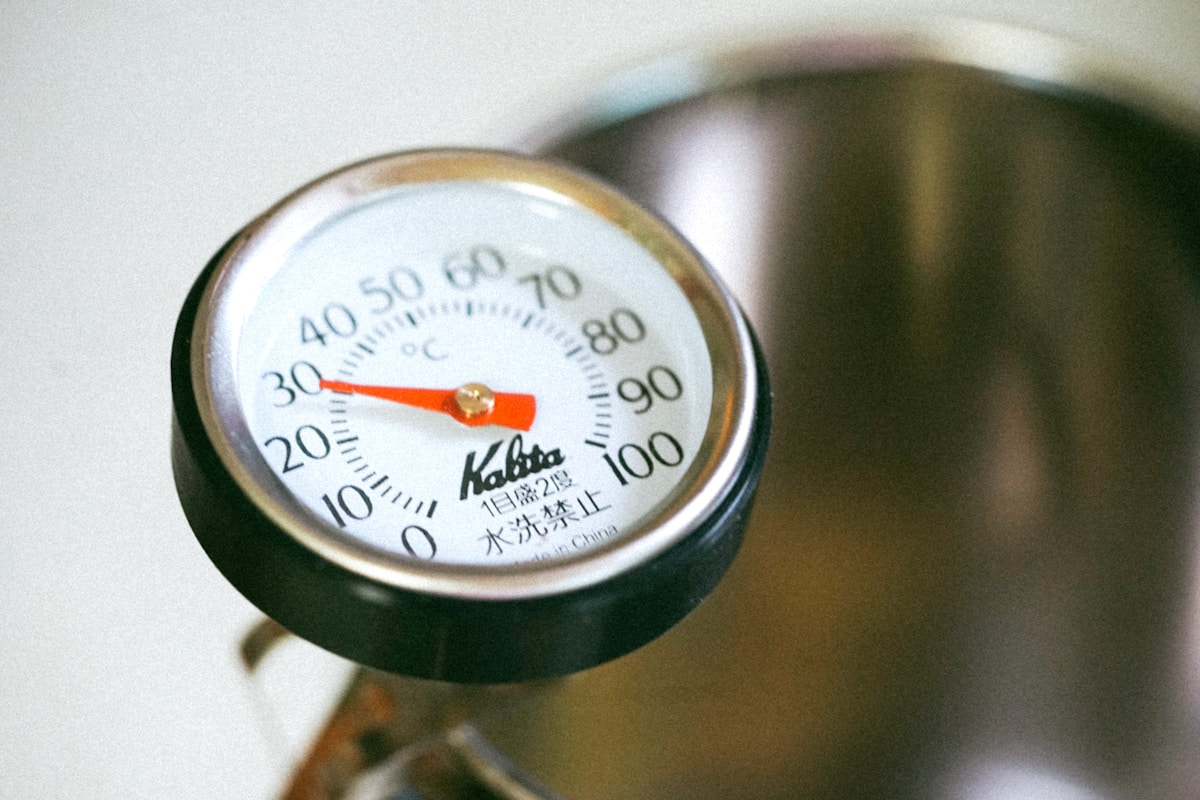
Your Most Important Tool: The Under-$15 Truth Teller
Before you even think about calling a repair person or browsing for a new oven, I want you to make the single best investment for your kitchen: an in-oven thermometer. Not a fancy digital probe for meat, but a classic, hang-from-the-rack dial thermometer. It is the only way to know what’s really happening inside that box.
This simple tool is the ultimate value proposition. A reliable model from a trusted brand like Taylor Precision Products or the commercial-grade Rubbermaid will only set you back $7 to $15. It lives in your oven full-time and provides the ground truth, cutting through all the guesswork.
Let’s do a quick comparison:
| Thermometer Type | Price Range | Pros | Cons | Best For |
|---|---|---|---|---|
| Dial | $7 - $15 | Inexpensive, durable, lives in the oven. | Can be hard to read, slower to react. | Everyday monitoring of your oven’s true temp. |
| Digital | $20 - $40 | Easy-to-read display, some have alarms. | Requires batteries, probe can be cumbersome. | Precise spot-checks and roasts. |
For our purpose—understanding your oven’s baseline behavior—the simple dial thermometer is king. (Trust me on this one.)
Here’s your first assignment:
- Hang the thermometer from the center of your middle oven rack. Don’t let it touch the walls.
- Preheat your oven to 350°F (177°C).
- Wait a full 20 minutes after the preheat light turns off. The oven walls need time to absorb and radiate heat evenly.
- Crouch down and read the thermometer through the glass. Don’t open the door! Is it at 350°F? Or is it reading 380°F? Or 330°F?
Now you have data. If your oven consistently runs hot, you can simply adjust by setting the dial lower. If it runs cold, you turn it up. You’ve just performed a basic manual calibration.
Mapping the Battlefield: The Famous Bread Test
Knowing the average temperature is a huge win, but we’re not done. Every oven has “hot spots” and “cold spots”—areas that get more or less heat due to the element’s location and patterns of air circulation. Finding them is the key to mastering your machine.
The best way to do this is with a brilliantly simple technique I call the Bread Test.
The Kitchen Hack:
- Buy the cheapest loaf of plain white sandwich bread you can find. (No fancy whole grains here.)
- Position an oven rack in the middle of the oven.
- Preheat your oven to a true 350°F (177°C), using your new thermometer to verify.
- Cover the entire rack with slices of bread, laid edge to edge like tiles.
- Bake for about 10 minutes. The goal is to get a range of toasting, so check after 8 minutes.
- Carefully pull the rack out and arrange the slices on your counter in the same pattern they were in the oven.
You now have a perfect thermal map of your oven’s interior. You’ll likely see that the slices in the back corners are much darker, the ones near the door are paler, and there might be a strangely dark patch right in the middle. This isn’t a flaw to be angry about; it’s intel you can use to your advantage.
Real-World Strategies for Perfect, Even Cooking
Armed with your oven’s true temperature and its thermal map, you can finally stop guessing and start cooking with intent. These are the practical, everyday strategies that will change your results forever.
- Calibrate and Compensate: As we discussed, make a note of your oven’s temperature offset. I keep a small sticky note on my oven: “Runs 15°F HOT.” If a recipe calls for 400°F, I automatically set my dial to 385°F. It’s second nature.
- Rotate Your Pans: This is the most crucial habit to develop. For anything baking longer than 15-20 minutes—cookies, cakes, casseroles, roasted vegetables—you must rotate the pan halfway through the cooking time. A simple 180-degree turn is all it takes. This ensures both sides get equal time in the hotter part of the oven. If you’re using two racks, you must do the “up-and-over”: the top pan moves to the bottom rack, the bottom pan moves to the top, and both are rotated 180 degrees. (Yes, really. It makes a huge difference.)
- Choose Your Bakeware Wisely: Your pan is an active participant in the cooking process.
- Dark Metal Pans: These absorb and radiate heat very efficiently. They’re great for getting a deep, brown crust on bread or a crispy pizza bottom, but they can easily burn the bottoms of delicate sugar cookies.
- Light Aluminum Pans: These are the workhorses of my kitchen. Brands like Nordic Ware make heavy-gauge, light-colored aluminum sheet pans that conduct heat evenly and gently. They are far more forgiving and promote beautiful, even browning.
- Glass and Ceramic: These materials are insulators. They take longer to heat up, but once they’re hot, they hold that heat for a long time. This makes them fantastic for casseroles and lasagnas that need to cook through slowly, but less ideal for things that need to bake quickly.
- Give Your Food Space: Overcrowding the oven is a cardinal sin. It blocks air circulation and creates steam, which is the enemy of browning and crisping. Always leave at least an inch or two between pans and between the pans and the oven walls. Use multiple racks if you need to, but never cram everything onto one.
You don’t need a new oven with a dozen fancy settings to make incredible food. You just need to understand the personality of the one you already own. By investing less than $15 in a thermometer and a few minutes in a simple test, you can transform your cooking from a game of chance into a craft you control. Stop letting your oven have the last word. Now you know its secrets.