It’s one of the most confusing moments in the kitchen. You followed the instructions. You loaded your slow cooker with a beautiful chuck roast, surrounded it with fragrant vegetables, and set it to cook all day. You came home, anticipating that fall-apart, fork-tender perfection. Instead, you opened the lid to find meat that was somehow both falling apart and disappointingly dry and stringy inside. What went wrong?
If you used the ‘High’ setting for a long cook time, you’ve just stumbled upon the slow cooker’s biggest paradox. Let’s be honest, we’ve all been there. You think ‘High’ means faster, better cooking. But when it comes to tough cuts of meat, it’s often the express train to Toughsville. The right tool makes cooking easier, but that means understanding how the tool works. Today, we’re demystifying those High and Low settings for good.
The Counterintuitive Truth About Slow Cooker Settings
Most people assume the ‘High’ and ‘Low’ settings on a slow cooker are just about time—that ‘High’ simply gets the job done faster. That’s only half the story. The real difference is the intensity of the heat and how quickly it gets there.
Think of it this way: your slow cooker’s job is to bring the food up to a simmer and then hold it there.
- Low Setting: Aims for a gentle simmer, typically around 200°F (93°C). It takes its time getting there, allowing for a long, slow, and gentle cooking process.
- High Setting: Aims for a more aggressive simmer, reaching a temperature closer to 300°F (150°C). It gets to that simmering point much faster and maintains a more rolling, active heat.
When you apply that aggressive, higher heat to a tough cut of meat like a chuck roast or a pork shoulder, you create a problem. The muscle fibers in the meat contract and tighten up very quickly. This rapid tightening squeezes out moisture before the real magic of slow cooking has a chance to happen. The result is meat that might shred, but the individual strands will be dry and chewy because you essentially boiled the moisture right out of them.
It’s like trying to run a marathon at a full sprint. You’ll burn out, and your muscles will seize. Tough meat needs a long, slow jog, not a race to the finish line.
The Science of Tender Meat Why Low and Slow is King
The reason we use slow cookers for cuts like beef chuck, pork butt, brisket, and lamb shanks is because they are loaded with connective tissue. This tissue is primarily made of a protein called collagen. When you cook a steak on a hot grill, you’re not trying to deal with collagen; you’re just searing tender muscle. But with these tough cuts, collagen is the whole game.
When cooked with dry, high heat, collagen remains tough and chewy. But when you apply low, moist heat for a prolonged period, a transformation occurs. The collagen begins to break down and melt, turning into rich, silky gelatin. This gelatin coats the muscle fibers, giving the meat that incredibly succulent, fall-apart-at-the-touch texture and a luscious mouthfeel. This is the entire point of braising or slow cooking.
The sweet spot for this conversion process is a gentle temperature—right around that 200°F (93°C) mark provided by the ‘Low’ setting. It gives the collagen hours to slowly dissolve without aggressively cooking and drying out the surrounding muscle fibers. The ‘High’ setting, on the other hand, blasts past this delicate process. It cooks the muscle so fast that the collagen doesn’t have time to properly render, leaving you with that classic tough-but-shredded result.
When to Use High vs When to Stick to Low
So, is the ‘High’ setting useless? Not at all. It’s a tool, and like any tool, it has a specific purpose. You just need to know when to use it. Here’s a simple guide for your Crock-Pot, Hamilton Beach, or any other slow cooker you have on your counter.
Always Use LOW for:
- Tough Cuts of Meat: This is the golden rule. Any recipe featuring beef chuck, round roast, brisket, pork shoulder (or butt), or lamb shanks should be cooked on low for 6-8 hours. (Your future self will thank you.)
- Maximum Tenderness: If your goal is the most tender, moist result possible, ‘Low’ is always the answer, even for leaner cuts.
- All-Day Cooking: If you’re setting it in the morning and coming home after a full workday, ‘Low’ is the safe, reliable choice.
It’s Okay to Use HIGH for:
- Soups and Stews: For dishes where the meat is already ground or in small, tender pieces (like chicken breast), ‘High’ is perfectly fine to get it done in 3-4 hours.
- Vegetarian Dishes: Cooking down sturdy root vegetables, beans, or lentils works great on ‘High’.
- Dips, Drinks, and Sauces: Making a big batch of queso dip, mulled cider, or keeping marinara sauce warm for a party is an ideal use for the ‘High’ setting.
- Converting a Recipe (with caution): As a general rule, you can convert a recipe from ‘Low’ to ‘High’ by cutting the time roughly in half. An 8-hour ‘Low’ recipe becomes a 4-hour ‘High’ recipe. Just be aware that if you’re cooking a large roast, the texture will not be as good as the low-and-slow method.
A Foolproof Recipe The Perfect Low-and-Slow Pot Roast
Talk is cheap. Let’s put this into practice with a recipe that proves the power of the ‘Low’ setting. This is my go-to for a no-fail, ridiculously tender chuck roast.
Ingredients:
- 1 boneless beef chuck roast (3-4 lbs)
- 2 tablespoons olive oil
- 2 yellow onions, thickly sliced
- 4 carrots, peeled and cut into 2-inch chunks
- 4 celery stalks, cut into 2-inch chunks
- 6 cloves garlic, smashed
- 1 cup dry red wine (optional, can substitute beef broth)
- 2 cups beef broth
- 1 tablespoon tomato paste
- 2 teaspoons dried thyme
- 2 bay leaves
- Salt and freshly ground black pepper
Instructions:
- Prep the Meat: Pat the chuck roast completely dry with paper towels. This is critical for getting a good sear. Season it generously on all sides with salt and pepper.
- Sear for Flavor: In a large, heavy-bottomed skillet or Dutch oven, heat the olive oil over medium-high heat. Carefully place the roast in the pan and sear for 4-5 minutes per side, until a deep brown crust forms. Do not skip this step! This Maillard reaction creates a massive amount of flavor that you can’t get from the slow cooker alone. Transfer the seared roast to your slow cooker.
- Build the Base: Lower the heat on your skillet to medium. If using wine, pour it in and scrape up all the delicious browned bits from the bottom of the pan (this is called deglazing). Let it bubble for a minute. Stir in the tomato paste, then add the beef broth, thyme, and bay leaves.
- Assemble and Cook: Place the onions, carrots, celery, and garlic around the roast in the slow cooker. Pour the liquid from the skillet over everything. The liquid should come about halfway up the side of the roast, but not submerge it.
- Set It and Forget It: Cover the slow cooker and set it to LOW for 8 hours. No peeking!
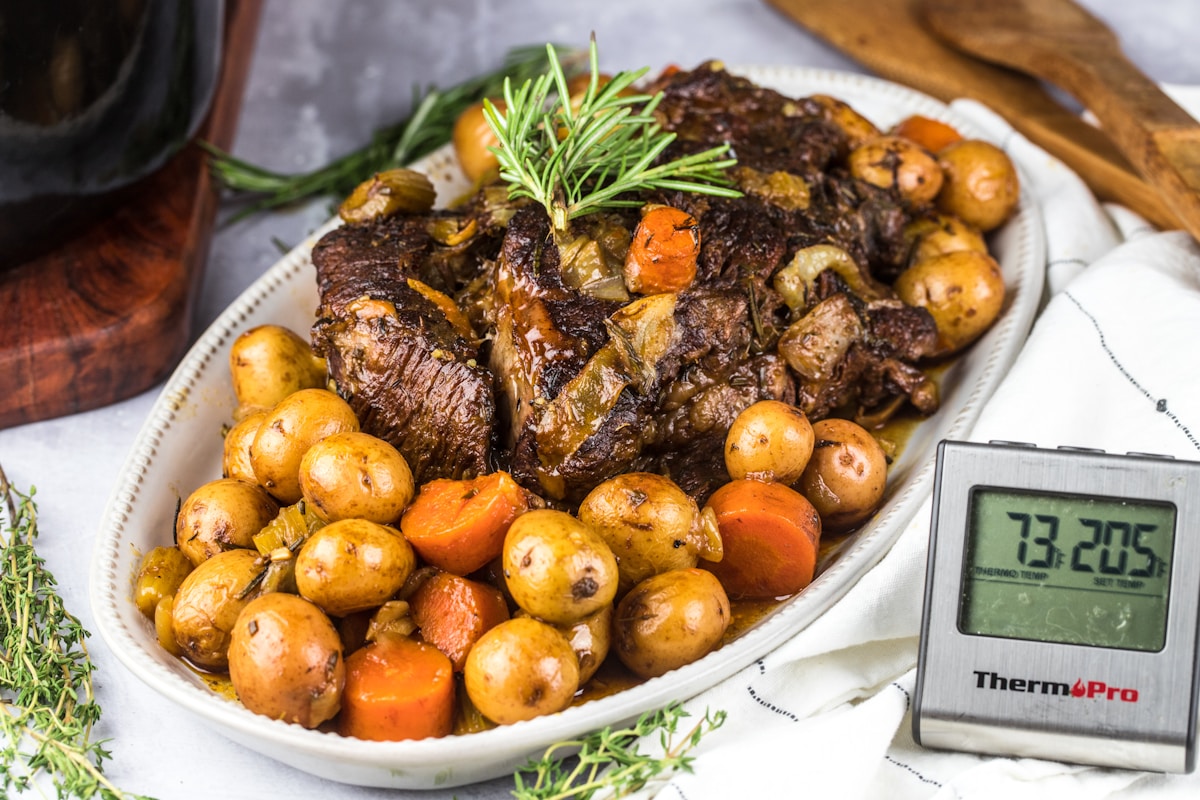
After 8 hours, the meat will be so tender you can shred it with a spoon. The collagen will have transformed into gelatin, creating a rich, savory gravy right in the pot. This is the result you’ve been looking for.
Kitchen Hack Quick Tips for Slow Cooker Success
Beyond the High vs. Low debate, a few simple habits can elevate your slow cooker game from good to great.
- Don’t Overfill: For the best results, your slow cooker should be between one-half and two-thirds full. Too little, and the food can scorch; too much, and it may not cook evenly or safely.
- Brown Your Meat First: As we did in the recipe, searing meat before slow cooking is a non-negotiable step for deep, roasted flavor.
- Go Easy on the Liquid: Remember that vegetables and meat will release a lot of their own moisture during the long cook. You often need less liquid than you think. Too much will just give you a diluted, watery sauce.
- Lid Down!: Every time you lift the lid to peek, you release a significant amount of heat and steam, potentially adding 15-20 minutes to your cooking time. Trust the process and let it do its job.
The slow cooker is a fantastic piece of equipment, but it’s not magic. Understanding the simple science behind its settings unlocks its true potential. The ‘High’ setting has its place for soups and dips, but for turning tough, affordable cuts of meat into something truly spectacular, ‘Low’ is, and always will be, the hero. It’s about using the right tool for the job to get the best value—and the best flavor—for your money.