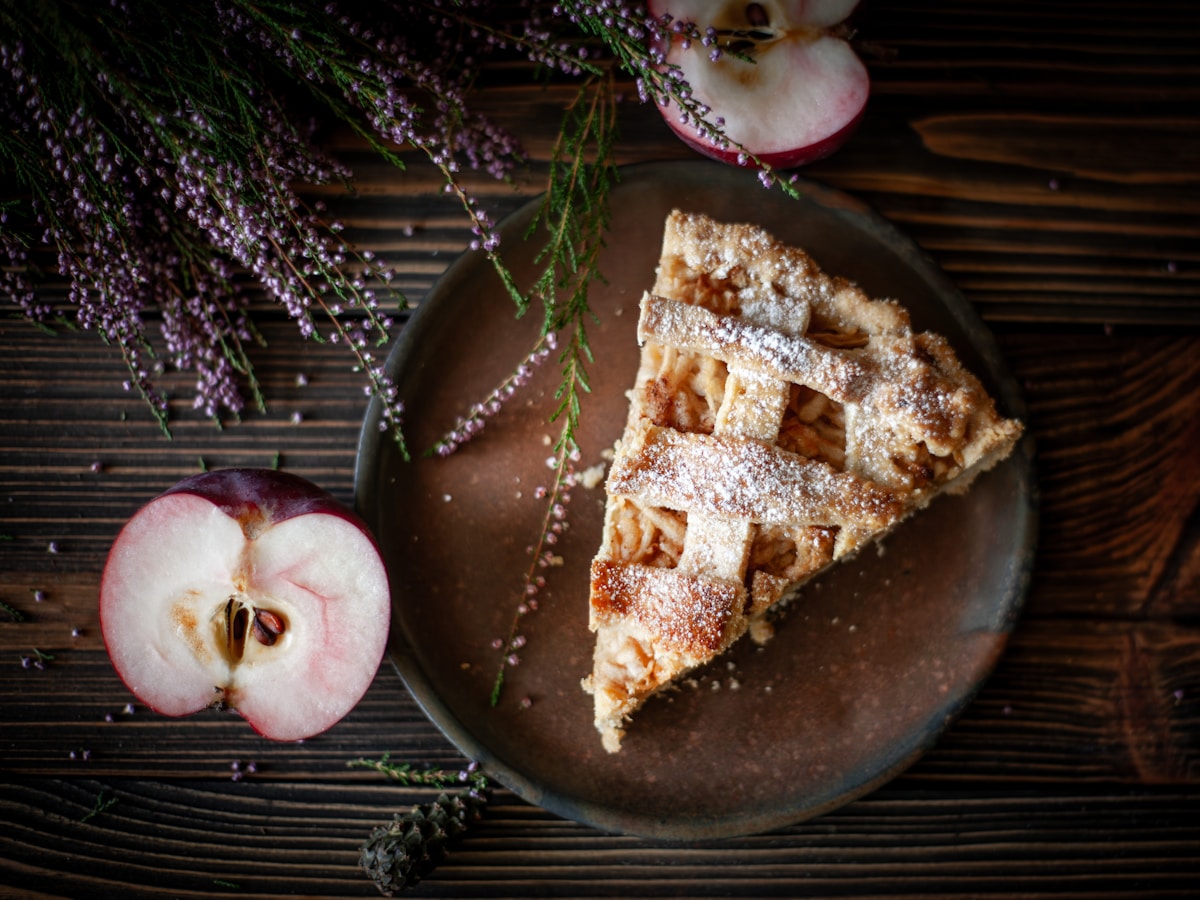
You’ve done everything right. The crust is a beautiful, flaky, golden-brown lattice. The aroma of cinnamon and baked apples fills your kitchen. You pull the pie from the oven, let it cool with admirable patience, and slice into your masterpiece. And then… disappointment. The filling is a soupy mess that floods the plate, or worse, the apples are still disappointingly firm and crunchy.
This is one of the most common frustrations in baking, a classic case where the exterior looks perfect but the interior hasn’t cooperated. The truth is, the perfect apple pie filling is a delicate balancing act of chemistry and physics. It’s a race against time between the crust browning and the filling cooking through. But with a little understanding of the science at play, you can win that race every single time. Let’s break down the problem and engineer a solution for a perfect, jammy, tender filling from now on.
The Apple Alliance Why Variety is Non-Negotiable
The first variable in our equation is the apple itself. Not all apples are created equal when it comes to heat. Some varieties contain higher levels of pectin and have a firmer cell structure, allowing them to hold their shape beautifully when baked. Others are softer and tend to collapse into a delicious, pulpy applesauce. The secret to a complex, satisfying texture is to use both.
Think of it as building a house. You need strong bricks for structure, and you need mortar to hold it all together.
- The Structural Apples (The Bricks): These are your firm, tart apples that won’t turn to mush. My go-to choices are Granny Smith, Honeycrisp, Braeburn, and Jonagold. They provide the distinct apple slices you expect to see and feel in a good pie.
- The Sauce Apples (The Mortar): These apples break down more easily, creating the luscious, jammy sauce that surrounds the firmer pieces. McIntosh and Cortland are perfect for this role. They melt into the filling, thickening it naturally and adding a wonderful depth of flavor.
For a standard 9-inch (23 cm) pie, I recommend a blend of about 6-8 medium apples. A great starting ratio is two-thirds structural apples to one-third sauce apples. For example, use four Granny Smiths and two McIntosh apples. This combination ensures you get tender-but-intact apple slices suspended in a rich, apple-forward sauce, hitting that perfect textural sweet spot.
The Geometry of the Slice Uniformity is King
Now that you have the right apples, how you cut them is the next critical step, and it’s the primary culprit behind crunchy, undercooked fillings. If your slices are a hodgepodge of different thicknesses—some paper-thin, some a half-inch thick—they will cook at wildly different rates. The thin ones will dissolve into mush while the thick ones remain stubbornly raw when the crust is perfectly baked.
Precision is your best friend here. Aim for uniform slices, about 1/4-inch (around 6 mm) thick. This is the ideal thickness to ensure the apples cook through to a state of perfect tenderness in the time it takes to bake the crust.
How do you achieve this uniformity? While a steady hand and a sharp knife work, my secret weapon for pie is a mandoline slicer. (Yes, really.) Set it to the 1/4-inch setting, use the safety guard, and you’ll have a perfectly uniform pile of apple slices in minutes. It’s a game-changer for consistency. Your future self will thank you when every single bite of your pie has the exact same tender bite.
Mastering Moisture The Science of a Jammy Filling
Here we tackle the arch-nemesis of many a pie baker: the soupy filling. The cause is simple: apples are about 85% water. When you mix them with sugar and bake them, that sugar acts hygroscopically—it draws the water out of the apple cells through osmosis. If you don’t manage this liquid, it will create a watery pool at the bottom of your beautiful pie, resulting in the dreaded “soggy bottom.”
We can turn this chemical reaction to our advantage with a technique called maceration.
- Macerate the Apples: In a large bowl, toss your uniformly sliced apples with your sugar (I use about 150g / 3/4 cup granulated sugar for 8 apples), cinnamon, nutmeg, and a pinch of salt. Let this mixture sit at room temperature for at least 30 minutes, but up to an hour.
- Drain the Liquid: After 30-60 minutes, you will be shocked at the amount of liquid that has pooled at the bottom of the bowl. This is all the water that would have ended up in your pie. Strain the apples, collecting every drop of this liquid in a small saucepan.
- Create a Syrup: Place the saucepan on the stove over medium heat. Bring the liquid to a boil and let it simmer for 5-7 minutes, or until it has reduced by about half and thickened into a light syrup. You have just created a super-concentrated apple-cinnamon elixir.
- Thicken and Recombine: While the syrup is reducing, toss your drained apple slices with a thickener. I recommend 2 to 3 tablespoons of cornstarch for a clear, glossy finish, or the same amount of all-purpose flour for a more opaque, traditional filling. Once the apples are coated, pour the hot, reduced syrup back over them and toss gently to combine.
You have now pre-emptively removed the excess water, concentrated its flavor, and added it back with a thickening agent. The result is a filling that is perfectly controlled, intensely flavorful, and guaranteed not to be watery.
The Foolproof Method Pre-Cooking the Filling
If you want absolute, undeniable certainty that your filling will be perfect, there is one final technique: pre-cooking the filling on the stovetop. This method takes all the guesswork out of the equation and ensures your apples are cooked to perfection before they even see the inside of an oven.
This is my go-to for competition-level pies where there is no room for error.
- Step 1: Follow all the steps above for macerating and creating the reduced syrup.
- Step 2: In a large, wide-bottomed pot or Dutch oven, melt 2 tablespoons (28g) of unsalted butter over medium heat.
- Step 3: Add your drained apple slices (without the thickener yet) and sauté them for 5-8 minutes, stirring occasionally, until they begin to soften slightly but still hold their shape. You’re giving them a head start on cooking.
- Step 4: In a small bowl, whisk your cornstarch or flour into the reduced apple syrup until it’s smooth, creating a slurry. Pour this slurry over the apples in the pot.
- Step 5: Continue to cook, stirring gently, until the mixture bubbles and thickens considerably. This should take about 2-3 minutes. The filling will look glossy and jammy.
Now, here is the most important part of this technique: you must let the filling cool completely to room temperature before putting it into your unbaked pie shell. Adding a hot filling to a cold, butter-laden pie crust will melt the butter, ruining that flaky texture you worked so hard for.
Once cooled, you can assemble your pie. Because the filling is already cooked, you only need to focus on baking the crust. I typically bake at 400°F (200°C) for the first 20 minutes to set the bottom crust, then reduce the heat to 375°F (190°C) for another 30-40 minutes until the top is deeply golden brown and the filling is bubbly. The result is a guaranteed masterpiece, every single time. It’s not a shortcut, but it is a sure path to perfection.