Let’s be honest for a second. Standing over a hot, sizzling pan with a beautiful, expensive steak in it can feel a little like trying to defuse a bomb. There’s the sizzle, the incredible smell, the timer ticking in your head. You have one mission: do not, under any circumstances, overcook this steak. We’ve all been there, poking it nervously with a fork, wondering if this is the moment it transforms from a juicy, perfect medium-rare into a sad, grey hockey puck.
That fear is totally normal. Cooking a great steak feels like a rite of passage, and the biggest mystery is always, “Is it done yet?” You’ve probably seen chefs on TV confidently press a steak with their finger and know its doneness instantly. It looks like a magic trick, a secret handshake for a club you’re not yet in. But I’m here to tell you it’s not magic, and you can absolutely learn the secret. Today, we’re going to demystify steak doneness, explore that famous ‘finger test,’ and give you a foolproof path to cooking the steak of your dreams. Everyone starts somewhere, and your journey to steak mastery starts right now.
The Famous ‘Finger Test’ Your Built-In Doneness Guide
Before digital thermometers were in every kitchen drawer, cooks relied on their senses, especially touch. The finger test is a classic technique that compares the firmness of the steak you’re cooking to the firmness of the fleshy part of your palm at the base of your thumb. It’s clever, it costs nothing, and it’s a great skill to develop. Think of your hand as a built-in cheat sheet.
Here’s how you do it. Hold out one of your hands, palm up, and keep it relaxed.
-
For RARE: With your hand open and relaxed, use the index finger of your other hand to poke the fleshy mound below your thumb. Feel that? It’s very soft and squishy. This is what a rare steak feels like when you press it.
-
For MEDIUM-RARE: Now, gently touch the tip of your thumb to the tip of your index finger. Don’t press hard. Feel that same fleshy area below your thumb again. It has firmed up slightly. This is the feel of a perfect medium-rare steak — giving, but with a little springy resistance.
-
For MEDIUM: Move on and touch your thumb to your middle finger. The muscle tenses up a bit more. That’s your target for a medium steak. It will feel firm but still have a bit of give in the center.
-
For MEDIUM-WELL: You guessed it. Touch your thumb to your ring finger. The muscle is now quite firm. This corresponds to a medium-well steak, with just a hint of pink left inside.
-
For WELL-DONE: Finally, touch your thumb to your pinky finger. The muscle at the base of your thumb will be very firm and tense. This is the texture of a well-done steak.
This method is a fantastic starting point. It connects you to the food you’re cooking and helps you build what chefs call “feel” or intuition. It encourages you to poke, press, and pay close attention to how the meat is changing with the heat.
Why the Finger Test Can Sometimes Lie to You
Now, before you go off and rely solely on your palm, we need to have a little heart-to-heart. The finger test is an excellent guide, but it’s more of an art than an exact science. (Your future self will thank you for knowing this.)
First, everyone’s hands are different. The firmness of the muscle in my hand might be different from yours. Second, and more importantly, every cut of steak is different. A lean filet mignon, which is naturally incredibly tender, will feel much softer than a chewier cut like a flank steak, even at the same internal temperature. The fat content, the muscle structure, and the thickness of the cut all play a huge role in how the steak feels to the touch.
Think of it like this: pressing on a memory foam pillow will feel different than pressing on a tightly-stuffed cushion, even if you press with the same amount of force. The same is true for steak. Relying only on the finger test when you’re starting out can be a bit of a gamble. It takes cooking hundreds, even thousands, of steaks for a professional chef to calibrate their sense of touch to account for all these variables. So, if your first few attempts don’t come out perfectly, do not get discouraged! You’re not a bad cook; you’re just learning a very nuanced skill.
Your Secret Weapon for Steak Perfection The Thermometer
So, if the finger test is a bit subjective, how do you get guaranteed, repeatable, absolutely perfect results every single time? You use a little bit of science. Meet your new best friend in the kitchen: the instant-read digital thermometer.
This little gadget isn’t a crutch or a sign of weakness. It’s a tool of precision. It removes all the guesswork and anxiety, giving you pure, simple data: the internal temperature of your steak. Using a thermometer is how you learn what a perfect medium-rare actually feels like. Brands like ThermoWorks make fantastic models, from the lightning-fast Thermapen (a favorite of pros) to the more budget-friendly ThermoPop, which is perfect for any home cook.
Here are the temperatures you need to know. Write them down, put them on your fridge, and commit them to memory:
- Rare: 125°F / 52°C (Cool red center)
- Medium-Rare: 135°F / 57°C (Warm red center, the sweet spot for many cuts)
- Medium: 145°F / 63°C (Warm pink center)
- Medium-Well: 150°F / 66°C (Slightly pink center)
- Well-Done: 160°F+ / 71°C+ (Very little or no pink)
The Golden Rule of Steak Temps: Always remember carry-over cooking. After you take the steak off the heat, its internal temperature will continue to rise by about 5-7 degrees as the residual heat travels to the center. So, for a perfect medium-rare at 135°F, you should pull your steak from the pan when it reads about 130°F. This is maybe the most important tip of all!
The Hybrid Approach Using Both to Become a Pro
Here’s the real secret. The goal isn’t to choose between the finger test and the thermometer. The goal is to use them together. This is how you fast-track your kitchen intuition.
Think of the thermometer as your training wheels. While your steak is cooking, use the finger test. Make a guess. “Hmm, this feels like my thumb-to-index-finger… I think it’s medium-rare.” Then, prove yourself right (or wrong!) by taking its temperature. Insert the thermometer into the thickest part of the steak, avoiding any large pockets of fat or bone.
When the thermometer reads 130°F, you’ll know, “Aha! This is what a real medium-rare feels like on this specific cut of steak.” You are actively teaching your hands. After you do this a dozen times, you’ll start to notice you don’t need the thermometer as much. Your guesses will become more and more accurate until one day, you’ll just know. That’s how you build real confidence.
Try This Tonight Your First Perfect Pan-Seared Steak
Ready to put it all into practice? Let’s do it. No fancy equipment needed, just a pan, a steak, and your newfound knowledge.
-
The Steak: Start with a good, accessible steak about 1 to 1.5 inches thick. A New York strip or a boneless ribeye is perfect. Take it out of the fridge about 30 minutes before cooking to let it come to room temperature.
-
Get it Dry: Pat the steak completely dry with paper towels. A dry surface is the key to getting that beautiful, brown crust (that’s the Maillard reaction, a delicious chemical reaction we love!).
-
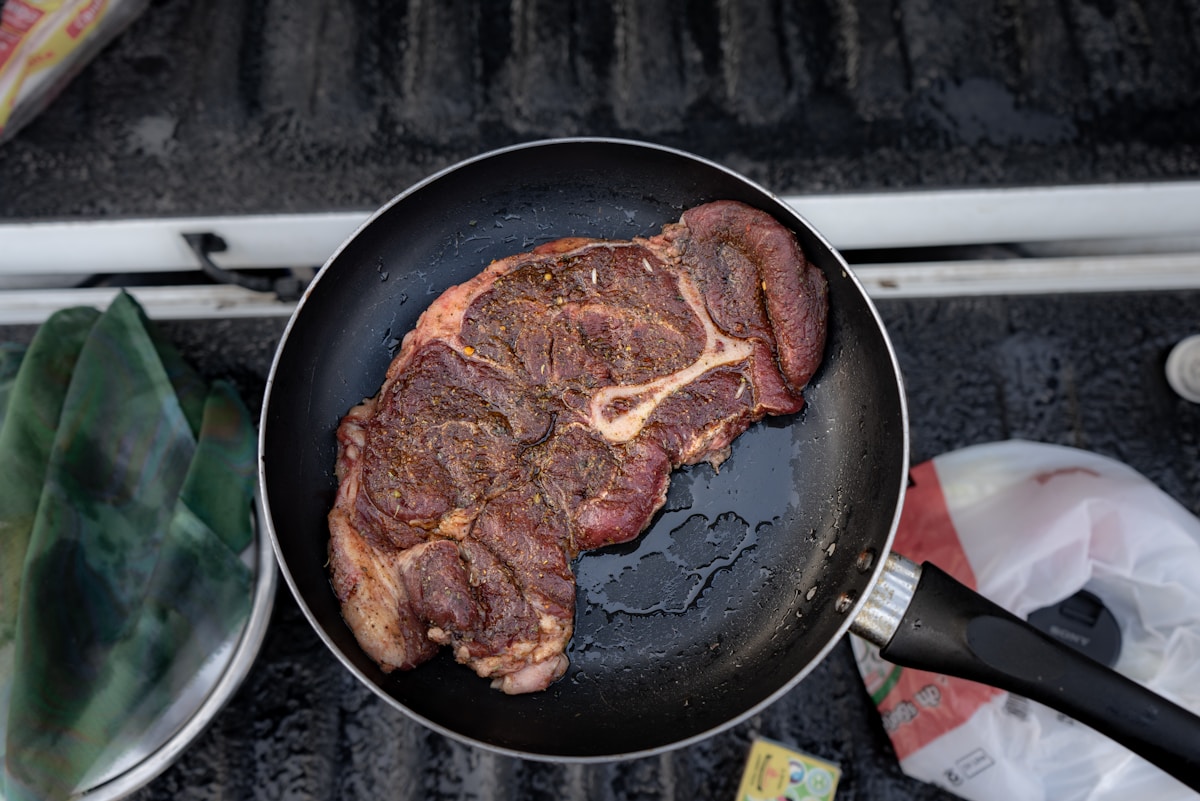
Season Generously: Don’t be shy! Season both sides liberally with coarse salt and freshly ground black pepper. You need more than you think.
-
Hot Pan: Get a heavy-bottomed skillet (cast iron is king here, like a classic Lodge pan) screaming hot over medium-high heat. Add a tablespoon of a high-smoke-point oil, like canola or grapeseed oil. When the oil shimmers, it’s ready.
-
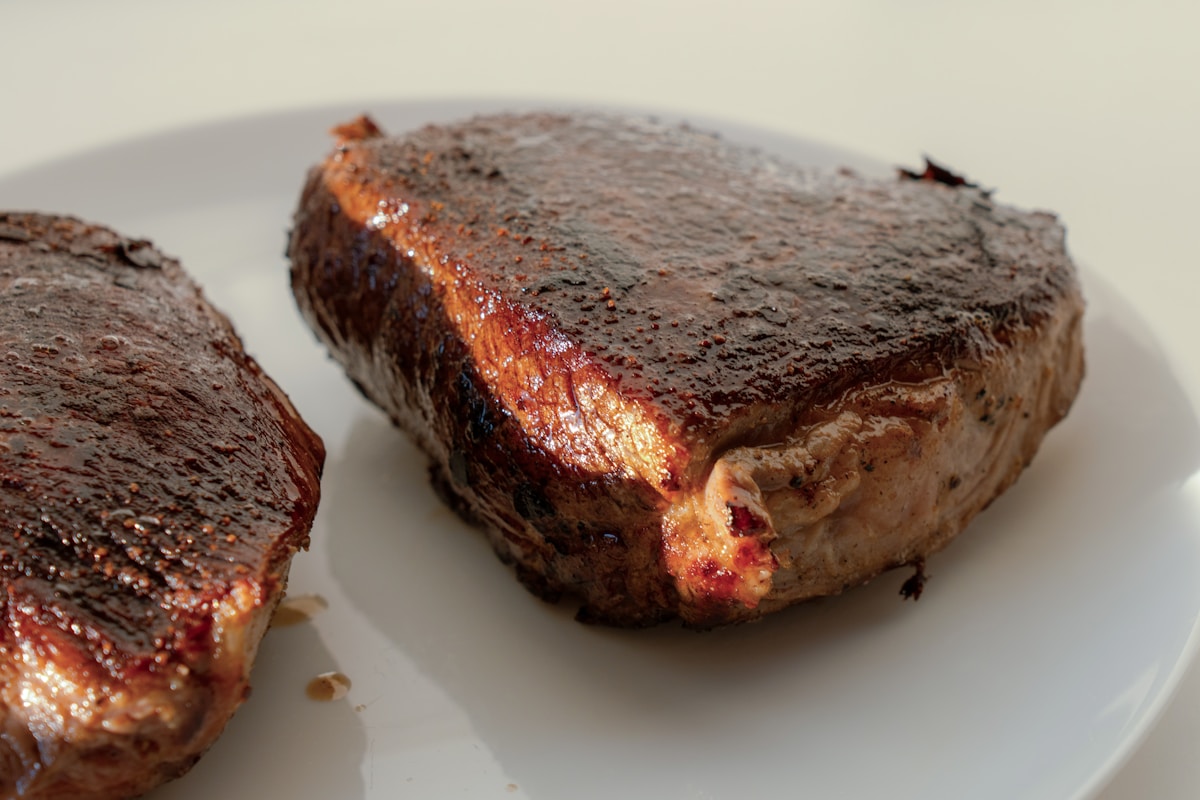
The Sear: Gently lay the steak in the pan, away from you. You should hear a loud, aggressive sizzle. That’s the sound of success! Don’t touch it. Let it sear for about 3-4 minutes to develop a deep brown crust. Flip it and sear the other side for another 3-4 minutes.
-
The Finish (and the Test!): Turn the heat down to medium. Add a tablespoon of butter, a smashed clove of garlic, and a sprig of fresh rosemary or thyme to the pan. As the butter melts, tilt the pan and use a spoon to baste the steak with that fragrant, bubbling butter for about a minute. Now, start your hybrid test. Give it a poke. What does it feel like? Now, check with your thermometer. Pull it when it’s 5 degrees below your target.
-
The Crucial Rest: Transfer the steak to a cutting board and let it rest for 5-10 minutes. This is non-negotiable! This allows the juices that were pushed to the center during cooking to redistribute throughout the meat, ensuring every bite is juicy. Tent it loosely with foil if you like.
Now, slice it against the grain and admire your work. You did it. You took the mystery out of the process and made a fantastic steak. The more you practice, the more that initial fear will be replaced by the pure joy of cooking.