Have you ever pulled a picture-perfect apple pie from the oven, all golden-brown and bubbling, only to watch it deflate as it cools? You cut the first slice, and there it is: the dreaded gap. A big, empty cavern between your beautifully flaky top crust and the shrunken apple filling below. It’s so frustrating! But I promise you, it’s not your fault, and it’s a super common issue. The good news? The fix is surprisingly simple, and it all comes down to how you slice your apples.
What Causes That Big Pie Gap Anyway?
Think of your uncooked apple slices like a pile of mismatched building blocks. If the blocks are too big and clunky, they leave a lot of empty space between them. When you put your pie in the oven, those big apple slices hold up the top crust like pillars.
As the pie bakes, the apples cook down, soften, and release steam, shrinking significantly. Suddenly, the pillars are gone! With nothing to hold it up, the crust slumps down into the space where the apples used to be. That, my friend, is your gap. It’s not a baking failure; it’s just a little bit of kitchen physics at play.
The ‘Just Right’ Slice for a Perfect Pie
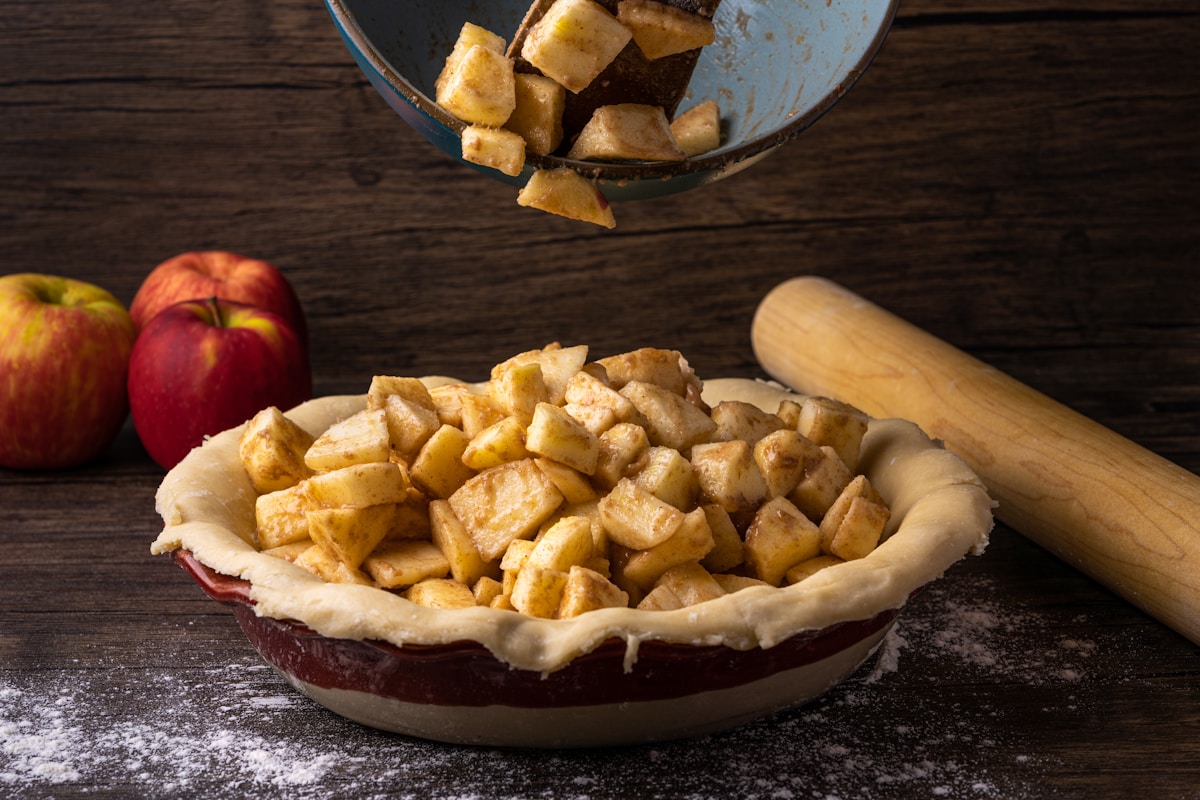
So, how do we avoid this structural collapse? We build a better foundation. And that means slicing your apples to the Goldilocks thickness: a uniform quarter-inch (about 6mm).
Why is this the magic number?
- Too Thick (1/2 inch or more): These chunky slices won’t cook down evenly. You’ll end up with some crunchy bits and some soft bits. More importantly, they create those giant air pockets that lead to the gap.
- Too Thin (Paper-thin): These slices have the opposite problem. They have so little structure that they break down completely in the oven’s heat, turning into a homogenous, textureless apple mush. Still tasty, but not the classic apple pie filling we’re dreaming of.
- Just Right (1/4 inch): These slices are substantial enough to hold their shape, but thin enough to cook through completely and become tender. They nestle together beautifully, creating a dense, stable layer of filling that supports the crust as it bakes and cools. No gaps, just glorious apple-filled goodness.
Your Slicing Toolkit From Beginner to Pro
Getting every single slice to a perfect quarter-inch by hand can feel like a tall order, especially when you’re new to this. Don’t worry, nobody expects perfection on day one (or day one hundred).
If you plan on making pies often, I highly recommend investing in a mandoline slicer. A good one, like the OXO Good Grips V-Blade Mandoline Slicer, makes this job incredibly fast and precise. But please, please, please always use the safety guard that comes with it. (Your fingertips will thank you.)
No mandoline? No problem! Your trusty chef’s knife will work just fine with a little technique. Here’s how:
- Peel and core your apple.
- Cut it in half from top to bottom, then cut each half into quarters.
- Lay one quarter on its flat, cut side. This creates a stable base so it won’t roll around.
- Now, just slice it crosswise, aiming for that quarter-inch thickness. Focus on consistency over speed. It’s better to go slow and get even slices than to rush and have a jumble of sizes.
My Favorite Trick for a No-Gap, No-Sog Pie
Want to take your pie to the next level and solve two problems at once? Let me introduce you to macerating. It sounds fancy, but it just means letting your sliced apples hang out in sugar for a bit before they go into the pie.
Here’s why it’s a game-changer:
- It Pre-Shrinks the Apples: The sugar draws out excess water from the apples. This means they’ve already done some of their shrinking before you bake them, which drastically reduces that post-oven slump.
- It Prevents a Soggy Bottom: All that liquid you drain off? That’s water that would have turned your bottom crust into a soggy mess. (Yes, really!)
- It Boosts Flavor: You’re left with apples that have a more concentrated, intense apple flavor.
How to do it: Simply toss your quarter-inch apple slices in a big bowl with your sugar and spices (cinnamon, nutmeg, etc.). Let them sit on the counter for 30 to 60 minutes. You’ll be amazed at the pool of liquid that collects at the bottom of the bowl. Just drain it off before you assemble your pie. (Kitchen hack: you can even simmer that drained liquid on the stove until it becomes a syrupy glaze and pour it back over the apples!)
Try This Tonight
You don’t need to bake a whole pie to see this in action. Take one apple and slice it as evenly as you can to about a quarter-inch thick. Toss the slices with one teaspoon of granulated sugar and a pinch of cinnamon.
Let the bowl sit for 30 minutes. Look at all that liquid! You’ve just performed a little kitchen magic. Now, for the fun part: melt a pat of butter in a small pan over medium heat and sauté those apple slices for a few minutes until they’re tender and caramelized. Spoon them over a bowl of vanilla ice cream or your morning oatmeal. It’s a delicious way to practice a key skill and build your kitchen confidence, one perfect slice at a time.