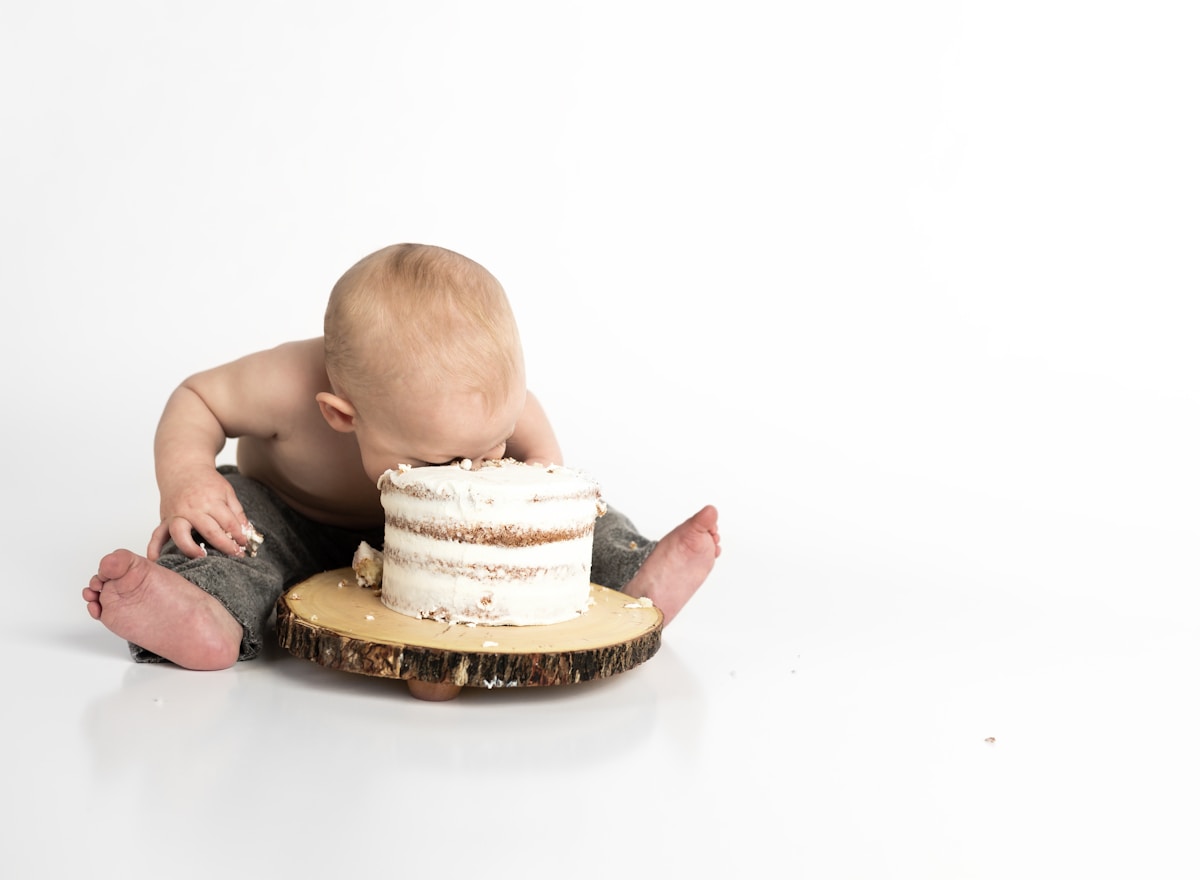
There it is on your calendar, circled in bright, happy ink: your little one’s first birthday. It’s a milestone that feels both impossibly far away and right around the corner. You’ve envisioned the tiny party hats, the wobbly first steps toward a brightly wrapped gift, and of course, the smash cake.
Ah, the smash cake. That glorious, messy, picture-perfect moment where your baby gets their first real taste of birthday cake. But then, a little wave of worry creeps in. You’ve spent the last year carefully introducing wholesome foods, following the advice to limit added sugars. The thought of handing over a slice of cake slathered in traditional American buttercream—which is often little more than butter and mountains of powdered sugar—feels… well, a bit counterintuitive.
If you’re nodding along, please know you are not alone! This is one of the most common kitchen conundrums I hear from new parents. You want all the joy and celebration, but you also want to feel good about what your baby is eating. My dear reader, I am here to tell you that you can absolutely have both. The secret? Trading that heavy, sugary buttercream for its lighter, dreamier, and far more toddler-friendly cousin: stabilized whipped cream.
Why Whipped Cream is a First Birthday Hero
Let’s be honest, most one-year-olds don’t have a seasoned sweet tooth. Their palates are still developing, and the intense sweetness of a traditional frosting can be overwhelming. More often than not, they poke at it, make a glorious mess (which is the point!), but don’t actually eat much of the frosting itself. Whipped cream frosting changes the game.
-
Dramatically Lower Sugar: This is the big one. While American buttercream often uses a 1:2 ratio of butter to powdered sugar, you can make a beautiful whipped cream frosting with just a tablespoon of maple syrup or powdered sugar per cup of cream. It provides a whisper of sweetness that complements the cake and any fruit, rather than overpowering it. This aligns perfectly with the American Academy of Pediatrics’ recommendation to avoid added sugars for children under two.
-
A Texture Toddlers Love: Think about the foods your baby enjoys. They’re likely soft, easy to manage, and light. Heavy, greasy buttercream can be a textural challenge. Whipped cream, on the other hand, is light, airy, and cloud-like. It’s much closer to the texture of yogurt or purees, making it more intuitive and enjoyable for little mouths.
-
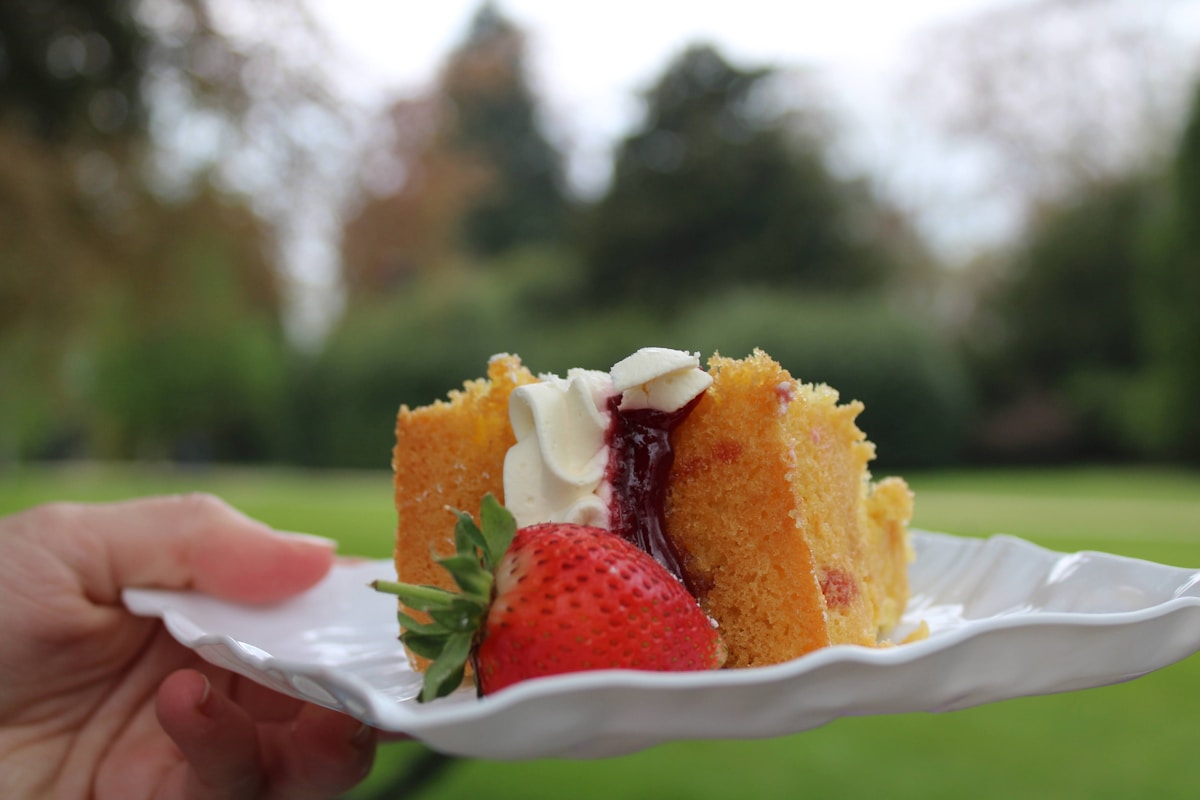
The Perfect Partner for Fruit: Because it isn’t cloyingly sweet, whipped cream frosting allows the natural sweetness of fruit to shine. It’s the perfect topping for a simple sponge cake layered with mashed strawberries or a banana cake sweetened with, well, bananas! It tastes fresh and real, which is exactly what we want for our budding foodies.
The Secret to Frosting Success Stabilization
“But Beatrice,” you might be thinking, “won’t regular whipped cream just melt and weep all over the cake?” And you would be absolutely right! The key to turning whipped cream from a last-minute topping into a sturdy, pipeable frosting is stabilization. This simply means adding a special ingredient that helps the cream hold its shape for hours, even at room temperature.
Don’t let the word “stabilization” intimidate you; it’s incredibly simple. You have two fantastic, easy-to-find options, and I’ll walk you through both.
Option 1: The Mascarpone Method (My Favorite!)
This is my go-to for its simplicity and the wonderfully rich, creamy flavor it adds. Mascarpone is a soft Italian cream cheese that blends seamlessly into the whipped cream, giving it body and stability without any grittiness.
Option 2: The Gelatin Method
This is a classic pastry chef technique that creates a very sturdy frosting. It requires one extra small step—blooming the gelatin—but it’s foolproof once you do it. A little unflavored gelatin gives the cream incredible holding power.
Beatrice’s Fail-Proof Stabilized Whipped Cream Frosting Recipe
This recipe makes enough to generously frost a 6-inch, two-layer smash cake. (Your future self will thank you for making a small cake.) The most important rule for making any whipped cream is to make sure everything is very cold. I mean it! Pop your metal mixing bowl and whisk attachment (or beaters) in the freezer for at least 15 minutes before you start.
Ingredients:
- 2 cups (473 ml) very cold heavy whipping cream (at least 36% fat)
- 2 to 4 tablespoons of powdered sugar or pure maple syrup (adjust to your taste)
- 2 teaspoons vanilla extract
For the Mascarpone Stabilizer:
- 1/2 cup (about 4 ounces or 113g) cold mascarpone cheese
For the Gelatin Stabilizer:
- 1.5 teaspoons unflavored gelatin powder
- 2 tablespoons cold water
Instructions:
-
Prepare Your Stabilizer:
- If using mascarpone: Simply place the cold mascarpone in a small bowl. You’re all set.
- If using gelatin: In a tiny, microwave-safe bowl, sprinkle the gelatin over the cold water. Let it sit for 5 minutes to “bloom”—it will absorb the water and look like applesauce. Then, microwave it for just 5-10 seconds, until it’s completely liquid. Set it aside to cool slightly, but don’t let it set.
-
Start Whipping: Pour your very cold heavy cream into your very cold mixing bowl. Using a stand mixer with a whisk attachment or a hand mixer, begin whipping on medium speed. Once the cream starts to thicken and bubble, add your powdered sugar (or maple syrup) and vanilla.
-
Add the Stabilizer: Increase the speed to medium-high.
- For mascarpone: Add the mascarpone cheese one spoonful at a time, letting it incorporate fully before adding the next.
- For gelatin: With the mixer running, slowly and steadily stream the slightly cooled, liquid gelatin into the whipping cream. Pouring it in too fast can create lumps, so a slow, steady stream is key!
-
Whip to Stiff Peaks: Continue whipping until the cream forms stiff peaks. This is the magic moment! To check, stop the mixer and pull the whisk straight up. The peak of cream that forms should hold its shape and point straight up without flopping over. Be careful not to over-whip, or you’ll start making butter! (It happens faster than you think.)
-
Frost Your Cake: Your beautiful, stable, and delicious frosting is now ready. Use an offset spatula to create rustic swirls on your cooled smash cake. It may not be suited for intricate piping, but it creates a lovely, soft look that’s perfect for a first birthday.
Decorating Your Naturally Sweet Masterpiece
Now for the fun part! Since this frosting isn’t overwhelmingly sweet, you can lean into natural decorations. Here are a few ideas my family loves:
- Fresh Berries: A few sliced strawberries, a sprinkle of blueberries, or a single raspberry on top looks beautiful and is perfect for little hands to grab.
- Fruit Swirls: Before frosting the cake, set aside a small amount of whipped cream and gently fold in a tablespoon of fruit puree (like raspberry or mango) to create a colored swirl you can add to the top.
- A Dusting of Spice: A light sprinkle of cinnamon or cocoa powder (if you’ve introduced it) can add a touch of flavor and color.
Seeing your little one dive into a cake you made with so much love—and so little sugar—is a memory you will treasure. It’s a celebration of them, of this incredible first year, and of the sweet, messy, wonderful journey of parenthood. The kitchen is where families grow together, and this first birthday cake is a beautiful, delicious chapter in your family’s story.