It’s a scene I know all too well. Your little one has a birthday coming up and puts in a very specific request: a strawberry banana cake! Your heart melts. You imagine their face lighting up as they see the perfect cake, made with love and their favorite fruits. You head to the kitchen, chop up fresh, beautiful berries and bananas, and fold them lovingly into your best vanilla cake batter.
The whole house smells divine as it bakes. But when you pull it out, something isn’t quite right. The cake looks a little… sunken. And when you try to slice and frost it, you’re met with a baker’s worst nightmare: a dense, gummy, and hopelessly soggy middle that refuses to hold its shape. The layers slide, the frosting won’t stick, and your beautiful birthday creation looks more like a delicious science experiment gone wrong.
If this has happened to you, please know you are not alone! It’s one of the most common heartbreaks in a family kitchen. The good news is that the problem isn’t your baking skill; it’s the fruit. But there is a wonderful, simple, and downright magical solution that will give you that intense fruit flavor your child craves while keeping your cake perfectly light and fluffy. Let’s talk about the magic of a fruit syrup soak.
Why Fresh Fruit Can Be a Cake’s Worst Enemy
Before we get to the solution, let’s understand the problem. It all comes down to one simple thing: water. Fruits like strawberries, peaches, raspberries, and even bananas are packed with moisture. When you bake them inside a delicate cake batter, that moisture turns to steam. This steam creates dense, wet pockets around the fruit chunks, preventing the cake crumb from setting properly.
Instead of a light, airy sponge, you get a gummy, under-baked texture. Not only that, but the extra water can throw off the delicate balance of flour, sugar, and fat in your recipe, leading to a cake that’s heavy and prone to collapsing. It’s especially tricky with delicate cakes like a classic sponge or chiffon, which rely on a very specific structure to achieve their signature lightness.
Adding fruit chunks can also make your cake layers uneven and difficult to stack. The fruit can sink to the bottom, creating a dense layer that’s impossible to frost cleanly. It’s a recipe for frustration, especially when you have a little one eagerly waiting for their special treat. So, how do we get all that wonderful, nostalgic fruit flavor without the structural disaster? We separate the flavor from the water.
The Golden Ticket: A Simple Fruit-Infused Syrup
Here is the secret that professional bakers and savvy home cooks swear by: a fruit-infused simple syrup. It sounds fancy, but I promise you, it’s one of the easiest things you’ll ever make in your kitchen. A simple syrup is just equal parts sugar and water, heated until the sugar dissolves. To turn it into our cake-saving elixir, we’re just going to add fruit!
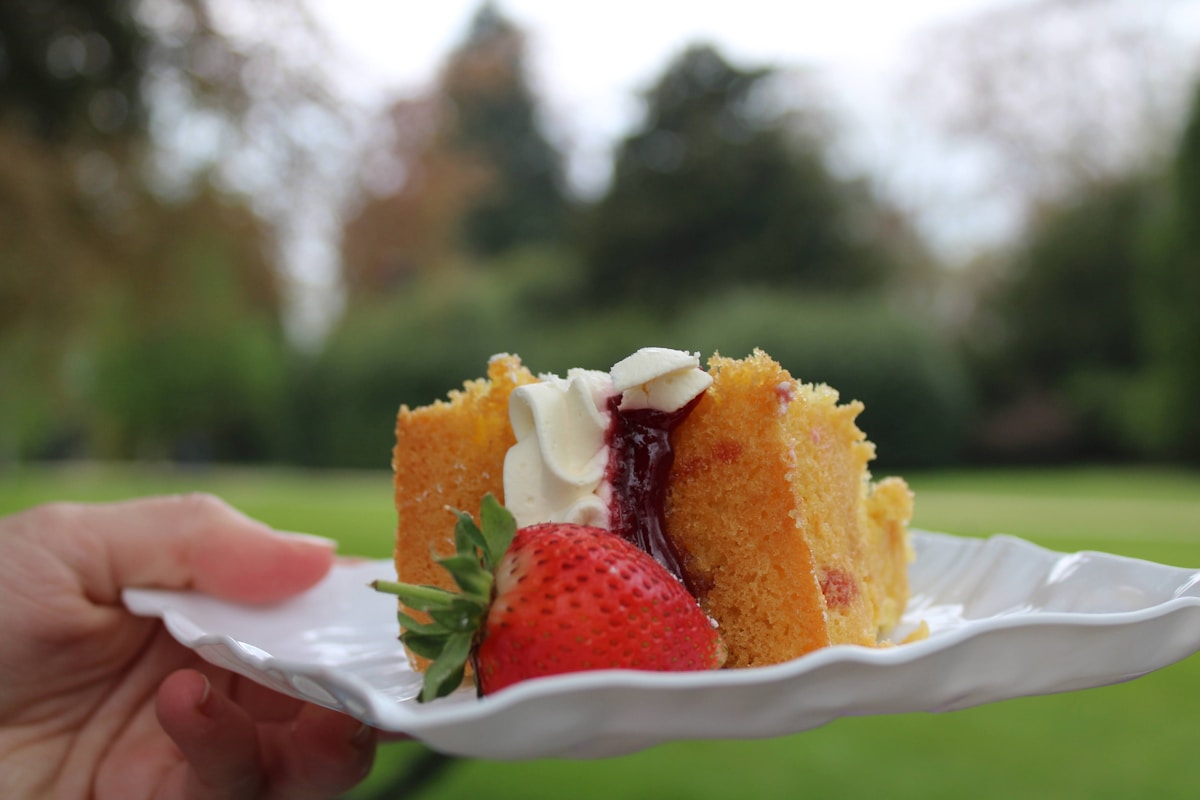
By cooking the fruit into the syrup, we extract all its delicious flavor and color, leaving most of that pesky water behind. When you brush this concentrated syrup over your cooled cake layers, the flavor soaks right into the sponge. The result is a cake that is evenly and intensely flavored from top to bottom, incredibly moist (in a good way!), and structurally perfect. (Your future self, the one frosting the cake, will thank you.)
This method gives you complete control. You can make the flavor as subtle or as punchy as you like. It works beautifully for almost any fruit—strawberries, raspberries, blueberries, cherries, peaches, you name it. It’s the key to making a truly memorable and delicious fruit-flavored cake that will stand tall and proud on the birthday table.
How to Make a Perfect Fruit Syrup for Your Cake
Ready to try it? It takes about 15 minutes and uses ingredients you probably already have. This recipe makes enough syrup for a standard two-layer 8-inch or 9-inch cake.
You Will Need:
- 1 cup (200g) granulated sugar
- 1 cup (240ml) water
- 1 to 1.5 cups of chopped fruit (fresh or frozen both work wonderfully!)
For our strawberry banana example, I’d use about 1 cup of sliced strawberries and one medium, ripe banana, mashed.
Step-by-Step Instructions:
-
Combine Ingredients: In a small saucepan, combine the sugar, water, and your prepared fruit. Give it a gentle stir.
-
Bring to a Simmer: Place the saucepan over medium heat. As it heats up, the sugar will dissolve. Bring the mixture to a gentle simmer. You don’t want a rapid, rolling boil, just soft bubbles.
-
Simmer and Thicken: Let the syrup simmer for about 10-15 minutes. During this time, the fruit will break down and release all its gorgeous flavor into the liquid. The syrup will thicken slightly. A good way to test it is to dip a spoon in; the syrup should coat the back of the spoon. For a strawberry syrup, it will turn a beautiful, vibrant pink.
-
Strain the Syrup: Once it’s done simmering, pour the mixture through a fine-mesh sieve into a heatproof bowl or measuring cup. Use the back of a spoon to gently press on the fruit solids to squeeze out every last drop of flavorful syrup. (Kitchen Hack: Don’t throw away that fruit pulp! It’s delicious swirled into yogurt or served over ice cream.)
-
Cool Completely: This is the most important step! You must let the syrup cool completely to room temperature before using it. Applying warm syrup to a cake will make it melt and turn gummy. You can pop it in the fridge to speed this up.
And that’s it! You now have a bottle of liquid gold that will transform your cakes forever.
The Art of Soaking: How to Apply Your Syrup
Once you have your baked and completely cooled cake layers and your completely cooled syrup, you’re ready for the final touch.
First, I recommend leveling your cake layers if they baked up with a dome. Use a long, serrated knife to carefully slice off the top for a perfectly flat surface. This creates a more porous surface for the syrup to soak into and makes for a much more stable, professional-looking cake.
Next, grab a pastry brush. A silicone one is great because it’s easy to clean. Dip the brush into your fruit syrup and gently brush it all over the surface of your cake layer. Don’t drench it! The goal is to apply a light, even coating. You’ll see the sponge absorb it almost immediately.
How much should you use? For a standard 8-inch cake layer, I typically use about 2 to 3 tablespoons of syrup per layer. You want the cake to be moist and flavorful, but not wet. Start with a small amount, let it soak in, and add a little more if needed. Pay special attention to the outer edges, as they tend to be the driest part of the cake.
After soaking each layer, you can proceed with filling and frosting your cake as you normally would. You’ll be amazed at how much easier it is to work with these stable, flavorful layers.
Frostings and Finishes for Your Flawless Fruit Cake
Because the syrup-soaked cake is so moist and flavorful on its own, you don’t need a heavy or overly sweet frosting. A simple, light frosting will let the fruit flavor shine.
My absolute favorite pairing is a classic stabilized whipped cream. It’s light, airy, and not too sweet, providing the perfect creamy contrast to the fruit-infused sponge. To stabilize it so it holds its shape, I just whip in a tablespoon or two of cornstarch or instant vanilla pudding mix along with the powdered sugar.
Another wonderful option is a simple cream cheese frosting, which has a delightful tang that cuts through the sweetness. And of course, a classic American buttercream is always a crowd-pleaser. You could even add a tablespoon or two of your leftover fruit syrup to the frosting for another layer of flavor!
The next time your child asks for a special fruit-flavored birthday cake, you can say “yes” with total confidence. This simple syrup method is your secret weapon for creating a cake that is not only packed with the flavors they love but is also a joy to bake, assemble, and, most importantly, share. Happy baking!

