We’ve all been there. You need a fast, crowd-pleasing dessert, and your mind immediately goes to Rice Krispie treats. They’re a classic for a reason: simple, quick, and satisfyingly sweet. But let’s be honest, they can also be a little one-dimensional. The flavor is pure, unadulterated sweetness from the marshmallow, with a bit of texture from the cereal. It’s pleasant, but rarely memorable.
For years, I accepted this as their fate. A reliable, if slightly boring, resident of the bake sale table. Then, I discovered a technique so simple, so transformative, it felt like uncovering a secret. It’s a single step that elevates this childhood staple into something truly gourmet, a dessert with depth, nuance, and an aroma that will fill your kitchen with warmth. That step? Browning the butter.
Baking is chemistry you can eat, and this is one of the most delicious experiments you can conduct in your own kitchen. By simply cooking your butter for a few extra minutes, you unlock a universe of flavor that completely changes the game. Once you try it, I promise you’ll never go back to just melting the butter again.
What Exactly is Brown Butter?
At its core, brown butter is just butter that has been cooked past the melting point until the milk solids within it toast and caramelize. The French, in their culinary wisdom, have a beautiful name for it: beurre noisette, which translates to “hazelnut butter.” This isn’t because it contains hazelnuts, but because the aroma it releases is uncannily similar to that of freshly toasted nuts.
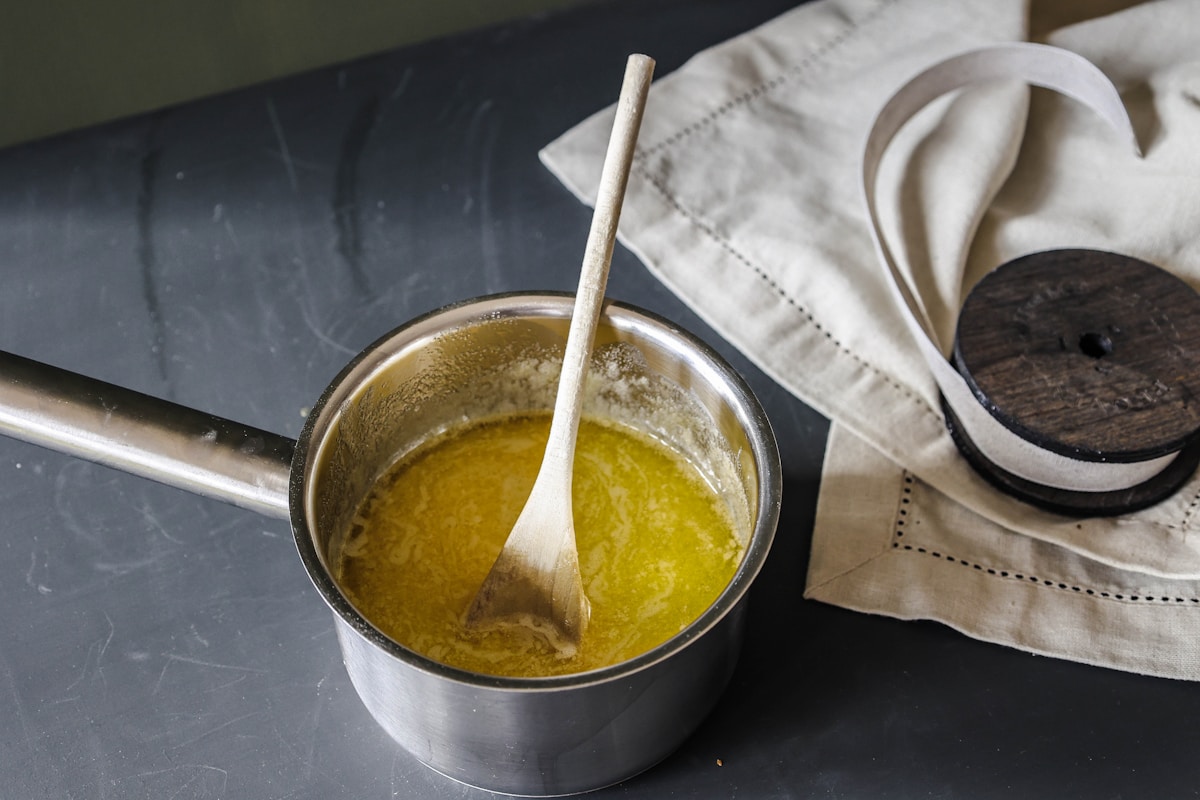
When you first melt butter in a pan, it separates into two main components: pure butterfat and milk solids (which are tiny particles of milk proteins and sugars). As you continue to apply heat, the water content in the butter cooks off, causing it to sputter and hiss. Once the water is gone, the temperature of the butterfat can rise above the boiling point of water, and this is where the magic begins. The milk solids, which have sunk to the bottom of the pan, begin to toast.
You’ll see them transform from pale white to a beautiful golden, and then to a rich, nutty brown. This is the visual cue that you’ve done it. The entire process takes only about 5 to 8 minutes, but it requires your full attention. The difference between beautifully browned butter and acrid, burnt butter is a matter of seconds. (Trust me on this one.)
The Science of Flavor: Chemistry You Can Eat
So, what’s actually happening in the pan on a molecular level? We’re initiating one of the most important chemical reactions in the culinary world: the Maillard reaction. This is the same reaction responsible for the brown crust on bread, the sear on a steak, and the deep flavor of roasted coffee.
The Maillard reaction is a complex cascade of chemical changes that occurs between amino acids (from the milk proteins) and reducing sugars (like lactose in the milk solids) when they are heated. At temperatures around 250-275°F (120-135°C), these compounds begin to react, creating hundreds of new aroma and flavor molecules. You get nutty, toasty, and caramel-like notes that simply don’t exist in plain melted butter.
Why does this work so brilliantly in Rice Krispie treats? It’s all about balance. Standard treats are a pure sugar rush. The browned butter introduces a savory, nutty complexity that cuts through the sweetness of the marshmallows. It adds a layer of depth that makes you pause and wonder, “What is that amazing flavor?” The slightly bitter, toasted notes provide a perfect counterpoint to the sugary goo, creating a more sophisticated and deeply satisfying dessert. It’s the difference between a simple sketch and a fully rendered painting.
The Step-by-Step Guide to Perfect Brown Butter
Making brown butter is easy, but it demands respect and attention. The key is to use your senses—your eyes, your ears, and especially your nose. Here’s how to do it perfectly every time.
Equipment:
- A light-colored saucepan (stainless steel or ceramic-coated is ideal). A dark, non-stick pan will make it impossible to see the color of the milk solids changing.
- A heat-proof spatula for stirring.
Process:
- Melt: Place your butter in the saucepan over medium heat. Let it melt completely.
- Foam: As it heats, the butter will begin to foam up. This is the water content beginning to separate and cook off.
- Sputter: The foaming will be followed by a more vigorous sputtering and popping sound. This is a good sign! It means the water is evaporating, allowing the butterfat’s temperature to rise.
- Watch & Swirl: Once the sputtering quiets down, the browning will happen quickly. Swirl the pan gently every 15-20 seconds to ensure the milk solids at the bottom are heating evenly. You’ll start to see them turn from pale to a light tan.
- Smell & See: The most important cue is the aroma. Your kitchen will suddenly fill with a rich, nutty scent. Look closely at the bottom of the pan—the solids should now be a deep golden-brown, like the color of an almond’s skin. The butterfat itself will be a clear, amber color.
- Stop: The moment you reach this stage, immediately remove the pan from the heat. The residual heat in the pan will continue to cook the butter, so you want to stop just as it hits that perfect color. Pour the brown butter, including all the toasted bits at the bottom (that’s where the flavor is!), into your bowl for the next step.
The Ultimate Brown Butter Rice Krispie Treat Recipe
This recipe is designed to maximize flavor and texture. We use a little extra butter to account for water evaporation during browning, a splash of vanilla to round out the flavor, and a generous pinch of flaky sea salt to make everything pop.
Yields: 16 small squares Prep time: 10 minutes Set time: 1 hour
Ingredients:
- 8 tablespoons (1/2 cup or 113g) unsalted butter (I use a quality brand like Land O’Lakes or Plugrà)
- 1 (10-ounce / 283g) bag of mini marshmallows (Jet-Puffed works great)
- 1 teaspoon pure vanilla extract
- 6 cups (about 170g) puffed rice cereal (Kellogg’s Rice Krispies are the standard)
- 1/2 teaspoon flaky sea salt, like Maldon, plus more for sprinkling
Instructions:
- Prepare Your Pan: Lightly grease a 9x9-inch or 8x8-inch baking pan with butter or non-stick spray. Set aside.
- Brown the Butter: In a medium, light-colored saucepan or Dutch oven, brown the 8 tablespoons of butter over medium heat using the method detailed in the section above. Watch it carefully until the milk solids are toasted brown and the aroma is intensely nutty.
- Melt the Marshmallows: As soon as the butter is browned, remove the pan from the heat. Immediately add the entire bag of mini marshmallows to the hot butter. The residual heat is plenty to melt them. Stir constantly with a spatula until the marshmallows are completely melted and the mixture is smooth and incorporated with the brown butter.
- Add Flavor: Stir in the vanilla extract and the 1/2 teaspoon of flaky sea salt.
- Combine: Pour the puffed rice cereal into the marshmallow mixture. Using your spatula, gently fold the cereal in until it is just evenly coated. Be careful not to overmix or you’ll crush the delicate cereal, leading to dense treats.
- Press Gently: Scrape the mixture into your prepared pan. Here is a critical tip: do not pack it down firmly. Use a greased spatula or a piece of parchment paper to gently press the mixture into an even layer. Compacting it is the number one cause of hard, dense Rice Krispie treats.
- Finish & Set: Sprinkle the top generously with a little more flaky sea salt. Let the treats cool and set at room temperature for at least one hour before cutting and serving. (Your future self will thank you for being patient.)
Troubleshooting and Pro-Tips
Even a simple recipe can have pitfalls. Here’s how to navigate them.
-
Problem: My butter went from brown to black!
- Cause: This happens fast. The heat was likely too high, or you stepped away for a moment too long. Burnt butter tastes bitter and acrid.
- Fix: There’s no saving it. You must discard it and start over. Next time, use slightly lower heat and don’t take your eyes off the pan once the sputtering stops.
-
Problem: My treats are rock hard.
- Cause: Two main culprits here. Either the marshmallow mixture was overheated, causing the sugar to crystallize and harden, or you pressed the mixture into the pan too aggressively.
- Fix: Always melt the marshmallows off the heat, using only the residual heat from the browned butter. When spreading them in the pan, think ‘patting’ not ‘packing.’ You just want to guide them into the corners.
-
Kitchen Hack: The Double Toast
- Want to take the nutty flavor to an even higher level? Before you start, spread your 6 cups of puffed rice cereal on a baking sheet and toast it in the oven at 350°F (175°C) for about 5-7 minutes, until it’s fragrant and ever-so-slightly golden. Let it cool completely before adding it to the marshmallow mixture. This second layer of toasting deepens the flavor profile in a remarkable way.
This simple, scientific upgrade transforms a basic treat into something special. It’s a perfect example of how understanding a fundamental technique—the Maillard reaction—can have a massive impact on your baking. It’s not just a recipe; it’s a lesson in flavor development, and the delicious results speak for themselves.