We all have a memory of a classic Rice Krispie treat. That simple, sweet, and satisfyingly crunchy square from a school bake sale or an after-school snack. It’s a foundation of home baking for a reason: it’s nearly foolproof. But have you ever found them a little… one-dimensional? The sweetness from the marshmallow often overpowers everything else, leaving you with a pleasant but forgettable treat.
For years, I felt the same way. Then I stumbled upon a technique that didn’t just improve the recipe—it completely transformed it. It’s a five-minute process that turns a simple children’s snack into a sophisticated confection with layers of flavor. The secret? Browning the butter.
This isn’t just about melting butter; it’s about fundamentally changing its chemical structure to create new, complex flavors. This is where baking becomes chemistry you can eat, and it’s the key to making the best Rice Krispie treats you’ve ever had.
The Beautiful Science of Brown Butter
So, what is happening in the pan during those few extra minutes? When you heat butter past its melting point, you’re not just turning a solid into a liquid. You’re initiating one of the most magical reactions in all of cooking: the Maillard reaction.
Butter is an emulsion of water, fat, and milk solids. Those milk solids, which make up about 1-2% of the butter, are where the magic lies. They are composed of proteins (primarily casein) and sugar (lactose). When you heat them to a temperature between 260°F and 280°F (127°C - 138°C), the proteins and sugars begin to react and rearrange themselves, creating hundreds of new aromatic compounds.
This is the exact same reaction that gives a seared steak its deeply savory crust, roasted coffee its aroma, and a loaf of bread its golden-brown exterior. In the case of butter, it creates compounds that our noses and tongues register as nutty, toasty, and deeply caramelized. The resulting liquid, what we call beurre noisette or brown butter, is no longer just melted fat; it’s a complex flavor agent.
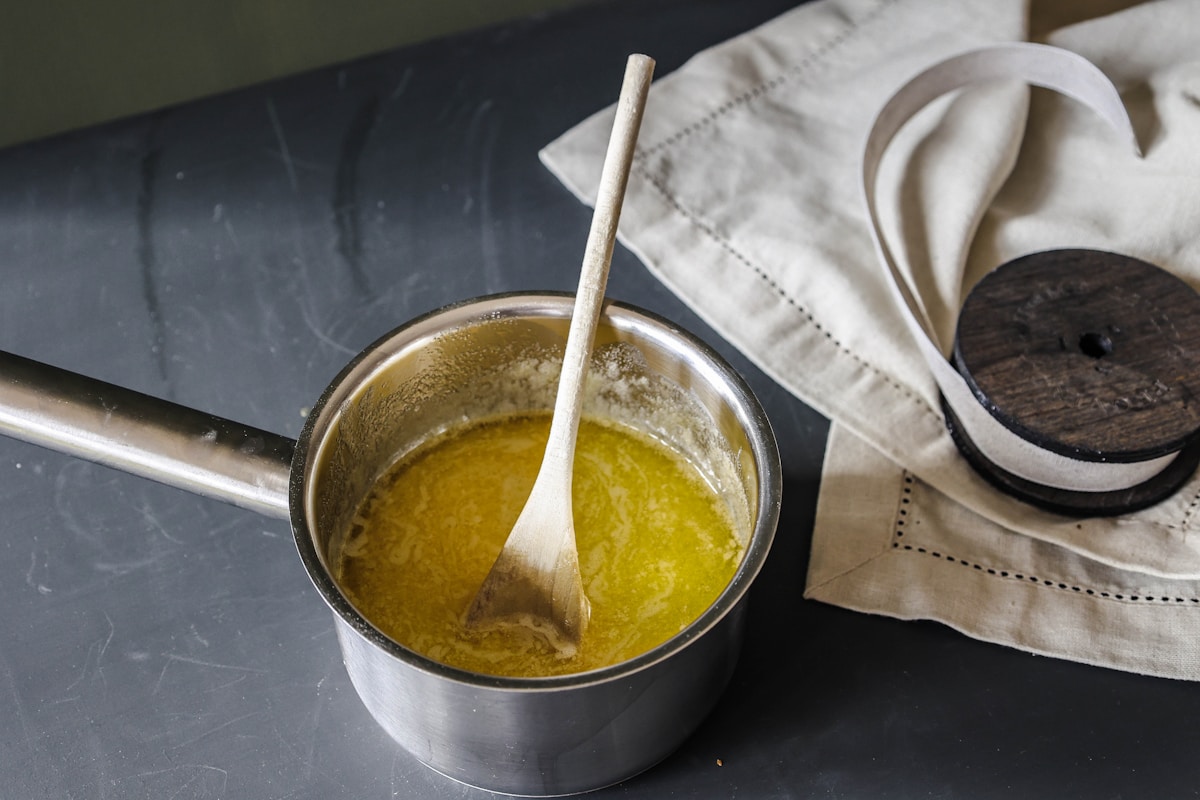
You’ll know it’s happening when your kitchen starts to fill with an intoxicatingly nutty aroma. The butter will foam, then the foam will subside, and you’ll see tiny brown specks forming at the bottom of the pan. These specks are the toasted milk solids, and they are pure flavor. (Don’t ever discard them!) This single, simple step adds a savory depth and a toffee-like note that beautifully cuts through the pure sweetness of the marshmallows.
Mastering the Technique A Practical Guide
Browning butter is simple, but it requires your full attention. The line between perfectly browned and acridly burnt is frustratingly thin. Follow these steps, and you’ll nail it every time.
1. Choose Your Equipment: Use a light-colored saucepan (stainless steel or enameled cast iron). A dark pan makes it nearly impossible to judge the color of the milk solids, which is your most important visual cue.
2. The Process: Place your measured butter in the pan over medium heat. Don’t walk away. The process unfolds in stages:
- Melting (Minute 1): The butter will melt completely. Nothing exciting yet.
- Foaming (Minutes 2-3): As the water in the butter cooks off, it will begin to foam and sputter quite vigorously. This is normal. The foam can obscure your view, so swirl the pan gently and continuously.
- Clearing (Minute 4): The sputtering will subside as the water evaporates. The foam will begin to thin, and you’ll be able to see the bottom of the pan more clearly. This is the critical moment. Your nose is your best guide here; you’ll start to smell that distinct nutty aroma.
- Browning (Minute 5): Look closely. You’ll see tiny, tan-colored specks appearing at the bottom of the pan. The butter itself will have turned from a pale yellow to a beautiful amber-brown. As soon as you see these specks and the color is right, immediately remove the pan from the heat.
Troubleshooting Tip: If you see black specks or smell anything acrid or bitter, you’ve gone too far. Unfortunately, there is no saving burnt butter. You must discard it and start over. It happens to everyone, so don’t be discouraged. The key is to trust your eyes and nose and pull it from the heat the second it reaches that perfect nutty-brown stage.
The Definitive Brown Butter Rice Krispie Treat Recipe
Now let’s put that beautiful brown butter to work. The salt and vanilla are not optional here; they are crucial supporting players that enhance the star of the show.
Yields: 16 squares Prep time: 10 minutes Set time: 1 hour
Ingredients:
- 6 tablespoons (85g) unsalted butter
- 1 (10-ounce / 283g) bag of mini marshmallows
- 1 teaspoon pure vanilla extract
- 1/2 teaspoon coarse or flaky sea salt (like Maldon), plus more for sprinkling
- 6 cups (about 180g) crisp rice cereal (like Kellogg’s Rice Krispies)
Instructions:
- Prepare Your Pan: Lightly grease a 9x9 inch square baking pan or line it with parchment paper, leaving an overhang on two sides to use as handles later.
- Brown the Butter: In a large Dutch oven or light-colored pot, melt the unsalted butter over medium heat. Continue cooking, swirling the pan frequently, until the butter foams, the sputtering subsides, and you see brown specks at the bottom and smell a nutty aroma. This should take about 5-7 minutes.
- Melt the Marshmallows: Immediately remove the pan from the heat. Add the entire bag of mini marshmallows, the vanilla extract, and the 1/2 teaspoon of sea salt. The residual heat from the pan will be enough to melt them. Stir constantly with a silicone spatula until the mixture is completely smooth and combined. (Working off the heat prevents the marshmallow sugar from getting too hot and creating a rock-hard treat.)
- Combine with Cereal: Pour the 6 cups of crisp rice cereal into the pot. Gently fold with your spatula until the cereal is evenly coated in the marshmallow mixture.
- Press into Pan: Scrape the mixture into your prepared pan. To press it down without it sticking to your hands, you can use the back of your spatula (lightly greased) or place a piece of parchment paper on top and gently press down with your hands. Do not pack it down firmly. A gentle press is all that is needed to form an even layer. Compacting it too much is a primary cause of hard treats.
- Finish and Set: Sprinkle a little extra flaky sea salt over the top. Let the treats cool at room temperature for at least one hour to set completely before slicing into squares.
Common Pitfalls and Pro-Level Upgrades
Even with a simple recipe, things can go sideways. Here’s how to ensure perfection.
-
Why are my treats rock-hard? Two likely culprits. First, you overheated the marshmallows. Melting them off the heat using the residual heat of the pot prevents the sugar from crystallizing. Second, you pressed the mixture into the pan too aggressively. Be gentle!
-
Can I use salted butter? You can, but I recommend against it. Using unsalted butter and adding your own salt gives you complete control over the final flavor. If you only have salted butter, reduce the added salt to 1/4 teaspoon.
-
Freshness Matters: Use a fresh bag of marshmallows. Older marshmallows dry out, lose moisture, and don’t melt as smoothly, which can contribute to a tougher final product.
-
Pro-Level Upgrades: The nutty flavor of brown butter pairs beautifully with other ingredients. Consider adding 1/2 cup of toasted pecans or walnuts along with the cereal. A handful of dark chocolate chunks folded in at the end creates a wonderful sweet and bitter contrast. For an even more grown-up version, a swirl of salted caramel sauce on top before setting is absolutely divine.

