The Cow Pat Chronicles: My Journey to Brownie Cookie Perfection
Let me paint you a picture: you pull a tray of what should be glossy, crackly brownie cookies out of the oven, and instead you’re met with a sad, greasy puddle that looks less like a cookie and more like… well, a cow pat. That’s exactly what happened to a Reddit baker in r/Baking earlier this year, and I’ve been there too. The frustration is real. Brownie cookies sit in that magical sweet spot between a rich, fudgy brownie and a chewy cookie, but they’re notoriously finicky. One bad batch after another—flat discs, cakey hockey pucks, or burnt edges with raw centers—can make you want to throw in the towel. But I promise you, with a little understanding of the science behind these treats, you can nail them every time. Let me walk you through exactly what went wrong with those “cow pats” and how to fix it for good.
Why Your Brownie Cookies Spread Like Pancakes (and What to Do About It)
Flat brownie cookies are the most common failure, and it’s almost always down to one of four culprits: over-softened butter, too much sugar, insufficient chilling, or old baking soda. Let’s break them down.
Butter temperature matters more than you think. Most cookie recipes call for creamed room-temperature butter and sugar, which incorporates air and gives a lighter, cakier texture. But brownie cookies are different. They need density. That’s why the winning recipe—the one that finally worked for that Reddit user—uses melted butter. Melted butter coats the flour proteins more efficiently, limiting gluten development and producing a denser, fudgier crumb. It also reduces the amount of air you’d normally beat in, so the cookies stay thicker during baking. If you use softened butter and cream it, you’re essentially making a cakey cookie that will spread more.
Sugar is both friend and foe. Brown sugar adds moisture and chewiness because of its molasses content, but too much of any sugar can cause excessive spreading. Sugar is hygroscopic—it attracts water—and in the oven, it melts and turns the dough into a puddle before the structure sets. For brownie cookies, stick to a ratio of about 1 cup brown sugar to 1/2 cup white sugar per 2 cups flour. Any more, and you’re asking for trouble. Also, make sure your sugar is well incorporated into the melted butter; if you see graininess, you haven’t dissolved it enough.
Chilling is non-negotiable. The Reddit user’s successful recipe called for a 20-minute chill before baking. I’ve found that 30 minutes to 1 hour works even better. Chilling solidifies the fat back up, which means the cookies spread slower in the oven. It also gives the flour time to hydrate fully, reducing spread and improving texture. Don’t skip this step, even if you’re in a hurry. If your dough is warm or even room temperature, those cookies will flatten as soon as they hit the heat.
Check your leavener. Baking soda loses potency after about 6 months. If your soda is old, it won’t produce enough carbon dioxide to give the cookies a little lift (they need some height, just not too much). For brownie cookies, you want a modest amount—about 1/2 teaspoon per 2 cups of flour. Too much baking soda and they’ll puff up and then collapse into thin wafers. Test your baking soda by dropping a pinch into vinegar; if it fizzes vigorously, it’s good.
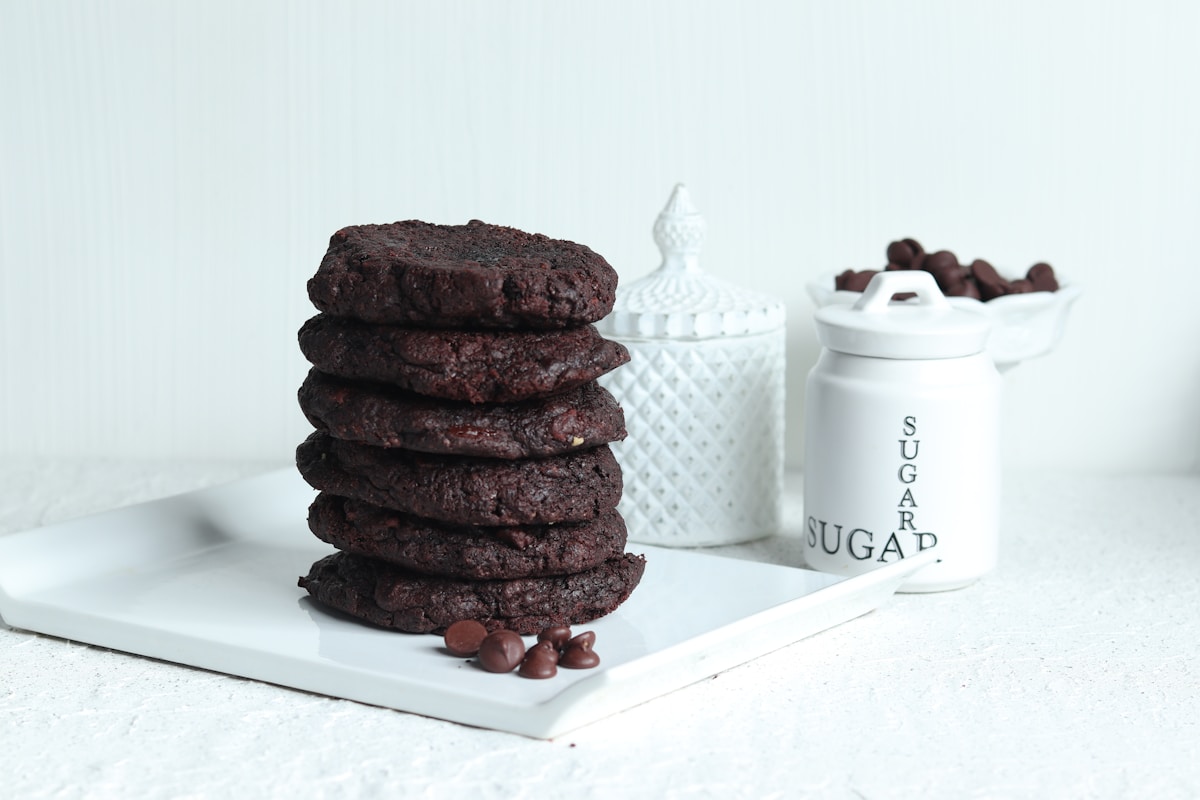
The Science of a Fudgy Center with Crackly Edges
The perfect brownie cookie has a thin, crackly crust and a soft, gooey interior that’s almost like brownie batter. That texture comes from a precise balance of ingredients and technique.
Cocoa powder vs. chocolate chips. Most successful recipes use a combination of cocoa powder and chopped chocolate or chocolate chips. Cocoa powder (Dutch-processed is my preference for its smoothness, but natural works too) provides the deep chocolate flavor without adding extra fat. Chocolate chips add richness and structure when they melt and re-solidify. For a 2-cup-flour batch, I use 1/2 cup cocoa powder and 1 cup chocolate chips (60-70% cacao works perfectly). Brands like Ghirardelli for chips and King Arthur Flour’s Dutch-Process Cocoa are reliable.
The egg count. Eggs provide structure and moisture. For brownie cookies, two large eggs per 2 cups of flour is standard. But here’s a trick: after adding the eggs to your melted butter mixture, whisk vigorously for about 30 seconds. This incorporates air and helps create that crackly top. But don’t overmix after adding the flour, or you’ll develop gluten and end up with tough, cakey cookies.
Baking at 350°F (175°C) for 10-12 minutes. The exact time depends on your oven and the size of your cookie scoop. I use a standard 1.5-tablespoon scoop. The key is to pull them when the edges are set but the centers still look slightly underdone and shiny. They will continue to bake on the hot sheet pan after you remove them from the oven. If you wait until the centers look baked, you’ll end up with dry, cakey cookies. Let them rest on the pan for 2-3 minutes, then transfer to a wire rack to cool completely.
A Foolproof Brownie Cookie Recipe (Finally)
Here’s the recipe that turned my cow pats into gold. It’s adapted from King Arthur Baking’s version, with a few tweaks based on the Reddit community’s advice.
Ingredients:
- 1/2 cup (113g) unsalted butter, melted and slightly cooled
- 1 cup (200g) packed light brown sugar
- 1/2 cup (100g) granulated sugar
- 2 large eggs, at room temperature
- 2 teaspoons vanilla extract
- 1 cup (120g) all-purpose flour (I use King Arthur Unbleached)
- 1/2 cup (50g) Dutch-processed cocoa powder (or natural)
- 1/2 teaspoon salt
- 1/2 teaspoon baking soda (check freshness!)
- 1 cup (170g) semi-sweet chocolate chips or chopped chocolate
Instructions:
- In a large bowl, whisk together the melted butter, brown sugar, and granulated sugar until smooth and no lumps remain. The mixture should look like wet sand.
- Add the eggs one at a time, whisking well after each. Then add vanilla and whisk for 30 seconds until the mixture is slightly thick and pale.
- In a separate bowl, sift together the flour, cocoa powder, salt, and baking soda. Add the dry ingredients to the wet and fold gently with a spatula until just combined. Do not overmix.
- Fold in the chocolate chips until evenly distributed.
- Cover the dough and refrigerate for at least 30 minutes (20 minutes minimum). This is not optional.
- Preheat your oven to 350°F (175°C) with racks in the middle. Line two baking sheets with parchment paper.
- Using a 1.5-tablespoon cookie scoop, portion the dough into balls and place them 2 inches apart on the prepared sheets. If the dough is too sticky, slightly wet your hands to roll them.
- Bake one sheet at a time for 10-12 minutes. The centers should still look wet and puffed, and the edges should be set. If you press gently, the top should spring back slightly but still feel soft.
- Remove from oven and let cool on the pan for 3 minutes. Then transfer to a wire rack to cool completely. They will set up as they cool.
Troubleshooting: What Went Wrong With Your Last Batch
Even with the right recipe, things can go sideways. Let’s diagnose the most common issues:
“My cookies spread into thin discs.”
- Causes: Dough not chilled enough, butter too warm, too much sugar, or too little flour.
- Fix: Chill your dough for a full hour. Measure your flour by weight (120g per cup) rather than scooping, which can compress it. Reduce sugar by 2 tablespoons next time.
“My cookies are puffy and cakey.”
- Causes: You used creamed butter instead of melted, or you overmixed after adding flour. Also, too much egg can cause a cake-like rise.
- Fix: Stick to melted butter, and fold dry ingredients in 10-12 strokes only. Use exactly 2 eggs for this batch size.
“My cookies are dry and crumbly.”
- Causes: Overbaked, or too much flour. Flour measured by volume can easily be 150g instead of 120g, ruining the moisture balance.
- Fix: Pull them at the 10-minute mark if your oven runs hot. Weigh your flour. Also, try adding an extra tablespoon of milk to the dough if it seems too dry.
“The tops are not crackly.”
- Causes: Insufficient whisking after adding eggs. That 30-second whisk is crucial for surface tension.
- Fix: Whisk vigorously after each egg, and make sure the mixture is pale and slightly thicker before adding dry ingredients.
Pro Tips for Brownie Cookie Success
Here are a few kitchen hacks I’ve learned from dozens of batches:
Use a quality cookie scoop. A #30 scoop (about 2 tablespoons) gives uniform sizing, which ensures even baking. I swear by OXO Good Grips stainless steel scoop—it’s under $10 and has a trigger release that keeps your hands clean.
Line your pans with parchment. Silicone mats can cause the cookies to spread a bit more because they’re non-stick and the fat has less friction. Parchment paper gives a slight grip that helps them stay rounded.
Don’t skip the salt. Salt balances sweetness and enhances chocolate flavor. Use fine sea salt (not iodized) for even distribution. A flaky sea salt like Maldon sprinkled on top before baking adds a delightful crunch.
Let them cool completely on the rack. If you wrap or stack them while still warm, the moisture will soften the crackly top. For maximum chewiness, store in an airtight container with a slice of bread to maintain humidity.
The Takeaway: Baking as Chemistry You Can Eat
Brownie cookies taught me that baking really is chemistry you can eat. Every flat cow pat was a lesson in fat quantity, chilling, and oven temperature. The next time you’re tempted to skip the chill or use old baking soda, remember that those tiny variables are the difference between a fudgy delight and a disappointing pancake. Armed with melted butter, a good chilling, and a thermometer, you’re now ready to create the perfect brownie cookie. And when you pull that sheet pan out of the oven and see those crackly, domed cookies with their molten centers, you’ll know all that science was worth it. Happy baking!


