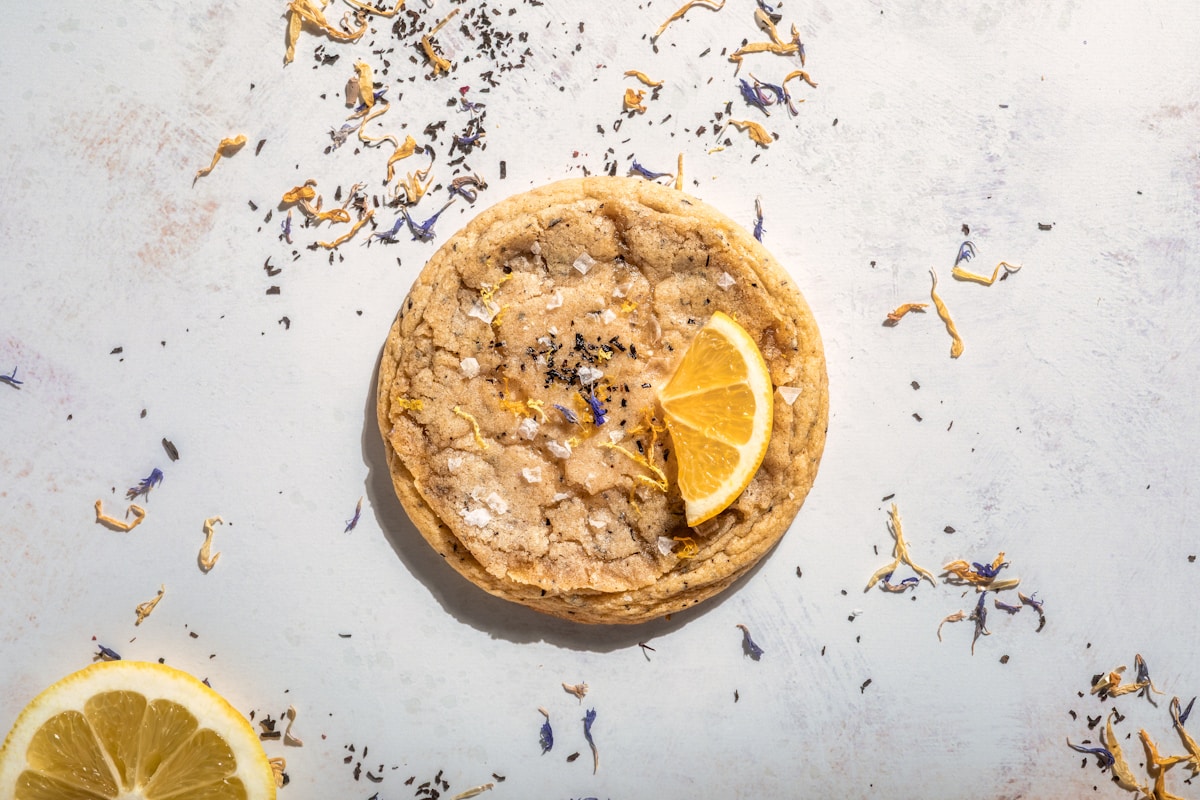
You pictured it perfectly, didn’t you? A batch of buttery, golden-brown cookies, each one crowned with a jewel-like slice of vibrant orange. It’s the kind of bake that looks like it belongs in a fancy café window. You pull them from the oven, they cool on the rack, and you take that first excited bite… only to be met with a wave of surprising bitterness and a slightly soggy center.
Don’t hang up your apron just yet! This is one of the most common frustrations when bakers venture into using fresh fruit, and I promise you, it’s not your fault. It’s just a little bit of kitchen science at play. That beautiful orange has a secret weapon—a bitter pith and a lot of water—that can sabotage a perfectly good cookie.
But what if I told you the solution is incredibly simple? All it takes is one ingredient you already have in your pantry and about 20 extra minutes of (mostly hands-off) time. Today, we’re going to turn that baking disappointment into a resounding success. We’re going to learn the simple, magical technique of sugar-coating fruit slices, ensuring every cookie is as delicious as it is beautiful.
Why Fresh Fruit Can Be Tricky in Baking
Before we get to the fix, let’s understand the problem. When you know the why, the how makes so much more sense. There are two main culprits when you bake with raw citrus slices: water and bitterness.
First, let’s talk about water content. A fresh orange slice is packed with juice. (That’s why they’re so delicious!) But when you place that slice on top of cookie dough, all that moisture has to go somewhere as the oven heats up. It seeps into the dough directly underneath it, creating a little steam pocket. This prevents that part of the cookie from baking properly, leaving you with a gummy, under-baked spot right in the center. Think of it like trying to bake a cookie with a tiny, wet sponge on top—it just doesn’t work.
Second, and perhaps more offensively to our taste buds, is the bitterness. This comes from the white part of the orange, the layer between the vibrant peel and the juicy flesh, called the pith. In its raw state, it has a subtle bitterness. But when you apply heat, that flavor intensifies, becoming sharp and unpleasant. It can easily overpower the sweet, buttery flavor of your cookie, which is the exact opposite of what you were hoping for.
So, the challenge is twofold: we need to gently remove some of that excess water and we need to neutralize the bitterness of the pith. And luckily, a simple bowl of sugar is the hero we need.
The Magic of a Simple Sugar Coat
This isn’t about making complicated, slow-simmered candied oranges that take hours. This is a quick, pre-baking treatment that solves both of our problems in one elegant step. The science behind it is wonderfully straightforward.
Sugar is hygroscopic, which is a fancy way of saying it loves to attract and hold onto water molecules. When you press a fresh orange slice into a bed of granulated sugar, a process called osmosis begins immediately. The sugar crystals on the surface start pulling moisture out of the orange slice.
This does two amazing things for us:
-
It Dehydrates the Slice (Just a Little): As the water is drawn out, the orange slice becomes less watery. This concentrates its wonderful citrus flavor and, most importantly, prevents it from turning your cookie into a soggy mess. You’ll actually see the liquid pooling on the surface of the slice or dripping onto the plate below. That’s moisture that is not going into your cookie dough.
-
It Tames the Bitterness: The sugar coating creates a protective barrier around the slice. As it bakes, this sugar melts and caramelizes slightly, creating a sweet glaze that perfectly balances and neutralizes any bitterness from the pith. Instead of a sharp, jarring flavor, you get a lovely, complex marmalade-like taste that beautifully complements the orange itself.
Essentially, you’re giving the orange slice a sweet, protective jacket before it heads into the hot oven. It’s a simple step that makes a world of difference.
Step-by-Step Guide to Perfect Orange Slice Cookies
Ready to try it? Let’s walk through the process together. For this, you’ll want a sturdy cookie dough that can support the fruit. A classic sugar cookie or a simple shortbread is a perfect canvas. Avoid very light, cakey, or delicate doughs.
What You’ll Need:
- 1 medium-sized orange (Navel oranges are great because they’re seedless and sweet)
- About 1/2 cup of granulated white sugar
- Your favorite sugar cookie or shortbread dough, ready to be baked
- A sharp knife (a serrated one can be helpful for clean cuts)
- A plate or shallow bowl for the sugar
- A wire cooling rack and a baking sheet
- Parchment paper
The Method:
-
Prep Your Oranges: Wash and dry the orange thoroughly. The most important part of this step is slicing it correctly. You want very thin, uniform slices, about 1/8-inch (or 3mm) thick. If the slices are too thick, they’ll hold too much moisture for even the sugar to handle. Take your time here for the best results.
-
Give Them a Sugar Bath: Spread your granulated sugar on the plate. Take one orange slice at a time and press it firmly into the sugar, coating one side completely. Flip it over and do the same to the other side. Don’t be shy; you want a generous, even coating.
-
Let Them Rest (This is Crucial!): Place the sugar-coated slices in a single layer on the wire rack. Set the rack over a baking sheet to catch any drips. Now, just walk away for about 20 to 30 minutes. During this time, you will see the magic happen. The sugar will begin to look wet as it pulls the juice from the orange. This resting period is what ensures your cookies won’t be soggy.
-
Assemble Your Cookies: While the slices are resting, portion out your cookie dough. Roll the dough into balls and place them on your parchment-lined baking sheet, leaving space for them to spread. Once the orange slices have rested, gently pick one up (it will be a bit syrupy) and press it lightly onto the top of a cookie dough ball.
-
Time to Bake: Bake the cookies according to your recipe’s instructions. Typically, for a sugar cookie, this will be around 350°F (175°C) for 10-14 minutes. The cookies should be golden at the edges, and the orange slice on top will look glossy and slightly caramelized. Let them cool on the baking sheet for a few minutes before transferring them to the wire rack to cool completely.
Troubleshooting and Common Questions
Even with a simple technique, questions can pop up. Here are a few common ones I hear:
-
“My cookies were still a little wet in the middle. What happened?” Nine times out of ten, this means the orange slices were either cut too thick or didn’t rest long enough in the sugar. Next time, try for even thinner slices and don’t skip the full 30-minute rest.
-
“Can I use other types of sugar?” Granulated white sugar is definitely the best choice. Its crystal structure is ideal for drawing out moisture. Brown sugar has too much moisture itself, and powdered sugar will just dissolve into a paste immediately without doing the work we need it to do.
-
“Will this work with other fruits?” Absolutely! This is a fantastic technique for thin slices of lemon, lime, and even firm, crisp apples or pears. For something like a grapefruit, you might want to cut the slices into smaller, more manageable segments. The principle is the same: draw out water, balance flavor.
Try This Tonight: Beyond the Cookie
Now that you’ve mastered this skill, don’t just stop at cookies! This technique is a gateway to so many other beautiful and delicious creations.
Here’s a fantastic Kitchen Hack for you: If you have any leftover sugared orange slices, don’t throw them away! Place them on a parchment-lined baking sheet and bake them in a very low oven—around 200°F (95°C)—for 1 to 2 hours, flipping them halfway through. They will slowly dry out and become crisp, creating the most delicious, simple candied orange chips. You can use them to decorate a cake, garnish a cocktail, or even just drop one into a cup of hot tea for an instant flavor boost.
You can also use this pre-treatment method for slices to top a simple vanilla pound cake or a batch of muffins before they go into the oven. The result is a stunning, professional-looking bake with a perfectly balanced fruity flavor.
So go ahead, grab that orange that’s been sitting in your fruit bowl. You now hold the secret to turning it into a spectacular, delicious, and—most importantly—bitter-free addition to your baking. Happy baking!


