Have you ever scrolled through pictures of glorious, bubbly, golden-brown pizza, the kind with that perfectly crispy crust, only to click on the recipe and see those dreaded words: “Using the dough hook of a stand mixer…”?
I see you. I’ve been there. Your heart sinks a little. You glance over at your countertop, notably empty of a big, heavy, and often expensive KitchenAid, and you think, “Well, I guess that’s not for me.”
I am here today, with flour on my apron, to tell you that is absolutely, 100% not true. You do not need a stand mixer to make incredible, life-changing pizza. In fact, I think that for beginners, skipping the mixer is actually the better way to learn. You get a real feel for the dough, you understand how it changes, and you build a confidence that no machine can give you.
Today, we’re going to make a beautiful cast iron pan pizza. It’s crispy, chewy, cheesy, and deeply satisfying. And we’re going to do it all with a bowl, a spoon, and our own two hands. Ready? Let’s begin.
Why Your Hands Are Better Than a Machine (Seriously)
The whole point of kneading dough, whether with a machine or by hand, is to develop something called gluten. Don’t let the word scare you; it’s not complicated. Think of gluten as a tiny, stretchy net inside your dough. As you work the dough, that net gets stronger and more organized. When the yeast in your dough creates gas bubbles, this strong net traps them, which is what gives bread and pizza crust that lovely, airy, chewy texture.
A stand mixer develops gluten with brute force, using a hook to stretch and slam the dough around for ten minutes. But there’s another, gentler way: hydration and time.
When you use a high-hydration dough (which just means it has a higher percentage of water), the flour naturally absorbs all that moisture and starts to form gluten bonds all by itself. This process is called autolyse. Instead of forceful kneading, we’re going to use a simple technique called the “stretch and fold.” It’s exactly what it sounds like: you’ll gently stretch a section of the dough up and fold it over itself. A few sets of these simple folds, with some rest time in between, is all it takes to build a gluten network that’s just as strong as one made in a mixer.
The dough will be sticky. That’s a good thing! Stickiness means high hydration, and high hydration means a tender, airy crust. Your secret weapon for handling it? Wet hands. A little water on your fingertips prevents the dough from sticking to you. (Trust me on this one.)
Your Cast Iron Skillet’s Secret Superpower
Now, let’s talk about the other hero of this recipe: the cast iron skillet. Your heavy black pan—maybe that trusty 10 or 12-inch Lodge skillet you use for everything—is about to become your favorite pizza stone. Here’s why it’s perfect for beginners.
Most home ovens can’t get anywhere near the blistering temperatures of a professional pizza oven (we’re talking 900°F / 480°C). This is why homemade pizza can sometimes end up with a pale, soft, disappointing crust.
A cast iron skillet completely solves this problem. It gets ripping hot and, more importantly, it holds that heat incredibly well. When you assemble your pizza in a well-oiled cast iron pan, you’re not just baking it; you’re essentially frying the bottom of the crust. The olive oil heats up and sizzles, creating a golden-brown, unbelievably crispy foundation that can stand up to any toppings. It gives you that restaurant-quality crunch, even from a standard 475°F / 245°C oven.
Let’s Make Dough Your New Best Friend
Alright, enough talk. Let’s make some dough. This recipe is designed to be as forgiving as possible. The measurements are here, but don’t stress about perfection. Cooking is about feeling, and this is the perfect recipe to start building that intuition.
Ingredients You’ll Need:
- 400g Bread Flour (about 3 cups, plus a little for dusting)
- 300g Warm Water (about 1 1/4 cups, around 95°F / 35°C - like warm tap water)
- 8g Fine Sea Salt (about 1 1/2 teaspoons)
- 2g Instant Yeast (about 1/2 teaspoon)
- 1 tablespoon Olive Oil, plus more for the bowl and pan
Step-by-Step Instructions:
-
The Shaggy Mix: In a large bowl, whisk together the bread flour, salt, and instant yeast. Pour in the warm water and the tablespoon of olive oil. Mix with a spoon or your hand until it forms a shaggy, sticky ball and there are no dry patches of flour left. That’s it! No kneading. Scrape down the sides of the bowl, cover it with a plate or plastic wrap, and let it rest on your counter for 30 minutes.
-
The First Stretch and Fold: After 30 minutes, wet your hands. Uncover the dough. Reach into the bowl, grab one side of the dough, gently stretch it upward, and fold it over the center. Rotate the bowl a quarter turn and repeat. Do this a total of 4 times (top, bottom, left, right). The dough will already feel a bit smoother. Cover and let it rest for another 20-30 minutes.
-
Two More Folds: Repeat the stretch-and-fold process two more times, with a 20-30 minute rest in between each set. By the third fold, you’ll notice a huge difference. The dough will be smooth, elastic, and will hold its shape much better. It’s alive!
-
The Rise (Bulk Fermentation): After your final fold, drizzle a little olive oil on top of the dough and turn it over to coat. Cover the bowl tightly and let it sit at room temperature for about 1.5 to 2 hours, or until it has roughly doubled in size. You’ll see bubbles forming under the surface. (Your future self will thank you for this patience.)
From Dough Ball to Golden-Brown Glory
This is where the magic really comes together. Your dough is bubbly and ready. Let’s turn it into pizza.
-
Prep The Pan: Pour a generous 2-3 tablespoons of olive oil into your 10 or 12-inch cast iron skillet. Yes, it seems like a lot, but this is what creates that fried, crispy crust. Use your fingers to spread it all over the bottom and up the sides.
-
Shape The Dough: Gently scrape the risen dough out of the bowl and into the oiled pan. It will deflate a bit, which is fine. Let it sit in the pan for 15-20 minutes to relax. After it’s relaxed, use your fingertips to gently press and dimple the dough out towards the edges of the pan. Don’t force it. If it springs back, just wait another 10 minutes and try again.
-
The Final Proof: Once the dough fills the pan, cover it and let it sit for one final rise, about 30-45 minutes. It will become puffy and pillowy. While it’s rising, preheat your oven to 475°F (245°C) with a rack in the middle position.
-
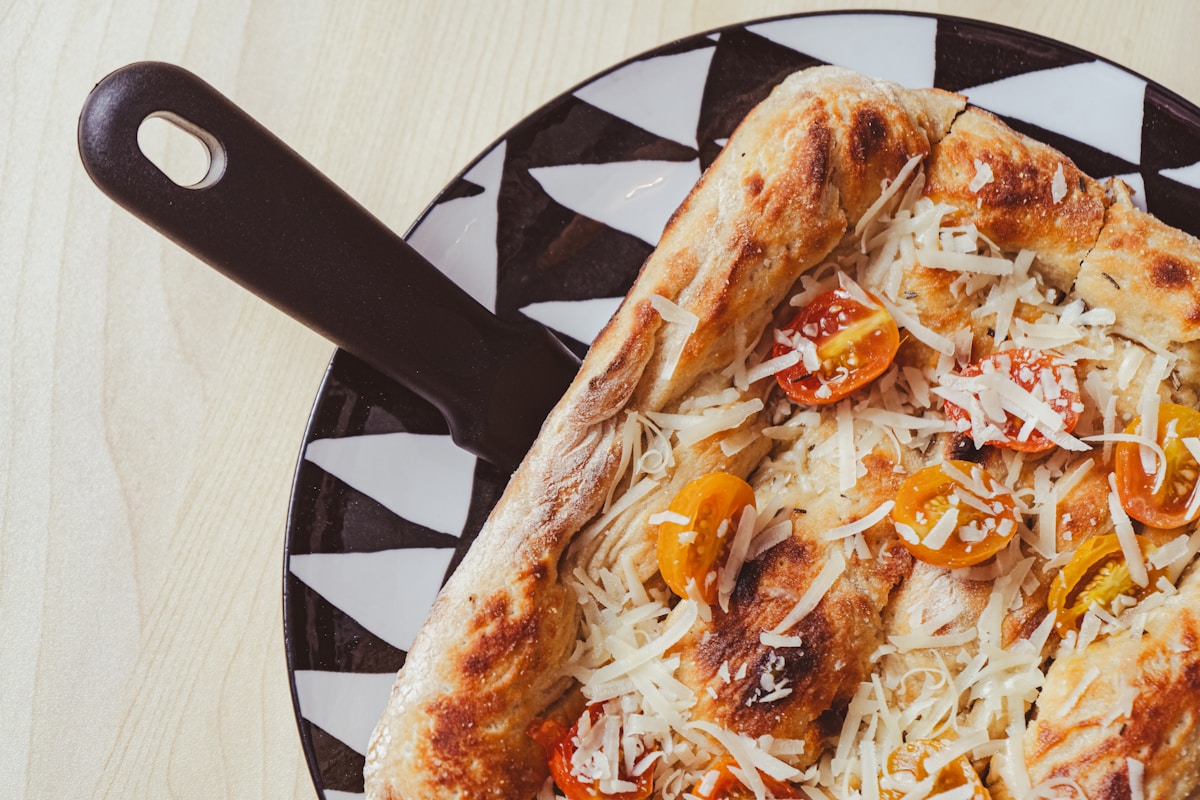
Top and Bake: Uncover your beautiful, puffy dough. Now, add your toppings! Keep it simple for the first time: a thin layer of your favorite pizza sauce (leaving a small border), a generous layer of low-moisture mozzarella cheese, and maybe some pepperoni. Carefully place the heavy skillet into the preheated oven.
-
The Bake: Bake for 18-22 minutes. The cheese should be bubbly and starting to brown, and the crust should be a deep golden color. The best part? When you carefully use a spatula to lift a corner, the bottom should be dark brown and crispy. That’s the cast iron magic!
-
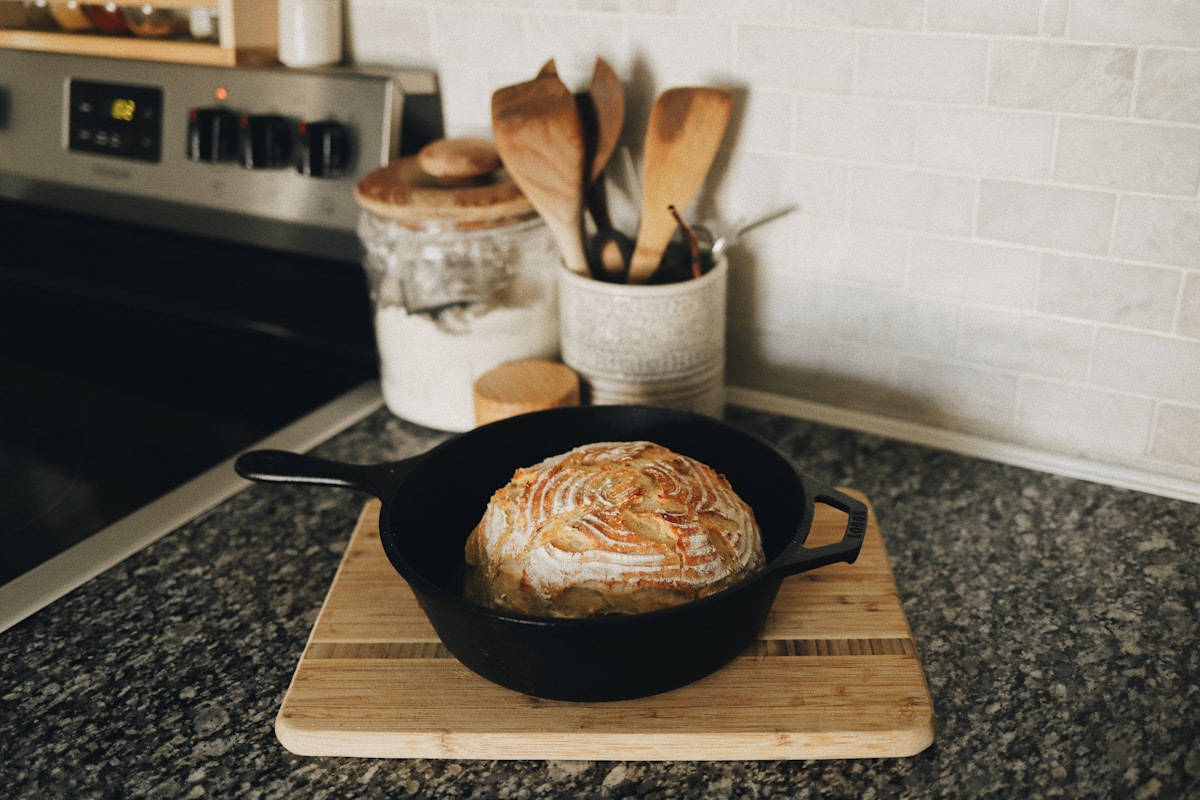
The Finish: Using sturdy oven mitts, carefully remove the skillet from the oven. Let it cool in the pan for a minute before using a spatula to transfer the pizza to a cutting board. The sizzle and the smell will be absolutely incredible. Let it rest for 5 minutes before slicing and devouring.
You Did It! A Final Encouragement
See? No mixer, no problem. You just made world-class pizza with a bowl and a spoon. You learned to trust the process, to feel the dough change, and to harness the power of your oven and a simple pan.
The biggest lesson here is to not be afraid of sticky dough. A wet dough becomes a light, airy, and tender crust. A dry, tough dough becomes a dense, tough crust. If you ever feel like the dough is unmanageable, just walk away for 15 minutes. Time is the best tool a baker has.
Try This Tonight: Don’t wait for the perfect moment or a special occasion. The ingredients are simple. The process is forgiving. Make this pizza. Even if it’s not flawless, even if you put a little too much sauce on, I promise you it will be delicious. You made it. And nothing tastes better than that.