You know that feeling. You can whip up a batch of chocolate chip cookies blindfolded. But the moment a recipe calls for yeast, your hands start to sweat. It happened to a Reddit user in the r/Baking community not long ago. They were a self-proclaimed “pro at cookies” but felt utterly intimidated by yeast. They tried cinnamon rolls for the first time and shared a photo of a gorgeous batch with vanilla bean specks. The community cheered. And here is the truth: if they can do it, so can you. Cinnamon rolls might just be the most forgiving introduction to yeast baking there is. Let me walk you through exactly why that is and how to get it right on your first try.
Why Yeast Feels Scary (And Why Cinnamon Rolls Are Different)
Yeast is a living organism. It eats sugar and produces carbon dioxide gas, which makes dough rise. That fact alone can feel like a lot of responsibility. What if you kill it? What if it doesn’t puff up? The good news is that cinnamon roll dough is enriched with butter, milk, eggs, and sugar. That richness does two things: it makes the dough incredibly soft and tender, and it gives the yeast plenty to eat. Because the dough is forgiving, small mistakes like slightly under-proofing or a little too much flour won’t ruin your rolls. They will still taste delicious. The Reddit user who succeeded used a detailed recipe with instant yeast, which eliminated the need to proof the yeast first. That is a game changer for beginners.
Instant Yeast vs Active Dry Yeast: Pick Your Weapon
Let’s clear up the biggest confusion right now. Active dry yeast needs to be “proofed” — dissolved in warm water with a pinch of sugar to see if it bubbles. If it doesn’t bubble, your yeast is dead and you wasted ingredients. Instant yeast (also called rapid-rise or bread machine yeast) can be added directly to your dry ingredients. No proofing, no worrying. For cinnamon rolls, instant yeast is your best friend. Brands like SAF Instant Yeast or Red Star Quick-Rise are reliable and widely available. The Reddit user’s recipe likely called for instant yeast, which takes the anxiety out of the process. If you only have active dry, that’s fine — just proof it in warm liquid (105-115°F or 40-46°C) for 5-10 minutes until frothy. But for your first time, buy instant yeast. Trust me on this one.
The Temperature Sweet Spot: Not Too Hot, Not Too Cold
Yeast is picky about temperature. Too hot and you kill it. Too cold and it stays dormant. For instant yeast, you want the liquid (milk, water, or butter) to be between 120-130°F (49-54°C). That might feel warm to the touch — like a comfortable bath, not scalding. For active dry yeast, aim for 105-115°F (40-46°C). The easiest way to nail this is to use an instant-read thermometer. A simple ThermoWorks Thermapen or even a $10 digital kitchen thermometer will save you from guessing. The Reddit community always stresses this: temperature matters. If you don’t have a thermometer, the old trick is to drip a little liquid on the inside of your wrist. It should feel pleasantly warm, not hot. But honestly, spend the ten dollars. Your future self will thank you.
Kneading and the Windowpane Test
Once you mix your dough, you need to knead it to develop gluten. Gluten is what gives the rolls structure and that soft, pull-apart texture. Over-kneading can make the dough tough, but under-kneading can lead to flat, dense rolls. So how do you know when to stop? The windowpane test is your secret weapon. Pinch off a small piece of dough and gently stretch it between your fingers. If it stretches thin enough to see light through without tearing, you have kneaded enough. If it tears easily, keep going. For a stand mixer (KitchenAid is a common choice), knead on medium-low speed for about 5-7 minutes with instant yeast. By hand, expect 8-10 minutes of steady folding and pressing. The dough should be smooth, elastic, and slightly tacky but not sticky. If it’s sticking to everything, add a tablespoon of flour at a time. If it’s dry and stiff, add a splash of milk. Remember: the dough will relax and become softer as it proofs.
Where to Let It Rise: The Draft-Free Zone
A drafty spot is the enemy of a good rise. Cold air slows down yeast activity and can lead to a long, uneven proof. The ideal temperature for rising is around 75-85°F (24-29°C). If your kitchen is chilly, here are two easy hacks. First, turn your oven to the lowest setting for exactly one minute, then turn it off. Place your covered bowl inside with the light on. The residual warmth is perfect. Second, you can place the bowl on top of the refrigerator or near a warm stove (as long as it’s off). Cover the bowl with a damp kitchen towel or plastic wrap to keep moisture in. The Reddit user’s success also came from a consistent warm spot. Let the dough rise until it has doubled in size — about 1 to 1.5 hours for instant yeast. If it’s taking longer, don’t panic. Patience is key. You can even let it rise slowly in the fridge overnight and shape the rolls the next day. That actually improves flavor.
Common Beginner Mistakes (And How to Fix Them)
Let’s talk about the mistakes that trip most people up. Expired yeast is the number one culprit. Check the date on your packet. If it’s past expiry, the yeast may be weak or dead. Always buy fresh yeast from a store with high turnover. Another mistake is over-kneading. If your dough starts to feel tight and resists stretching, stop. You can also tell by the surface: a well-kneaded dough is smooth like a baby’s bottom. A third mistake is using liquids that are too hot. A thermometer prevents this instantly. A fourth mistake is letting the rolls rise in a cold, drafty spot. If your rolls seem to be taking forever to puff up, move them to a warmer place. Finally, under-proofing the shaped rolls. After you cut and arrange the rolls in the pan, they need a second rise until they are puffy and touching each other. This usually takes about 30-45 minutes in a warm spot. If you bake them too soon, the centers will be dense. The r/Baking community comforted the original poster by noting that even pros get flat rolls sometimes. So don’t stress. Just learn and try again.
The Recipe That Works for Beginners
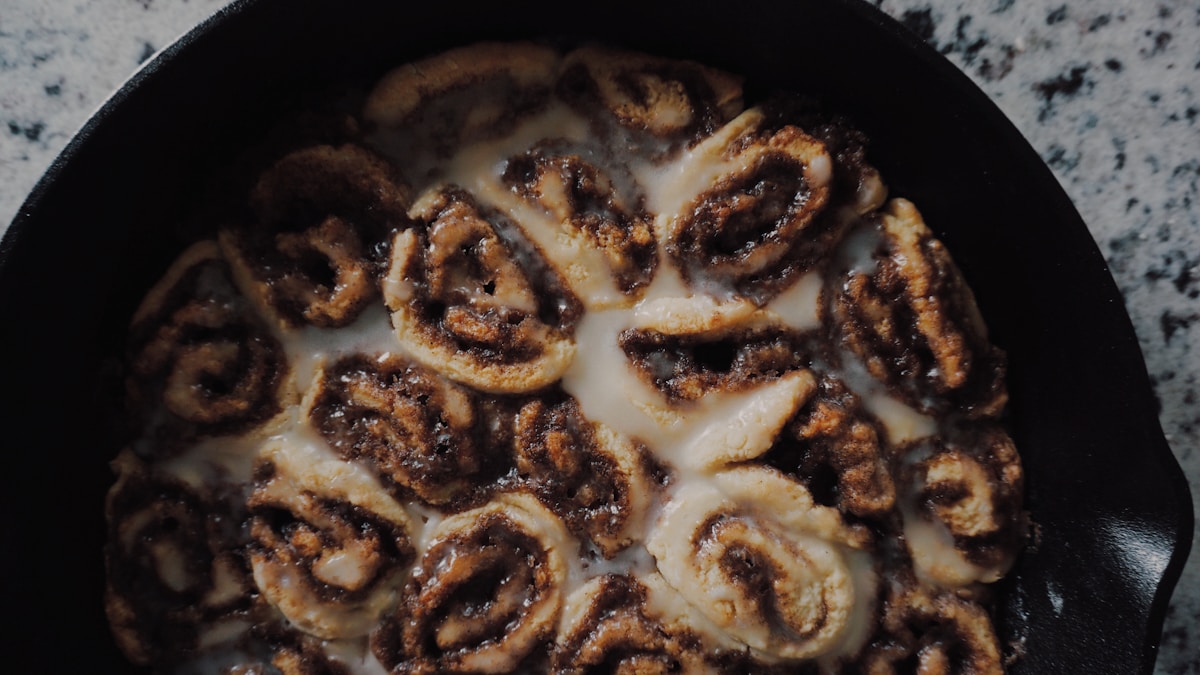
King Arthur Flour’s classic cinnamon roll recipe is a tried-and-true starting point. It uses instant yeast, a milk-and-butter enriched dough, and explicit temperature instructions. Here’s a quick overview to show you it’s not as complex as you think. Warm 1 cup of milk to 120°F (49°C). Stir in 1/4 cup sugar, 1/3 cup melted butter, 1 egg, and 1 teaspoon salt. Add 4 cups of King Arthur All-Purpose Flour and one packet (2 1/4 teaspoons) of instant yeast. Mix until a soft dough forms, knead, and let it rise. Roll out into a rectangle, spread with softened butter, sprinkle with cinnamon and sugar (use a generous amount of cinnamon!), then roll up tightly and cut into 12 rolls. Place them in a greased 9x13 pan (a Lodge cast iron baking pan works beautifully). Let them rise again until puffy, then bake at 350°F (175°C) for about 22-25 minutes until golden brown. That’s it. The specks you see in the original poster’s rolls likely came from scraping a real vanilla bean into the filling or glaze. You can replicate that by using vanilla bean paste or the seeds from one vanilla bean. But even plain vanilla extract works great.
Try This Tonight: A Single-Batch Confidence Builder
If you are still nervous, scale it down. Make a half batch — six rolls in an 8-inch square pan. Less dough means less to worry about. Use instant yeast. Measure your liquid temperature with a thermometer. Do the windowpane test. Place the bowl on top of your fridge or in a warm oven. And remember: even if your rolls are a little lopsided or the icing pools in the center, they will still taste amazing. The magic of cinnamon rolls is that the smell alone makes everyone happy. The kitchen-fun.com spirit is all about joy and starting where you are. So go ahead. Buy some instant yeast, get that butter soft, and give it a shot. The r/Baking community will be proud of you. And soon you’ll be the one posting your victory photo.