You watch her tiny hands twist open a jar of sprinkles, her face lit up with pure joy. She announces, “Mom, I’m going to be a chef when I grow up!” and your heart melts. But then the practical side of you kicks in: Where do we even start? You want to nurture that dream without losing your mind—or your clean kitchen. I’ve been there, and I promise you, teaching a seven-year-old to cook is one of the most rewarding adventures you can share. Let’s walk through the exact skills that build confidence, spark creativity, and keep everyone safe.
Getting Ready: Safety First, Always
Before a single ingredient touches the counter, establish the non-negotiables. At age seven, kids are ready to understand cause and effect, but they still need clear boundaries. Start with the two most important rules: wash hands thoroughly with soap and warm water for at least 20 seconds, and tie back long hair. A simple apron — something like the full-bib ones from Sur La Table or even a repurposed adult shirt — makes them feel official and keeps clothes clean.
Make this ritual fun. Sing a silly hand-washing song together, or let your child pick out her own apron with a favorite color or character. (Trust me, that little bit of ownership goes a long way.) The American Academy of Pediatrics emphasizes that children at this age learn best through repetition and clear, simple instructions. So repeat those safety steps every time, without nagging.
A tip I swear by: create a “kitchen station” for her. A sturdy step stool (the adjustable ones from KitchenAid or a simple wooden stool) lets her reach the counter safely. Keep all sharp objects and hot surfaces out of reach when she’s not directly supervised. We’ll get to knives in a bit, but for now, the goal is to make the space hers.
Building Skills with No-Cook Tasks
The easiest way to build confidence is with recipes that require zero heat. Your seven-year-old can master a handful of essential skills while making something delicious they’ll actually eat. Measuring dry ingredients is a perfect first step. Show her how to scoop flour into a measuring cup and level it off with the back of a table knife. King Arthur Flour’s measuring cups are great because they have clear markings and a comfortable handle. Let her practice with oats, sugar, or even dry beans.
Next comes pouring. Hand her a glass liquid measuring cup with a spout and let her pour water into a bowl. It’s messy at first, and that’s okay. The spill will teach her to slow down and tilt carefully. I like to use a wide bowl or a 9×13 baking pan to catch splashes. Another fantastic no-cook task is using a salad spinner. Fill it with washed lettuce or spinach, show her how to press the pump or pull the cord, and watch her delight as the water flies off. (Your future self will thank you for this skill—she’ll be making salads in no time.)
Spreading is another low-risk winner. Give her a table knife — not a butter knife with a serrated edge, but a smooth, blunt spreader — and let her spread softened butter or cream cheese on crackers or bread. The motion builds wrist strength and control. She’ll likely put on too much at first. That’s perfect. You’ll both laugh, and the next time she’ll use a little less.
The Art of Cracking Eggs
Cracking an egg is a rite of passage. It’s also one of the messiest, most teachable moments in the kitchen. Start with a practice egg: crack one into a separate bowl yourself, then let her try with a second egg. Show her the “tap, crack, and pull apart” method. Tap the egg firmly on the counter (not the bowl edge — that pushes shell inward), then use both thumbs to open the shell over a bowl.
If she gets shell in the bowl, don’t panic. Use a larger piece of shell to scoop out the smaller bits — that’s an old chef’s trick. Or let her fish them out with a clean finger. The key is patience. She will break yolks. She will get egg on her hands. That’s okay. Every crack is practice. After a few tries, she’ll be cracking like a pro. I’ve seen seven-year-olds graduate to separating eggs (using a dedicated plastic separator) within a few weeks.
Stirring, Mixing, and Following Steps
Once your child has the basics, move on to combining ingredients. Start with cold mixtures — no heat, no risk. A simple no-bake cheesecake or granola bar recipe is ideal. Show her how to stir with a wooden spoon in a large bowl, using a circular motion from the bottom up. The key is to let her control the spoon. You can guide her hand gently, but let her feel the resistance.
Following a sequence of steps is a major cognitive milestone at this age. Write down the recipe in big letters or use picture cards. For example:
- Step 1: Measure oats into bowl.
- Step 2: Add honey and peanut butter.
- Step 3: Stir until combined.
- Step 4: Press into pan.
She’ll feel immense pride in completing the process from start to finish. The book “Cooking Class” by Deanna F. Cook is a fantastic resource, with step-by-step photos and recipes designed for kids ages 6 to 10. I keep a copy on my kitchen counter and my own grandchildren page through it constantly.
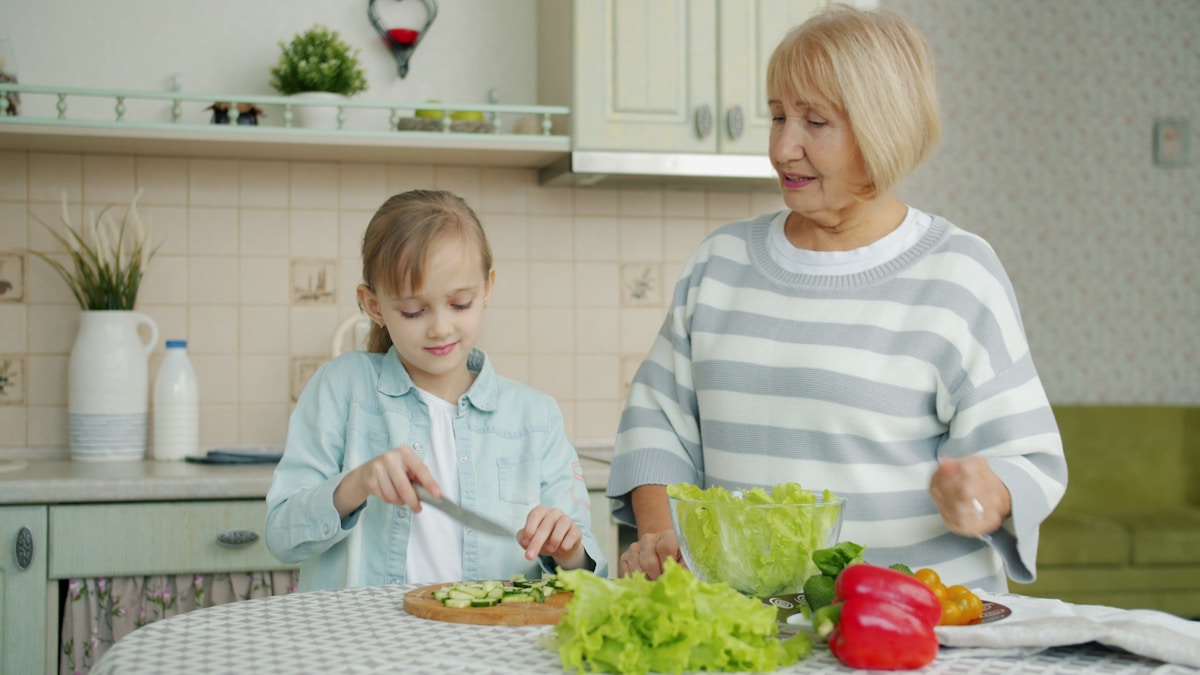
Introducing Knife Skills Safely
This is the big one. The question every parent asks: When can my child use a knife? At age seven, with proper supervision and a child-safe knife, it’s absolutely possible. The AAP recommends starting with a serrated plastic knife or a “kid”safe” knife like the Kuhn Rikon Y-shaped peeler or the Curious Chef nylon knife set. These tools can cut soft fruits and vegetables like bananas, strawberries, cucumbers, and mushrooms, but won’t cut skin easily.
Demonstrate the “claw grip”: curl your fingers inward, knuckles forward, and hold the food with your fingertips tucked under. Then let her try on a banana. Show her to let the knife do the work, sawing gently back and forth. Stay right next to her, hand over hand if needed. A great first recipe is a fruit salad — she can slice bananas, strawberries, and peeled apples (you can core them first). The pride she’ll feel when she presents that bowl to the family is priceless.
If you feel she’s ready for a real paring knife, wait until age eight or nine, and always start with a blunt-tipped option. For now, the plastic knives build safety habits without fear. And remember: never let a child cut while you’re distracted. This is one-on-one time.
Encouraging the Journey: Messes, Mistakes, and Magic
Your seven-year-old’s dream of being a chef doesn’t rely on perfect technique. It relies on the feeling of creating something with her own hands. So let her make messes. Flour on the floor? That’s a memory. A spilled cup of milk? That’s a lesson in clean-up. The Reddit parents who shared their experiences all said the same thing: patience wins. Celebrate the successes, laugh at the failures, and always taste together.
One of my favorite moments in the kitchen is when a child takes a bite of something they made and their eyes go wide. That’s the real magic. So start with measuring, move to cracking, graduate to spreading, and when she’s ready, hand her that child-safe knife. You’re not just teaching cooking skills — you’re giving her a lifelong gift of confidence, creativity, and a love for feeding the people she cares about.
Now go preheat your oven for something simple, tie on those aprons, and let the adventure begin. (Yes, really.)