There’s a sound every parent knows. It’s the gentle patter of little feet on the kitchen floor, followed by that hopeful, high-pitched question: “Can I help?”
My heart does a little flip every time I hear it. It’s a mix of pure joy (They want to be with me!) and a tiny bit of panic (Oh, the mess!). It’s so tempting to say, “Maybe next time, sweetie,” especially when you’re in a hurry. But I want to encourage you to pause, take a deep breath, and say, “Yes!”
The kitchen isn’t just a room for making food; it’s a place where families grow together. Those sticky counters and spilled cups of flour are the backdrop for some of life’s most precious lessons and memories. And at six years old, your little one is at the perfect age to truly begin their culinary journey alongside you. They’re past the toddler stage of putting everything in their mouth but still full of that wonderful, wide-eyed eagerness to learn and participate.
So let’s roll up our sleeves, put on our aprons, and figure out how to turn that enthusiastic question into a beautiful partnership.
The Magic of the ‘Little Helper’ Stage
Welcoming a six-year-old into your cooking space is about so much more than just getting a meal on the table. Think of it as planting seeds. You’re planting seeds of confidence, curiosity, and connection.
At this age, children are developing crucial fine motor skills, and tasks like whisking, spooning, and sprinkling are fantastic practice. They’re also learning to follow multi-step directions, a skill that will serve them well in school and beyond. And don’t forget the secret math lesson! Counting scoops of flour and measuring half-cups of water introduces them to fractions and numbers in a tangible, delicious way.
The most important goal, however, isn’t a perfectly chopped onion or a lump-free batter. The goal is the shared experience. It’s looking at your child, their brow furrowed in concentration as they stir a bowl of ingredients, and knowing you’re building something that will last a lifetime. A little extra mess on the floor is a very small price to pay for that.
Getting Started Safe and Sound
Before we hand over the spatula, we need to set the stage for success. Safety and preparation are the secret ingredients to a happy and stress-free kitchen session with kids.
First, the ground rules. We always start by washing our hands with soap and warm water while singing a little song. It’s non-negotiable. If your little chef has long hair, pull it back into a ponytail. These are the foundational habits of good kitchen hygiene.
Next, create their very own workstation. This is my favorite trick. A sturdy step stool, like one of those popular learning towers, brings them up to counter height safely. Clear a little space that is just for them. Give them their own cutting board (a small plastic one is perfect) and their own bowl. This designated spot not only keeps them safely away from the hot stove but also gives them a sense of ownership and importance. (They’re not just in your way; they have a real job to do!)
Finally, talk about “tool rules.” We explain that some tools are for grown-ups (sharp knives, the food processor, anything near the oven) and some are for kids. This clarity helps prevent accidents before they ever happen.
Your 6-Year-Old’s First Kitchen Job Chart
Alright, your little helper is washed up and ready to go! So, what can they actually do? You’d be surprised how capable they are. Here are some of my favorite age-appropriate tasks that are both fun and genuinely helpful.
Washing & Prepping (The Sensory Fun):
- Rinse Produce: Set them up at the sink with a colander and let them wash potatoes, carrots, or apples. The feel of the cool water and the bumpy texture of a potato is a wonderful sensory experience.
- Tear Lettuce: Forget cutting! Tearing lettuce leaves for a salad is immensely satisfying for little hands. It’s a task they can complete from start to finish.
- Shuck Corn or Shell Peas: If it’s in season, these are fantastic activities. Peeling back the silky layers of a corn husk is like unwrapping a present from nature.
- Mash Soft Foods: Making guacamole or mashed potatoes? Give them a fork or a child-sized masher and a bowl of soft avocados or cooked potatoes. They will mash with surprising determination.
Measuring & Mixing (The Science Lab):
- Measure and Pour Dry Ingredients: This is a classic for a reason. To minimize the inevitable flour cloud, here’s a little hack: measure the ingredient yourself into a small, lightweight cup, then let your child be the one to pour it into the main mixing bowl. They still get the satisfaction of contributing, and you keep the mess contained.
- Stir Cold Ingredients: A big bowl, a sturdy spoon, and a batter for cookies or pancakes is a recipe for happiness. Always supervise to prevent over-mixing, but let them feel the power of combining ingredients.
- Crack Eggs: This one can feel scary, but it’s a huge confidence booster. Teach them to crack the egg on a flat surface (like the counter, not the bowl rim) to reduce shell fragments. Have them crack it into a separate small bowl first. That way, you can easily fish out any stray shell pieces before adding the egg to your main mixture. (Your future self will thank you for this tip.)
Cutting & Assembling (Building Skills):
- Use a Kid-Safe Knife: Please don’t hand your six-year-old a sharp blade! A simple butter knife works wonders on soft foods. You can also invest in a fantastic kid-safe nylon knife set from brands like Curious Chef or Tovla Jr. They can cut through a banana but won’t easily cut little fingers.
- What to Cut: Bananas, strawberries, mushrooms, hard-boiled eggs, cubes of soft cheese, and olives are all perfect for a beginner chef.
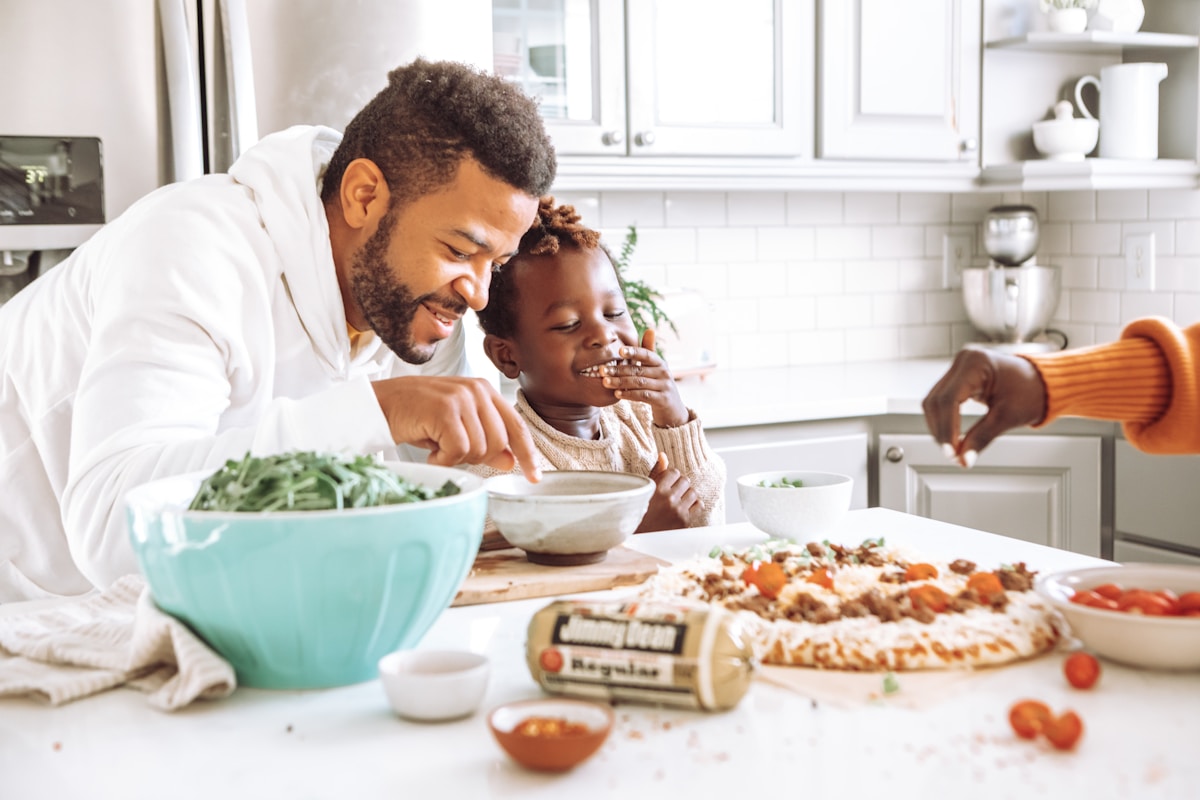
- Assemble & Decorate: This is where their creativity shines! They can spread butter on toast, assemble layers for a mini-lasagna in a loaf pan, sprinkle cheese on top of a casserole, or arrange pepperoni on a pizza.
Let’s Cook Something Together: Funny Face Pizzas
Ready to put it all into practice? These simple English muffin pizzas are a perfect first recipe because your child can do almost every step themselves.
You’ll Need:
- English muffins, split in half
- Pizza sauce or tomato paste
- Shredded mozzarella cheese
- Toppings: Sliced olives, pepperoni, strips of bell pepper, mushroom slices, cherry tomato halves
Your Little Chef’s Jobs:
- Spread the Sauce: Give them a spoon and let them spread a thin layer of sauce on each English muffin half. It’s okay if it’s a little messy!
- Sprinkle the Cheese: Pour the shredded cheese into a bowl and let them sprinkle it over the sauce with their fingers. It’s a snowstorm of cheesy goodness.
- Make a Funny Face: This is the best part! Set out the toppings in little bowls and let them design their own pizza. Olives for eyes, a pepper strip for a mouth—let their imagination run wild!
The Grown-Up’s Job: Once the masterpieces are complete, you handle the heat. Place the pizzas on a baking sheet and toast them in an oven or toaster oven at 400°F (200°C) for about 8-10 minutes, or until the cheese is bubbly and golden. Let them cool for a minute before serving.
Watching them take a bite of something they made themselves is pure magic. That look of pride is the secret ingredient in every dish you’ll ever make together.
The Most Important Ingredient of All
I’ll tell you a secret. The most important ingredient you can bring into the kitchen isn’t organic flour or fancy vanilla. It’s patience.
There will be spills. There will be eggshells where they don’t belong. There will be more flour on your child’s shirt than in the bowl. That is all perfectly okay. Keep a damp cloth handy, keep your sense of humor, and focus on praising their effort and enthusiasm.
Remember, you’re not just teaching them how to cook. You’re teaching them that it’s okay to try new things, that mistakes are just part of learning, and that the time you spend together is the most valuable thing of all. The flour will wash off, I promise. But the memories you’re making? Those will stick around for good.