I saw it from across the room—a tiny, triumphant figure covered head to toe in a fine white dust. My four-year-old nephew, Leo, had been tasked with the very important job of scooping flour into a measuring cup. In his mind, he had succeeded beautifully. In my kitchen, it looked like a blizzard had hit a bakery. My first instinct was to sigh, but then I saw his face, beaming with pride. In that moment, I was reminded of a beautiful truth: the kitchen isn’t just about the food we make; it’s about the little hands we’re holding and the memories we’re baking.
So many of you have written to me, asking how to bring your little ones into the kitchen without losing your sanity. It’s a wonderful question! That four-year-old energy is a special kind of whirlwind, isn’t it? They want to be independent, to do everything the big people are doing. Our job is to find a way to say “yes” safely and joyfully. It’s not about training a tiny chef; it’s about nurturing a curious, confident child who feels like a valued member of the family.
Why Cooking with Your Four-Year-Old is a Recipe for Success
Before we get our aprons on, let’s talk about the ‘why’. Bringing a preschooler into the kitchen is so much more than a way to pass an afternoon. Every stir, pour, and sprinkle is a building block for their development.
First, you’re working on those all-important motor skills. Scooping, pouring, tearing lettuce, and mashing a banana with a fork—these simple actions are fantastic for strengthening the small muscles in their hands and improving hand-eye coordination. It’s practical life practice disguised as fun.
Second, it’s a sensory wonderland! Think about it: the cool, smooth feel of dough; the squish of a ripe banana; the bright scent of a lemon; the rattling sound of dry pasta in a bowl. Engaging all their senses helps build new neural pathways in the brain. (It’s real science, dressed up in a floury apron!)
Most wonderfully, you are building a positive relationship with food. When a child has a hand in washing the carrots or stirring the batter, that food becomes theirs. They have a connection to it. I have seen the pickiest of eaters try a bite of a muffin they helped make. Giving them ownership can be the secret ingredient to encouraging a more adventurous palate. It’s not a guarantee, of course, but it opens the door to curiosity, which is the first step.
Setting Up Your Little Sous Chef for a Messy Masterpiece
The key to a happy kitchen experience is preparation, both for the space and for your mindset. Your goal is to create a “yes” space, where your little one has the freedom to explore without you having to say “no” every two seconds.
- Find a Safe Station: Forget the counters for now. A small, child-sized table is ideal. If you don’t have one, a clean patch of floor with a splat mat underneath works just as well. If you must use a counter, a very sturdy learning tower or kitchen helper stool is essential for safety. No wobbly chairs!
- Gather Everything First: This is the golden rule. Get out all the ingredients and tools you’ll need before you invite your child to join. A four-year-old’s attention span is fleeting; you don’t want to lose them while you’re hunting for the vanilla extract.
- Embrace the Mess (Mentally): Repeat after me: “The process is more important than the product.” There will be spills. There will be flour on the floor. An egg might even end up somewhere unexpected. Put down a mat, have a damp cloth at the ready, and take a deep breath. A messy kitchen is the sign of a successful adventure.
- The Apron Ceremony: Make it official! Having a special apron just for them makes them feel important and part of the team. It also saves their clothes, which your future self will thank you for.
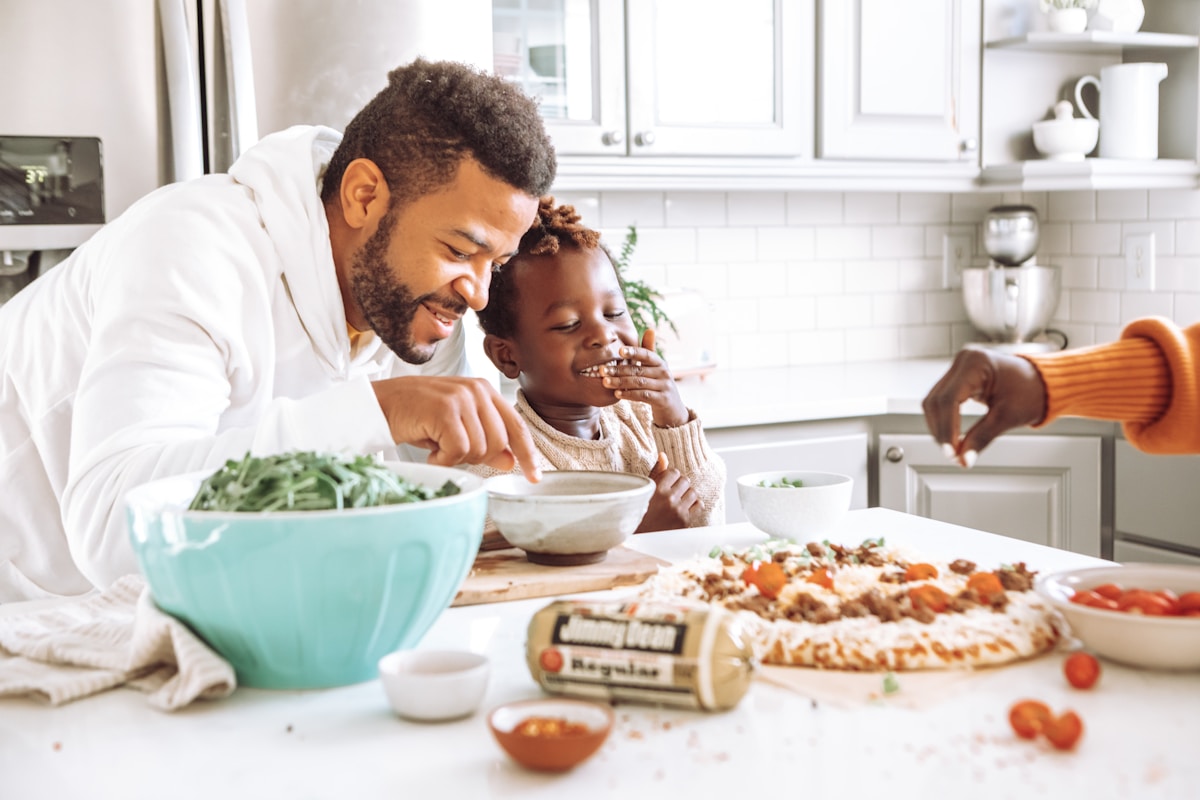
The Official ‘Big Kid’ Job List No Heat No Sharps
Alright, now for the fun part! What can they actually do? Here is my go-to list of safe, engaging, and genuinely helpful jobs for four-year-old hands. Remember, constant supervision is your most important ingredient.
-
The Official Vegetable Washer: This is a fan favorite. Fill a large bowl (or even the sink) with a few inches of water and hand them some sturdy produce like potatoes, carrots, or bell peppers. Give them a soft vegetable brush and let them scrub away. It’s part water table, part kitchen prep, and 100% fun.
-
The Supreme Salad Spinner & Leaf Tearer: Little hands are perfect for tearing lettuce, kale, or spinach into bite-sized pieces for a salad. It’s a wonderful pre-reading skill, learning to handle something gently. If you have a salad spinner, letting them push the plunger or turn the crank is a guaranteed hit.
-
The Master Masher: Is there anything more satisfying than squishing something? Hand your child a very ripe banana (the spottier, the better!) in a bowl and a fork. Show them how to press down and mash it into a lovely, lumpy pulp. This is the first and most important step in making my Sunshine Banana Muffins!
-
The Mighty Mixer (Cold Ingredients Only): While they aren’t ready for a stand mixer, they are certainly ready for a bowl and a whisk or spatula. Let them stir together cold or dry ingredients. Think pancake batter, muffin mix, or whisking eggs for scrambling (you handle the cooking, of course). Pro tip: Use a bowl that is much larger than you think you need to contain the enthusiastic stirring.
-
The Dough Artist: Give them a small piece of pre-made dough—sugar cookie dough (store-bought is perfectly fine!), pizza dough, or bread dough. They can pat it, roll it into snakes, and, best of all, use cookie cutters. The shapes might not be perfect, but the pride on their faces will be.
-
The Sprinkle Supervisor: This might be the most coveted job in the entire kitchen. Once cookies or cupcakes are baked and cooled, let them take charge of the sprinkles, jimmies, and colored sugars. Yes, you will find sprinkles in your house for weeks, but the sheer joy it brings is worth every single one.
A Simple Recipe for Success Banana Oat Muffins
Ready to put it all together? This recipe is practically designed for little helpers. It’s forgiving, delicious, and uses several of the skills we just talked about. Let’s make some memories!
Beatrice’s Sunshine Banana Oat Muffins
Yields: 12 muffins Prep time: 15 minutes Bake time: 18-22 minutes
Ingredients:
- 3 very ripe bananas
- 1/3 cup (75g) melted butter, cooled slightly
- 1 teaspoon vanilla extract
- 1 large egg
- 1/2 cup (100g) granulated sugar
- 1 1/2 cups (180g) all-purpose flour
- 1/2 cup (45g) old-fashioned rolled oats
- 1 teaspoon baking soda
- 1/2 teaspoon baking powder
- 1/4 teaspoon salt
- 1/2 teaspoon cinnamon
Instructions:
- Grown-Up Prep: Preheat your oven to 350°F (175°C). Line a 12-cup muffin tin with paper liners.
- The Mashing! (4-Year-Old’s Job!): In a large bowl, have your little one use a fork to mash the three bananas until they are mostly smooth. A few lumps are perfectly fine and add great texture!
- The Wet Mix (4-Year-Old’s Job!): Pour the cooled melted butter and vanilla into the bananas. They can help stir this together. Then, have them crack the egg into a separate small bowl (this way you can fish out any stray shells). Add the egg to the banana mixture and let them whisk it all up.
- The Dry Mix (4-Year-Old’s Job!): In another medium bowl, let your child help you measure and dump in the flour, oats, sugar, baking soda, baking powder, salt, and cinnamon. They can use a whisk to stir all the dry ingredients together. It’s like a magic potion!
- Combine (Teamwork!): Pour the dry ingredients into the wet ingredients. Now, this is important: stir only until just combined. A few floury streaks are okay. Over-mixing makes muffins tough. You can let your child do the first few stirs, and a grown-up can do the final fold.
- Scooping (Grown-Up’s Job): Use an ice cream scoop or large spoon to divide the batter evenly among the 12 muffin cups. This part is usually best for a grown-up to ensure they bake evenly.
- Baking (Grown-Up’s Job): Bake for 18-22 minutes, or until a toothpick inserted into the center of a muffin comes out clean. Let them cool in the pan for a few minutes before moving to a wire rack.
Handling the Inevitable Spills and Thrills
When a cup of milk topples over, try to reframe it in your mind. It’s not a catastrophe; it’s a lesson in cause and effect. Instead of a frustrated sigh, try a calm, “Uh oh! Let’s get the ‘spill rag’ and clean that up together.” Making them part of the cleanup process, without shame or anger, is a crucial life lesson.
Praise their effort, not just the result. “You are being so careful with that spoon!” is more powerful than “You made a perfect cookie.” It shows them that you value their hard work and focus, which builds resilience for the next time things don’t go as planned.
Remember, you are their guide. Your calm and joyful presence is what makes the kitchen feel like a safe and wonderful place. They will take their cues from you. If you’re having fun, they will too. So put on some music, get down on their level, and be ready to laugh.
These years are so fleeting. One day you’ll be shooing a teenager out of the kitchen for eating all the snacks, and you’ll miss the days of flour blizzards and lopsided cookies. The messes can be cleaned, but the memories you make together will warm your heart for a lifetime. Happy baking, my dears.