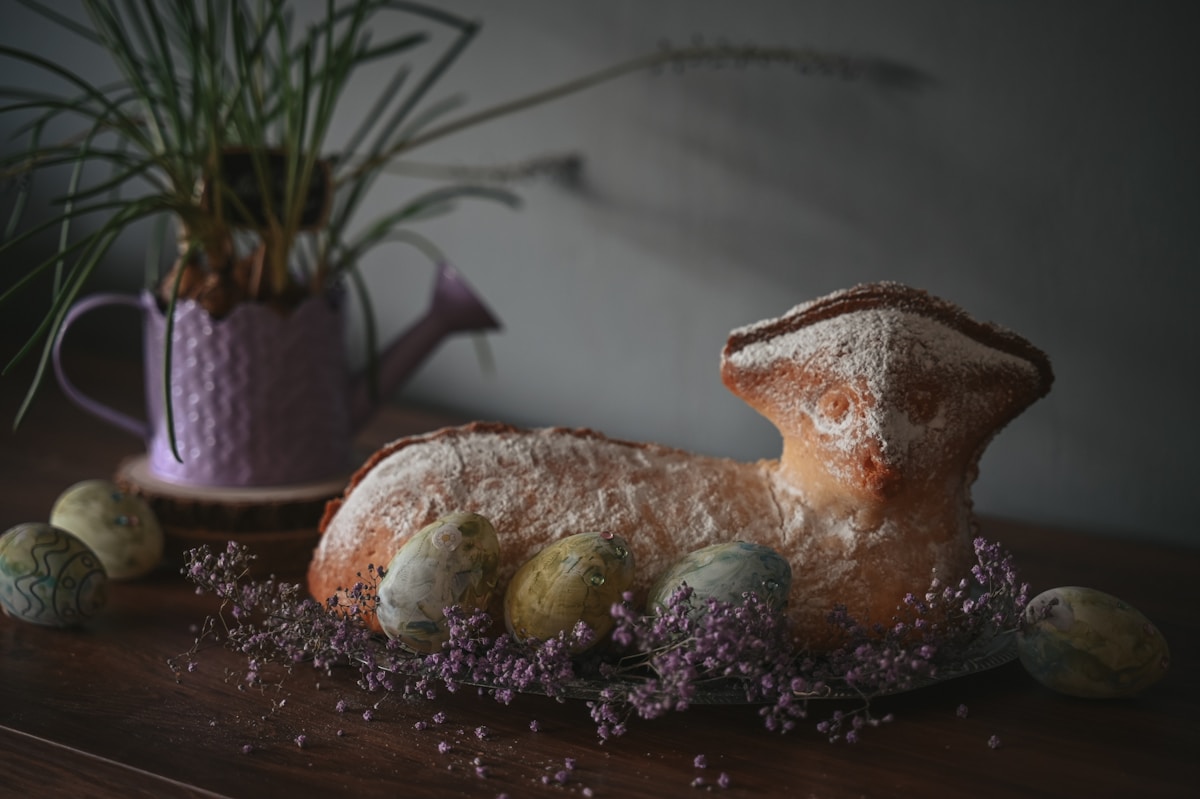
There it is, sitting in your cupboard—a piece of family history. It might be your grandmother’s cast aluminum lamb cake mold, a treasure from a thrift store, or a brand-new purchase for a spring celebration. You can picture it perfectly: a sweet, woolly lamb, sitting proudly on a bed of coconut grass, the centerpiece of your Easter table. But there’s a whisper of fear, isn’t there? A fear born from countless internet photos of ‘cake fails’—lopsided creatures, headless lambs, and featureless blobs that look more like sleeping sheepdogs.
That vintage mold holds more than just the potential for cake; it holds generations of tradition. The lamb, a powerful symbol of spring, innocence, and rebirth, has graced holiday tables for decades. Making one connects us to that history, to the hands that used that same mold years ago. But let’s be honest, it can be one of the most intimidating projects a home baker can tackle. The delicate ears, the slender neck, the detailed face—it all seems designed to break your heart.
But what if I told you that a successful, adorable lamb cake is completely within your reach? It’s not about luck; it’s about knowledge. It’s about understanding the science behind the structure and treating the process with a little bit of reverence. Today, we’re going to demystify the lamb cake. We’ll walk through every step, from choosing the perfect batter to the triumphant moment you place two jelly bean eyes on a perfectly formed face. Let’s turn that intimidating metal mold into a tool for creating joy.
The Heart of the Matter Choosing the Right Batter
This is the single most important decision you will make. Your favorite light and airy birthday cake recipe, as delicious as it is, will lead to disaster here. A lamb cake is an exercise in edible architecture, and it requires a strong foundation. You need a batter that is dense, sturdy, and has a fine, tight crumb.
Why? A light, fluffy cake with large air pockets is structurally weak. When you try to unmold it, those delicate features like the ears and nose have no internal support and will simply crumble or tear off. A dense batter bakes into a solid, cohesive structure that can hold its own weight and retain all the beautiful, crisp details of the mold.
Your best friend for this project is a classic pound cake or a sturdy butter cake. These recipes have a higher ratio of fat (butter) and flour to liquid and leavening, creating that necessary density. Avoid box mixes unless they are specifically labeled as pound cake mixes, and even then, a from-scratch recipe will give you the most reliable results.
Here is a simple, no-fail pound cake recipe perfect for most standard-sized lamb molds (which typically hold 6 cups of batter):
Classic Lamb Cake Pound Cake Batter
- 1 cup (227g) unsalted butter, softened to room temperature
- 1 1/2 cups (300g) granulated sugar
- 4 large eggs, at room temperature
- 1 teaspoon pure vanilla extract
- 1/2 teaspoon almond extract (optional, but lovely)
- 2 1/4 cups (270g) all-purpose flour
- 1/2 teaspoon baking powder
- 1/2 teaspoon salt
- 2/3 cup (160ml) whole milk, at room temperature
Instructions:
- Preheat your oven to 350°F (175°C).
- In a large bowl, cream the softened butter and sugar together with an electric mixer until light and fluffy, about 3-5 minutes. Don’t rush this step; it’s building the foundation.
- Add the eggs one at a time, beating well after each addition. Mix in the vanilla and almond extracts.
- In a separate bowl, whisk together the flour, baking powder, and salt.
- Add the dry ingredients to the butter mixture in three additions, alternating with the milk (Dry, Milk, Dry, Milk, Dry). Mix only until just combined. Over-mixing develops gluten and can make the cake tough.
The key takeaway is this: use room temperature ingredients. Cold butter, eggs, or milk won’t emulsify properly, leading to a greasy or curdled batter and a less-than-perfect final texture.
The Sacred Art of Mold Preparation and Baking
Now that you have the right batter, your next mission is to ensure the cake actually comes out of the mold. This is all about meticulous preparation. Every single crevice of that mold needs to be greased and floured perfectly.
Step 1: The Grease
Do not use liquid oil or melted butter. They are too thin and will pool in the bottom of the mold, leaving other areas bare. The absolute best tool for the job is solid vegetable shortening (like Crisco). Using a pastry brush or your fingertips, apply a thin, even layer of shortening to every single interior surface of both halves of the mold. Pay extra special attention to the high-detail areas: the ears, the eyes, the nose, and the curves of the neck. (This is the secret to a sharp, detailed face.)
Step 2: The Flour
Once greased, spoon a few tablespoons of all-purpose flour into one half of the mold. Holding it over the sink, tilt and tap the mold to coat the entire surface with a fine layer of flour. Tap out any excess. Repeat with the other half. When you’re done, the entire interior should look white and matte, with no shiny, greasy spots showing through. Modern baking sprays that contain flour (like Baker’s Joy) can also work well, but the old-fashioned shortening-and-flour method is famously reliable.
Step 3: Filling and Securing
Spoon your prepared batter into the front (face side) of the mold. Fill it until the batter is level with the top edge. Don’t overfill! The batter will rise, and you don’t want it to explode out the seams. Gently place the back half of the mold on top. To prevent leaks, you can secure the two halves together. Some vintage molds have clips, but if yours doesn’t, a few loops of kitchen twine tied snugly around the mold will do the trick.
Step 4: The Bake
Place the mold face-down on a baking sheet. Why face down? Some bakers swear this helps the batter fill the detailed face portion more effectively. Bake at 350°F (175°C) for 50-60 minutes. The exact time will depend on your oven and your specific mold. Begin checking for doneness around the 50-minute mark by inserting a long wooden skewer through one of the vent holes in the top of the mold. If it comes out clean or with a few dry crumbs, it’s ready.
The Moment of Truth Unmolding Your Lamb Cake
Take a deep breath. This is where patience is your greatest virtue. Rushing the cooling process is the number one cause of broken lamb cakes.
-
Initial Cooling: Once out of the oven, place the entire mold on a wire cooling rack and let it sit undisturbed for 15-20 minutes. This is a critical step. The cake is setting its structure, but it’s still warm enough that it hasn’t started to stick to the cooling metal.
-
Removing the Back: Carefully remove the twine and lift off the back half of the mold. It should release easily. If it sticks, you can gently tap the mold with the handle of a wooden spoon to loosen it.
-
The Full Cool-Down: Let the cake cool in the front half of the mold for another 10 minutes before carefully inverting it onto the wire rack to remove it completely. Now for the most important instruction: DO NOT TOUCH IT. Let the lamb cake cool on the wire rack for a minimum of two hours, or until it is completely, 100% at room temperature through and through. A warm cake is a fragile cake.
Kitchen Hack: Once fully cooled, your lamb might not stand perfectly flat. Take a long serrated knife and gently shave a thin layer off the bottom to create a stable, level base. (Your future self will thank you when it’s not tipping over post-decoration!)
Bringing Your Creation to Life Decorating Your Lamb
Congratulations, the hard part is over! Now you get to have fun and give your lamb some personality. A simple dusting of powdered sugar is elegantly beautiful, but for the full, traditional effect, you’ll want to give it a ‘wool’ coat.
-
Classic Buttercream Wool: The most iconic look is created with a simple vanilla buttercream and a piping bag fitted with a small star tip (like a Wilton #21). Starting from the base and working your way up, pipe small, close-together stars to cover the entire body. It’s time-consuming but creates a wonderful texture.
-
Quick Coconut Wool: For a faster, charmingly retro look, frost the cake with a thin layer of simple glaze or buttercream. Then, press sweetened shredded coconut all over the body. It’s quick, easy, and absolutely delicious.
-
Finishing Touches: The personality is in the details. Use two brown or black jelly beans for the eyes and a pink one for the nose. You can also use mini chocolate chips or simply pipe dots of black icing. To create a festive scene, tint some shredded coconut with green food coloring to make ‘grass’ and arrange it around the base of the cake with some candy eggs.
When Things Go Wrong (And Why That’s Okay)
What if, despite all your best efforts, an ear breaks off? Or the neck cracks? First, don’t panic. Icing is a baker’s best friend and can act as a powerful ‘glue’ to reattach broken pieces. A little extra buttercream fluff can hide a multitude of sins.
Remember the spirit of this tradition. This isn’t about creating a flawless, sterile product from a professional bakery. It’s about the act of creation itself. An imperfect lamb cake, made with love, is infinitely more charming than a perfect one bought from a store. It tells a story—of effort, of family, and of the joy found in a shared tradition. So embrace the slight lean, the slightly lopsided ear. Your family will remember the fun you had making it, and the delicious taste, long after they’ve forgotten that one little flaw. After all, in the world of kitchen fun, a little bit of character is always a welcome ingredient.


 Beatrice