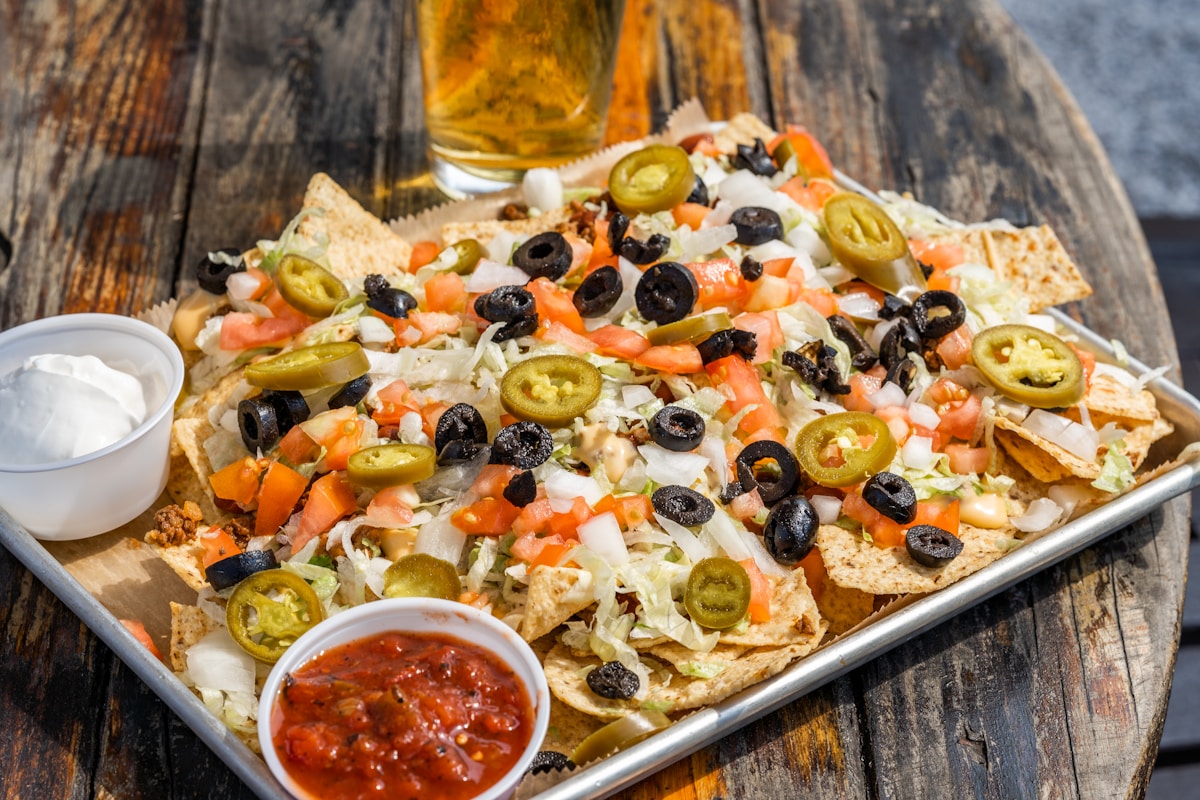
A familiar scene: you pull a gorgeous sheet pan of loaded nachos out of the oven, the cheese is bubbly, and everyone digs in. Five minutes later, the chips have gone soft and the bottom layer is a sad, damp mess. If you’ve been looking for a way to make crispy family nachos that actually stay crunchy, you’re in the right place. The secret is a combination of smart layering, the right baking technique, and careful timing of your toppings.
Key Takeaways
- Layer chips and cheese first, then bake before adding wet toppings.
- Use a wire rack on your sheet pan to promote airflow and prevent soggy bottoms.
- Bake at 400°F (200°C) for 10–12 minutes, then optionally broil for extra crunch.
- Choose low-moisture toppings like drained beans, firm veggies, and freshly shredded cheese.
- Serve salsa, sour cream, and guacamole on the side so chips stay crisp until the last bite.
Why Do Nachos Turn Soggy?
Moisture is the main culprit. Wet toppings like salsa, sour cream, and refried beans release liquid that soaks into the chips. When everything piles on at once, that moisture has nowhere to go. The chips begin absorbing it long before you even bake.
Overloading the tray also causes problems. When chips are stacked too high, steam gets trapped in the middle. Instead of crisping, the chips steam and soften from the inside.
Improper layering makes it worse. Placing wet ingredients directly on the chips before baking gives them time to seep in. Even the type of chip matters: thin, fragile chips break easily and soak up liquid faster. Sturdy restaurant-style chips hold up much better under toppings.
The Right Layering Order for Maximum Crunch
Building crispy family nachos starts with the right sequence. Think of it as constructing a foundation, then adding toppings in stages.
Step 1: Start with sturdy chips. Look for thick, restaurant-style tortilla chips. Avoid thin or overly salty brands. Spread them in a single layer on your sheet pan. Overlap slightly, but don’t pile them high.
Step 2: Add cheese first. Use a blend of freshly shredded cheddar and Monterey Jack. Pre-shredded cheese often contains anti-caking agents that can affect how it melts and may introduce extra starch. Sprinkle evenly over the chips.
Step 3: Add dry toppings only. This includes seasoned ground beef, black beans (drained and rinsed), corn, and diced bell peppers. These ingredients have significantly lower moisture than tomatoes or salsa. Spread them over the cheese.
Step 4: Bake until cheese melts and chips toast. Bake at 400°F (200°C) for 10–12 minutes. You want the cheese bubbly and the chips lightly golden around the edges.
Step 5: Add wet toppings after baking. Once the pan comes out of the oven, add salsa, sour cream, guacamole, pickled jalapeños, and fresh cilantro. These go on just before serving so they don’t have time to soften the chips.
This method keeps the base crunchy while still delivering all the flavors your family loves.
Best Baking Techniques
Oven technique makes a huge difference in achieving crispy family nachos. Here are the key details to get right.
Use a rimmed sheet pan. A half-sheet pan works perfectly. Line it with parchment paper or foil for easy cleanup.
Elevate the chips with a wire rack. Place an oven-safe wire rack on the sheet pan, then arrange the chips on the rack. This allows hot air to circulate underneath, preventing the bottoms from steaming. If you don’t have a rack, you can still get good results by keeping the chip layer thin and avoiding deep dishes.
Bake at 400°F (200°C). This temperature is high enough to melt cheese quickly and toast the chips without burning them. Bake for 10–12 minutes, then check. Ovens vary, so watch for the cheese to bubble and the chip edges to turn golden.
Finish under the broiler for extra crisp. If you want an even crunchier top layer, switch the oven to broil for the final 1–2 minutes. Stay nearby and watch closely – broilers can burn chips in seconds. Move the pan to the top rack for this step.
Avoid covering or deep pans. Lids, foil, or deep casserole dishes trap steam. Stick to open sheet pans for the crispiest result.
Choosing Toppings That Help
Not all toppings are equal when it comes to keeping nachos crispy. Here’s how to choose and prep them wisely.
Drain canned beans thoroughly. Whether you use black beans, pinto beans, or refried beans, rinse and drain them well. For refried beans, spread a thin layer – too much adds unwanted moisture.
Use firmer vegetables. Bell peppers, red onions, and pickled jalapeños contain less water than fresh tomatoes or cucumber. If you want tomatoes, choose cherry tomatoes and slice them thin, or save them for the post-bake salsa topping.
Shred your own cheese. Pre-shredded cheese is convenient, but the anti-caking coatings can make melting less smooth and sometimes add starches. Freshly shredded cheese melts more evenly and releases less moisture.
Serve wet toppings on the side. Place salsa, sour cream, and guacamole in small bowls and let each person add their own. This is the single most effective way to keep every chip crunchy until the last bite.
Skip watery additions. Avoid large dollops of sour cream or runny salsa directly on the hot chips. If you do add them directly, use only small amounts.
Serving Tips to Keep Nachos Crispy
Even with perfect construction, nachos start losing crunch once they sit. Here’s how to serve them so your family enjoys every bite.
Serve immediately after baking. The window of maximum crispiness is about 10–15 minutes. Have everyone at the table before you pull the pan out.
Make multiple smaller trays instead of one giant pan. If you’re feeding a crowd, bake two or three sheet pans rather than piling everything onto one. Smaller batches allow better air circulation and less moisture buildup. Bake one pan while everyone eats the first, then rotate.
Keep extra chips and toppings separate. Set out a bowl of plain chips and small bowls of leftover cheese, beans, and veggies. Guests can refresh their plates with new crunchy chips and add cold toppings as they go.
Do not microwave leftovers. The microwave turns chips into rubbery sadness. If you have leftover nachos, pick off the toppings and reheat the chips and cheese separately in a 350°F oven for a few minutes. Then add fresh cold toppings.
Food safety note: Nachos with meat and dairy should not sit at room temperature for more than 2 hours. If your family eats slowly, refrigerate leftovers promptly.
Frequently Asked Questions
Can I make nachos ahead of time? No, nachos are best made fresh. However, you can prep all toppings in advance – cook the meat, shred the cheese, chop veggies, and make the salsa. Store them separately in the fridge. Assemble and bake right before serving.
What cheese melts best without making nachos soggy? A blend of cheddar and Monterey Jack is ideal. Both melt smoothly and don’t release excess water. Young, low-moisture mozzarella also works well. Avoid high-moisture cheeses like fresh mozzarella or crumbled queso fresco (save those for post-bake toppings).
Is broiling better than baking for crispiness? Broiling gives a quick, intense blast of heat that crisps the top cheese and chips. But it can burn easily. The safest approach is to bake at 400°F until the cheese is melted, then broil for 1–2 minutes if you want extra crunch. Keep an eye on it the whole time.
Can I use homemade tortilla chips? Yes, homemade chips can be wonderful if you fry or bake them until very crunchy. They often hold up even better than store-bought because you can control the thickness. Just make sure they are completely cool and crispy before adding any toppings.
Why do my nachos get soggy even when I follow all the tips? Check a few things: Are you using a wire rack? Are you draining your beans? Is your cheese freshly shredded? Are you adding wet toppings before baking? Sometimes moisture sneaks in from unexpected places, like watery taco meat or juicy peppers. Drain everything well and pat vegetable moisture off with a paper towel.