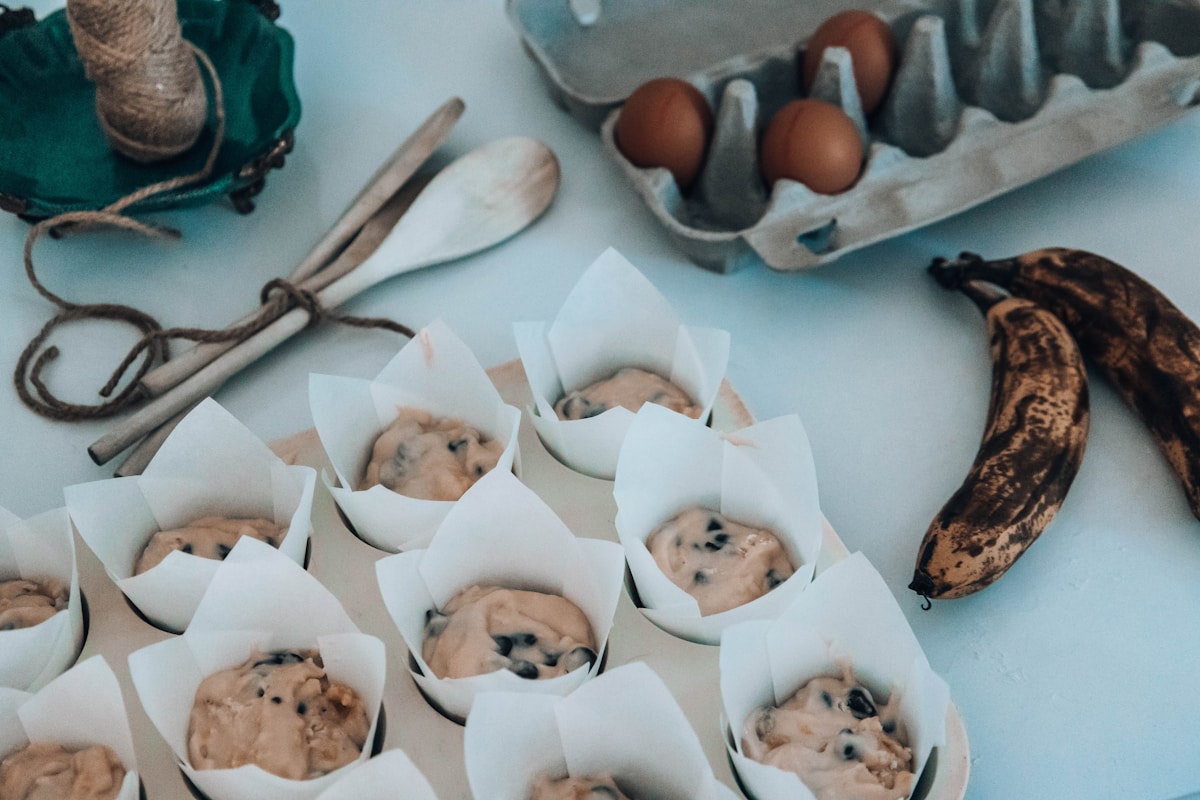
Every parent knows the struggle: you buy a bunch of fruit with the best intentions, and before you know it, those bananas are spotted, the berries are soft, and the apples have lost their crunch. You hate tossing them, but your kids won’t touch them. What if you could turn that overripe fruit into something magical? That is exactly what one clever mom on Reddit did, sharing a method for cocoa muffins sweetened entirely with a puree of leftover fruit, dates, and yogurt. No added sugar. No guilt. Just chocolatey goodness that your children will gobble up for breakfast or snack. I have tested this method in my own kitchen, and I am here to walk you through every detail so you can recreate it with confidence.
Why fruit puree works as a natural sweetener in baking
The idea of replacing sugar with fruit puree is not new, but it often gets a bad reputation for making baked goods dense or gummy. The truth is, with a few smart adjustments, fruit puree can produce tender, moist muffins that actually taste better than their sugar-laden cousins. Fruits like bananas, apples, and dates are naturally high in fructose and glucose, which provide sweetness. They also contain pectin and fiber that help bind moisture, creating a soft crumb. However, the extra liquid and acidity can affect structure and browning, so you need to balance the recipe carefully. The Reddit user used a combination of uneaten fruit scraps (think apple peels, berry ends, banana skins—yes, even skins!), dates, yogurt, eggs, flour, and baking powder. The dates add concentrated sweetness, while yogurt lends tang and tenderness. Cocoa powder brings deep chocolate flavor without bitterness when paired correctly. This approach is brilliant for families looking to reduce sugar intake while cutting down on food waste.
How to prepare your fruit puree for cocoa muffins
You can customize the puree based on what you have on hand, but the key is to cook the fruit first to concentrate its sweetness and break down fibers. Start by gathering about 2 cups of fruit scraps or overripe fruit: banana peels (washed), apple cores and peels, bruised berries, or pitted dates. Place them in a saucepan with just enough water to cover the bottom—about ¼ cup. Simmer over medium heat for 10 to 15 minutes until the fruit is very soft and the liquid reduces slightly. Let it cool, then transfer to a blender or food processor. Add ¼ cup plain yogurt (Greek or regular) and 2 large eggs. Blend until completely smooth. If you are using extremely fibrous fruit like apple peels, strain the puree through a fine-mesh sieve for a smoother texture, though it is not strictly necessary. The result should be a thick, pudding-like consistency—about 1½ cups total. If yours is too thin, simmer it a little longer or add a tablespoon of ground flaxseed to absorb extra moisture. One important tip: taste the puree. It should be pleasantly sweet. If it is not sweet enough, add an extra date or a spoonful of applesauce. Remember, the cocoa powder will add some bitterness, so you want the base to be sufficiently sweet.
Adjusting the dry ingredients for perfect cocoa muffins
Moisture is the biggest challenge when using fruit puree instead of sugar. Sugar not only sweetens but also creates air pockets during creaming and helps with browning. To compensate, you need to reduce the liquid in the recipe and increase the structure. Here is a reliable formula I have developed after several batches:
- 1½ cups all-purpose flour (I use King Arthur Flour for consistent results)
- ⅓ cup unsweetened cocoa powder (Ghirardelli or Hershey’s Special Dark works beautifully)
- 1 teaspoon baking powder
- ½ teaspoon baking soda
- ¼ teaspoon salt
- ½ teaspoon ground cinnamon (optional, but recommended)
- 1½ cups fruit puree (from above, at room temperature)
- 2 tablespoons melted coconut oil or unsalted butter
- 1 teaspoon vanilla extract
- ¼ cup milk (any kind, but whole milk gives a richer crumb)
Why the extra baking soda? Fruit puree tends to be slightly acidic, especially if you use berries or yogurt. The baking soda helps neutralize that acidity and promotes a better rise. Sift the dry ingredients together to avoid lumps in the cocoa powder. In a separate bowl, whisk the puree, melted oil, vanilla, and milk until smooth. Fold the wet into the dry gently—just until no streaks of flour remain. Overmixing will develop gluten and make the muffins tough. The batter will be thicker than standard muffin batter, almost like a thick pancake batter. That is exactly what you want.
Baking time and temperature for the best texture
Preheat your oven to 350°F (175°C). Line a 12-cup muffin tin with paper liners or grease it well with butter or non-stick spray. I prefer a heavy-duty pan like Lodge cast iron or a classic aluminum Wilton pan because they distribute heat evenly. Fill each cup about three-quarters full—the muffins will rise but not overflow if you do not overfill. For these muffins, I have found that 350°F provides a nice balance between developing a domed top and cooking the center without drying out the edges. Bake for 18 to 22 minutes. Start checking at 18 minutes by inserting a toothpick into the center of a muffin. It should come out with a few moist crumbs, not wet batter. If the toothpick is clean, they are overbaked. Remove the pan from the oven and let the muffins cool in the tin for 5 minutes, then transfer to a wire rack. This cooling period is crucial—the muffins are very tender when hot and can fall apart if moved too early.
One common issue with low-moisture baking is lack of browning. Fruit-sweetened muffins often stay paler on top. If you want a golden finish, brush the tops with a little milk or an egg wash before baking. Alternatively, you can sprinkle a pinch of coarse sugar on top (if you allow a tiny bit) or press a few chocolate chips into the centers before baking. That little pop of sweetness helps satisfy the craving without adding much sugar overall.
Flavor variations to keep your family excited
The beauty of this base recipe is how adaptable it is. The Reddit thread suggested adding cinnamon or nutmeg to balance the fruit flavor, and I wholeheartedly agree. Here are some of my favorite twists:
- Banana-chocolate swirl: Use puree from very ripe bananas (about 2 large ones). Mash them instead of cooking, then add 1 tablespoon of peanut butter for extra protein. Swirl in a spoonful of Nutella if you are feeling indulgent.
- Berry bliss: Puree frozen mixed berries (thawed) with a few dates. The berries make the batter a bit more acidic, so add an extra ¼ teaspoon of baking soda. The muffins will have a lovely purple hue.
- Apple-cinnamon crumble: Cook apple peels and cores with a cinnamon stick. After blending, stir in ½ cup of finely diced fresh apple. Top the muffins before baking with a crumble made from 2 tablespoons oats, 1 tablespoon flour, 1 tablespoon butter, and 1 teaspoon brown sugar. It adds texture without much sugar.
- Spiced pumpkin: In fall, use canned pumpkin puree (not pie filling) as the base. Add 1 teaspoon pumpkin pie spice and replace the cocoa with carob powder for a milder chocolate flavor.
- Chocolate orange: Zest one orange into the puree and add ¼ teaspoon of orange extract. The citrus cuts through the richness beautifully.
For all variations, keep the total volume of puree to about 1½ cups. If your fruit is very watery (like watermelon or very ripe peaches), simmer it longer to reduce or add an extra tablespoon of flour. Trust your instincts—the batter should be scoopable but not runny.
How to store and freeze these muffins for quick breakfasts
One of the best things about this recipe is that it freezes beautifully. In fact, the muffins taste even better after a day in the fridge because the flavors meld. Let them cool completely, then place them in a single layer in a freezer-safe bag or container. They will keep for up to 3 months. For a quick breakfast, microwave one for 20 seconds or pop it in a 300°F oven for 5 minutes. They are also great served with a dollop of yogurt or a smear of cream cheese.
If you are keeping them at room temperature, store them in an airtight container for up to 3 days. Because they are fruit-sweetened, they may mold faster than sugar-laden muffins, so if you live in a humid climate, keep them in the refrigerator. One reader told me she packs them in her kids’ lunchboxes frozen—they thaw by lunchtime and stay perfectly moist.
A final word of encouragement
I understand the hesitation: changing a recipe that uses sugar feels risky, especially when you are baking for little ones who expect that classic bakery taste. But I promise you, these cocoa muffins deliver on flavor and texture. The first time I made them, my three-year-old asked for seconds before I even had a chance to photograph them. The fact that they use up fruit that would otherwise go to waste is an added bonus for your wallet and the planet. (And for your conscience.) The method is forgiving: if your puree is a bit runny, add a tablespoon more flour. If the muffins are too dense, next time add an extra teaspoon of baking powder. Baking is trial and error, but that is the fun of it. So go ahead, rescue those sad bananas and soft apples from the counter. Give these cocoa muffins a try. Your family—and your kitchen compost bin—will thank you.


