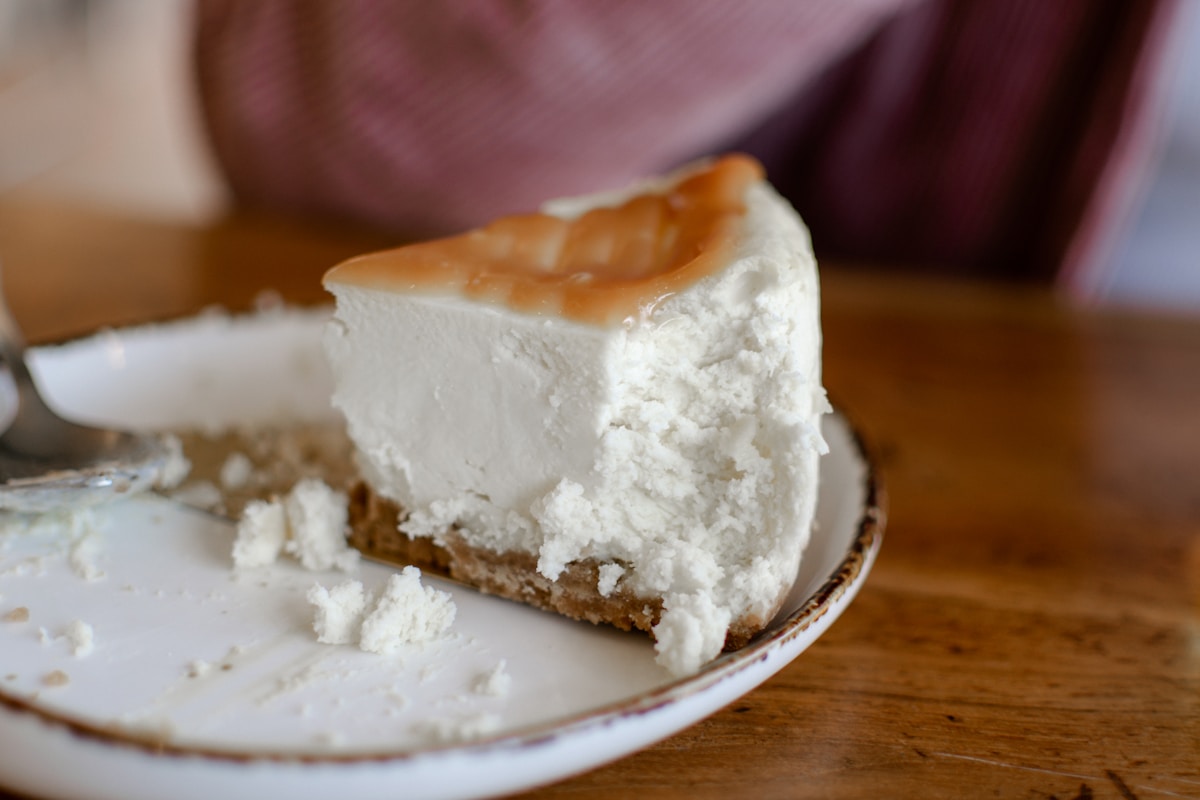
You have probably seen the photos online—a cheesecake that looks so much like a wheel of aged Gouda or cheddar that you almost want to slice it with a cheese wire. The golden-brown sides, the subtle cracks that mimic a natural rind, the way it sits on a wooden board like a artisan dairy product. It is a beautiful illusion, and one that has driven many bakers (my former self included) to multiple attempts, some cracked, some scorched, and a few glorious successes. I have been that baker on their fifth try, staring into the oven, willing the sides to brown evenly without burning the top. Let me save you some trial and error.
The Quest for the Perfect Cheese Wheel Cheesecake
The idea is straightforward: you bake a cheesecake in a tall springform pan, then after it cools, you brown the sides to create a rind-like appearance. The challenge is that cheesecake is delicate. It can crack if you look at it wrong. The sides, which normally stay pale and soft, need to be coaxed into a deep, even tan without turning bitter or black. The Reddit cheesecake community has refined this over the years, and the consensus is that practice makes perfect—but with the right knowledge, your first attempt can be a winner.
Before we dive into the browning methods, let us set the stage for success. You need a classic dense New York-style cheesecake base. Use four 8-ounce blocks of full-fat cream cheese (Philadelphia is my go-to), 1 cup of granulated sugar, 5 large eggs, 1 teaspoon of vanilla extract, and 1 cup of sour cream. Bake it in a 9-inch tall springform pan (at least 3 inches high) set inside a water bath. The water bath prevents rapid temperature swings that cause cracks. Bake at 325°F (163°C) for 60–70 minutes, until the center jiggles slightly but the edges are set. Turn off the oven, crack the door, and let the cheesecake cool inside for one hour. Then refrigerate for at least 6 hours, ideally overnight.
Only after the cheesecake is fully chilled and firm do you attempt the browning. Why? Because a warm cheesecake is soft and fragile; torching it will likely cause the sides to slump. Cold cheesecake holds its shape and gives you a stable canvas.
Understanding the Science of Browning: Maillard Reaction and Caramelization
Browning is not just aesthetics—it is chemistry. The golden-brown color on the sides of a cheesecake comes from two reactions: the Maillard reaction (between amino acids and reducing sugars) and caramelization (the breakdown of sugars). For the Maillard reaction, you need temperatures above 285°F (140°C). Caramelization starts around 320°F (160°C).
Cheesecake batter contains plenty of proteins (from eggs and cream cheese) and sugars (from sugar and dairy lactose). When you apply intense heat to the surface, those compounds react and produce hundreds of flavor and color compounds. But here is the catch: cheesecake is mostly water. As long as the surface is moist, it cannot get hot enough to brown—water evaporates at 212°F (100°C), acting as a heat sink. So you must dry the surface first. That is why we chill the cheesecake and sometimes apply an egg wash, which provides additional proteins and sugars that brown beautifully while the underlying moisture stays trapped.
Method 1: The Kitchen Torch for Precision Browning
A culinary torch (I use a Bernzomatic TS8000 with a MAP-Pro fuel canister, about $40 at hardware stores) is the most controlled way to brown cheesecake sides. It gives you direct heat where you want it, and you can see the color develop in real time.
Step-by-step torch technique:
- Remove the chilled cheesecake from the springform pan. Run a thin knife around the inside of the pan, then unclasp and lift the sides away. Place the cheesecake on a serving board or cooling rack lined with parchment.
- If you want an even deeper rind color, brush the sides with a simple egg wash: 1 large egg yolk whisked with 1 tablespoon of heavy cream or milk. Let the wash dry for 2 minutes. (This step is optional but highly recommended by Reddit veterans.)
- Light your torch and adjust the flame to a moderate, non-whistling blue cone. Hold the torch about 4–6 inches away from the side of the cheesecake.
- Move the flame in a slow, steady sweep across the surface. Do not linger in one spot longer than 2 seconds. The goal is to create an even tan, not a char. The color will continue to darken slightly after you move the heat away (residual heat), so stop a shade lighter than your target.
- Rotate the cheesecake and repeat until all sides have a uniform golden-brown hue. This takes about 5–10 minutes total.
- For a truly authentic wheel look, you can also lightly torch the top edge to create a faint ring of brown that mimics the rind’s shoulder.
Why this works: The torch delivers intense, dry heat that instantly raises the surface temperature above the browning threshold while the interior stays cold. The egg wash adds extra protein (from yolk) and sugar (from lactose in cream), accelerating the Maillard reaction and giving a deeper color with less risk of burning.
Method 2: The Broiler for Even Color (With Caution)
If you do not own a torch, your oven’s broiler can work—but it is less forgiving. Broilers produce uneven heat and can quickly turn a cheesecake side into a charcoal briquette if you step away. Use this method only if you can watch it like a hawk.
Broiler technique:
- Place a rack in the top position, about 4 inches from the broiler element. Preheat the broiler on high (typically 500°F to 550°F / 260°C to 288°C).
- Line a baking sheet with foil and place the chilled cheesecake (still on its parchment-lined base) on the sheet. This makes rotating easy.
- Slide the sheet under the broiler and immediately start rotating it 90 degrees every 30 seconds. The total time is usually 2 to 4 minutes, depending on your oven. The sides should turn a toasty brown.
- Watch for hot spots. If one area darkens faster, rotate that side away from the element. If you see smoke, remove the cheesecake immediately—it is burning.
- Because the broiler heats from above, you may need to angle the cheesecake slightly to get the sides. Some bakers tilt the pan on a crumpled piece of foil to expose the sides more directly. Be careful; the cheesecake can slide.
The downside: The broiler heats unevenly, and the top of the cheesecake can get too warm, potentially causing a crack or a soft top. To mitigate this, keep the cheesecake very cold (freezer for 15 minutes before broiling) and use a heat shield—a strip of foil wrapped around the top rim—to deflect heat away from the top surface.
Supporting Techniques: Egg Wash, Water Baths, and Oven Management
Even before you reach for the torch or broiler, the baking process itself affects the final browning. The water bath we mentioned is critical not just for preventing cracks but also for limiting heat exposure. A water bath keeps the oven environment humid, which prevents the cheesecake from developing a thick, dry crust that could crack during browning. A moist, smooth surface browns more evenly.
Egg wash variations:
- Simple egg yolk + cream: Gives a rich, mahogany color.
- Whole egg + water: Lighter gold, still good.
- Butter wash: Melted butter brushed on sides before broiling adds a subtle sheen and some browning, but less dramatic than egg wash.
Oven temperature and rack position: If you bake your cheesecake at too high a temperature (above 350°F), the sides may start to brown during baking, which can lead to splitting as the center rises. Keep it at 325°F. Also, place the water bath on the lower-middle rack so the top of the cheesecake is not too close to the oven ceiling. After baking, do not skip the slow cooling step—it prevents rapid contraction that causes cracks.
Rotating during baking: Since ovens have hot spots, rotate the cheesecake 180 degrees halfway through baking. This ensures even cooking and prevents one side from setting faster than the other, which could cause a lopsided rise. For the final browning, as mentioned, rotate constantly.
Troubleshooting Common Issues: Cracks, Uneven Browning, and Burnt Spots
Cracks: The number one fear. Cracks happen when the cheesecake is overbaked (internal temperature above 150°F / 66°C) or when it cools too quickly. Use a water bath, pull the cheesecake when the center still jiggles like a Jell-O, and cool it slowly in the oven. If a crack does appear, do not panic—you can fill it with a little cream cheese frosting, or embrace it as part of the cheese wheel illusion (real cheese wheels have cracks).
Uneven browning: This is almost always due to hot spots in your oven or torch technique. With a torch, maintain a consistent distance and speed. With a broiler, rotate every 30 seconds and watch for one side darkening faster. If you see a patch of burnt spots, you can carefully scrape them off with a flat knife, then re-torch the area lightly to blend.
Burnt spots or black bits: You held the torch too close or the broiler was too long. The Maillard reaction turns from delicious brown to bitter black very quickly. Prevention: always err on the side of lighter. You can always re-torch, but you cannot un-burn. If you get burnt spots, let the cheesecake cool completely (the bitter notes will mellow slightly), then very gently scrape the char off with a fine microplane or a paring knife. Then brush on a thin layer of egg wash and torch again.
Egg wash running off: If the egg wash is too thin (too much water), it will roll off the cold cheesecake. Use a ratio of 1 yolk to 1 tablespoon of cream or milk. Apply with a soft brush, and let it set for a minute before torching. For thick coverage, apply a second coat after the first is tacky.
The sides look pale near the bottom: The torch flame is naturally hotter at the tip of the blue cone. The bottom of the cheesecake may not get as much heat because it sits on a cool surface. Solution: tilt the cheesecake slightly (hold it with a gloved hand or prop it on a jar) so the flame hits the lower portion directly. With a broiler, place the cheesecake on a wire rack inside the baking sheet so heat can circulate underneath.
A Note on Creativity and the Joy of Imperfection
The cheese wheel cheesecake is a delightful challenge, but do not let the pursuit of perfection steal the fun. Real cheese wheels have character—bumps, slight asymmetry, and color variations. Your cheesecake can, too. The first one I ever made had a lopsided brown patch on one side and a tiny crack on the other. I served it at a dinner party, and everyone said it looked exactly like a miniature wheel of Gouda. They did not care about the slight wonkiness; they were too busy eating.
So preheat your oven, chill your cheesecake, and grab your torch. With a little patience and the science on your side, you will soon be pulling a cheesecake from the oven that fools even the cheese monger. And when you slice into it, that perfect line of golden brown against the creamy white interior is a small piece of kitchen magic. (Your future self will thank you for reading this far.)