The First Cake Frustration That Every Baker Knows
You spent hours baking that perfect chocolate cake. You whipped up a silky buttercream, tinted it your favorite pastel, and even added rainbow sprinkles to the batter for a funfetti effect. Then came the moment of truth: piping the rosettes and borders. But the buttercream blobs, the lines wobble, and the whole thing looks more like a toddler’s art project than a bakery-worthy dessert. Sound familiar? You’re not alone. On r/Baking, a new baker shared their third cake ever—a chocolate cake with rainbow sprinkles and piped buttercream—admitting they needed practice with piping. The comments flooded in with empathy and advice, and the one recurring theme was this: the right piping tips make all the difference. (Trust me on this one.)
Today, I’m going to walk you through what you actually need to start piping like a pro—without spending a fortune. I’m Lucas, and I’ve tested more piping tips than I care to count. Let’s cut through the noise and find the tools that will transform your buttercream from messy to magnificent.
Why the Right Piping Tip Matters More Than You Think
Piping isn’t just about squeezing a bag. It’s about control, pressure, and the shape of the opening. A star tip creates ridges that hold their form; a round tip gives you smooth lines; a leaf tip adds realistic foliage. Using the wrong tip—or a cheap, poorly-made one—can sabotage even the best buttercream. I’ve seen beginners try to pipe rosettes with a plain round tip, and the result is a sad, flat blob. The geometry of the tip determines the texture, the definition, and how the buttercream stacks.
Here’s a quick breakdown of what different tip shapes do:
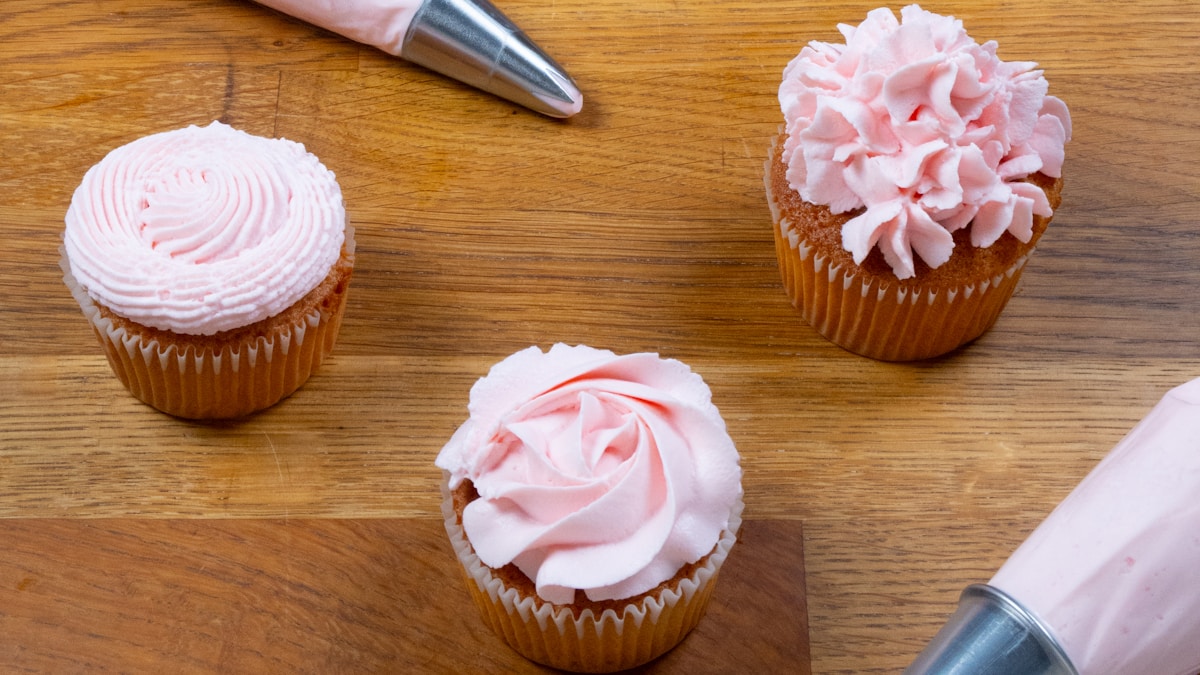
- Star tips (like Wilton 1M or 2D): Great for rosettes, shells, stars, and borders. The open star creates those lovely ridges that catch the light.
- Round tips (like Wilton 12 or 10): Perfect for writing, dots, outlines, and simple borders. They give a clean, smooth line.
- Leaf tips (like Wilton 352): For realistic leaves, ruffles, and decorative foliage. The V-shape creates a natural vein.
- Petal tips (like Wilton 104 or 127): Used for roses and ruffled flowers. More advanced but worth mastering later.
As a beginner, you don’t need a full set of fifty tips. You need three that’ll cover 90% of classic decorations. And that’s exactly what I recommend.
The Three Piping Tips Every Beginner Must Own
Based on advice from the r/Baking community and my own testing, here are the non-negotiables:
-
Wilton 1M Star Tip (or Ateco 846 equivalent) – This open star tip is the workhorse of beginner piping. It’s ideal for rosettes, swirls on cupcakes, shell borders, and stars. The wide opening means you don’t need insane hand strength to get a beautiful result. Price: around $3–$5 for a single tip, or included in many sets.
-
Wilton 12 Round Tip – For writing messages, making dots, piping choux pastry, or creating simple borders. The 1/4-inch opening is versatile without being too small to clog. Practice writing “Happy Birthday” with this tip on parchment before attempting it on a cake. Price: about $3.
-
Wilton 352 Leaf Tip – Leaves are surprisingly easy once you have the right tip. The 352 has a V-notch that creates a natural leaf shape with a center vein. With a little squeezing and a quick pull, you’ll have realistic leaves in seconds. Price: around $4.
That’s a total of about $10–$15 for three tips that will take you from frustrated to fabulous. (Yes, really.)
The Supporting Cast: Bags, Couplers, and a Turntable
Tips alone won’t save you. You also need the right piping bags and a few accessories. Let’s talk about what the experienced bakers on r/Baking stressed the most.
Disposable piping bags (at least 12-inch) are a lifesaver for beginners. They’re cheap, easy to fill, and you can toss them after use. No sticky cleanup. Look for brands like Wilton or Ateco. Expect to pay about $5 for a pack of 24.
Couplers are small plastic rings that let you change tips without emptying the bag. You screw the coupler base inside the bag, then attach the tip with a ring. This means you can swap from a star to a round tip in seconds while the bag is still full of buttercream. A set of couplers costs around $3–$5. It’s the best $5 you’ll spend.
A turntable (or a lazy Susan from a thrift store) makes piping borders and rosettes infinitely easier. America’s Test Kitchen recommends the Ateco 846 set as a budget-friendly starter, and many beginners on r/Baking swear by it. The Ateco 846 set includes 12 tips, a coupler, and a storage box for about $15–$20. That’s incredible value. If you’re buying individual tips, pick up the Wilton 1M, 12, and 352 separately and grab a coupler set.
Buttercream Consistency: The Secret to Control
Even the best tip will fail if your buttercream is too soft or too stiff. The community’s advice: use a stiff buttercream for better control. What does that mean? Your buttercream should hold its shape when you lift a spatula, but still be spreadable. For American buttercream, that means using a higher ratio of powdered sugar to butter (about 2:1 by weight) and a splash of milk or cream only if needed. If your kitchen is warm, pop the bowl in the fridge for 10 minutes before piping.
A quick test: Pipe a small star onto parchment. If the points collapse or melt, your buttercream is too warm or too soft. Add more powdered sugar and chill. If it comes out with ragged edges or you have to squeeze super hard, it’s too stiff. Add a teaspoon of milk and mix again. Perfect consistency is like soft ice cream.
How to Practice Like a Pro (Without Wasting Cake)
The single best tip from r/Baking: practice on parchment paper first. Lay a sheet of parchment on a baking sheet, and pipe stars, rosettes, leaves, and borders over and over. You can scrape the buttercream back into the bowl and reuse it. This is how professionals train. (Your future self will thank you.)
Try these drills:
- Rosettes: Hold the bag at a 90-degree angle over the parchment, squeeze, and move in a tight circle. Stop pressure and pull away.
- Stars: Hold the bag upright, squeeze a small amount, then stop pressure and lift straight up.
- Leaves: Hold the bag at a 45-degree angle, squeeze, and pull the tip forward while reducing pressure. The back-and-forth motion creates the leaf shape.
- Shells: Use a star tip, squeeze, then pull the tip forward and slightly downward. The bulge becomes a scallop.
Spend 15 minutes a day for a week on parchment, and your next cake will look restaurant-worthy.
A Better Buttercream Recipe for Piping
Not all buttercream behaves the same. For piping, I recommend a classic American buttercream that’s stiff and stable. Here’s a simple recipe:
- 1 cup (226g) unsalted butter, at cool room temperature (around 68°F / 20°C)
- 4 cups (480g) powdered sugar, sifted
- 2 tablespoons heavy cream or milk
- 1 teaspoon vanilla extract
- Pinch of salt
Beat the butter on medium speed until smooth and pale (about 3 minutes). Add powdered sugar one cup at a time, mixing on low. Add cream and vanilla, then beat on medium-high for 5 minutes until fluffy and stiff. If it’s too soft, add more sugar. If too stiff, add a teaspoon of cream.
This buttercream pipes cleanly, holds its shape, and tastes fantastic. (And yes, you can add food coloring gel without affecting consistency.)
The Verdict: Your Starter Kit for Under $25
If I had to start over today with a limited budget, here’s exactly what I’d buy:
- Ateco 846 set (12 tips, coupler, box) – $15–$20
- A pack of 12-inch disposable piping bags – $5
- A turntable (optional but highly recommended) – $10–$15 at a thrift store or KitchenAid brand for $25
Total: Under $30 for a setup that will last you through dozens of cakes. The Ateco set includes the equivalents of Wilton 1M, 12, and 352, plus many more for when you’re ready to branch out. It’s the same set America’s Test Kitchen recommends for beginners, and it’s backed by hundreds of Reddit bakers.
Now go make that chocolate cake with rainbow sprinkles, and don’t be afraid to pipe a few ugly rosettes first. Every pro started exactly where you are. Happy piping!


